Templates
Templates is the central library for two reusable building blocks of your hiring workflow:
- Email Templates — on-brand, reusable emails for every stage of hiring, with merge fields like
{{job_title}}and{{candidate_name}}that personalize each message automatically. - Custom Application Forms — the forms candidates actually fill in when they apply, built with your own sections, fields, branding and theme.
Both live under the same screen as two tabs, so everything you reuse across jobs and candidates is in one place.
Email Templates
The Email Templates tab lists every email template in a table. Each row shows the template Name, its Type (the event it serves), the Subject line, the Review Status, whether it is the Default for its type, the Last Updated date, and an Actions column. A Search by name… box and the + Create button sit at the top right, and results are paginated.
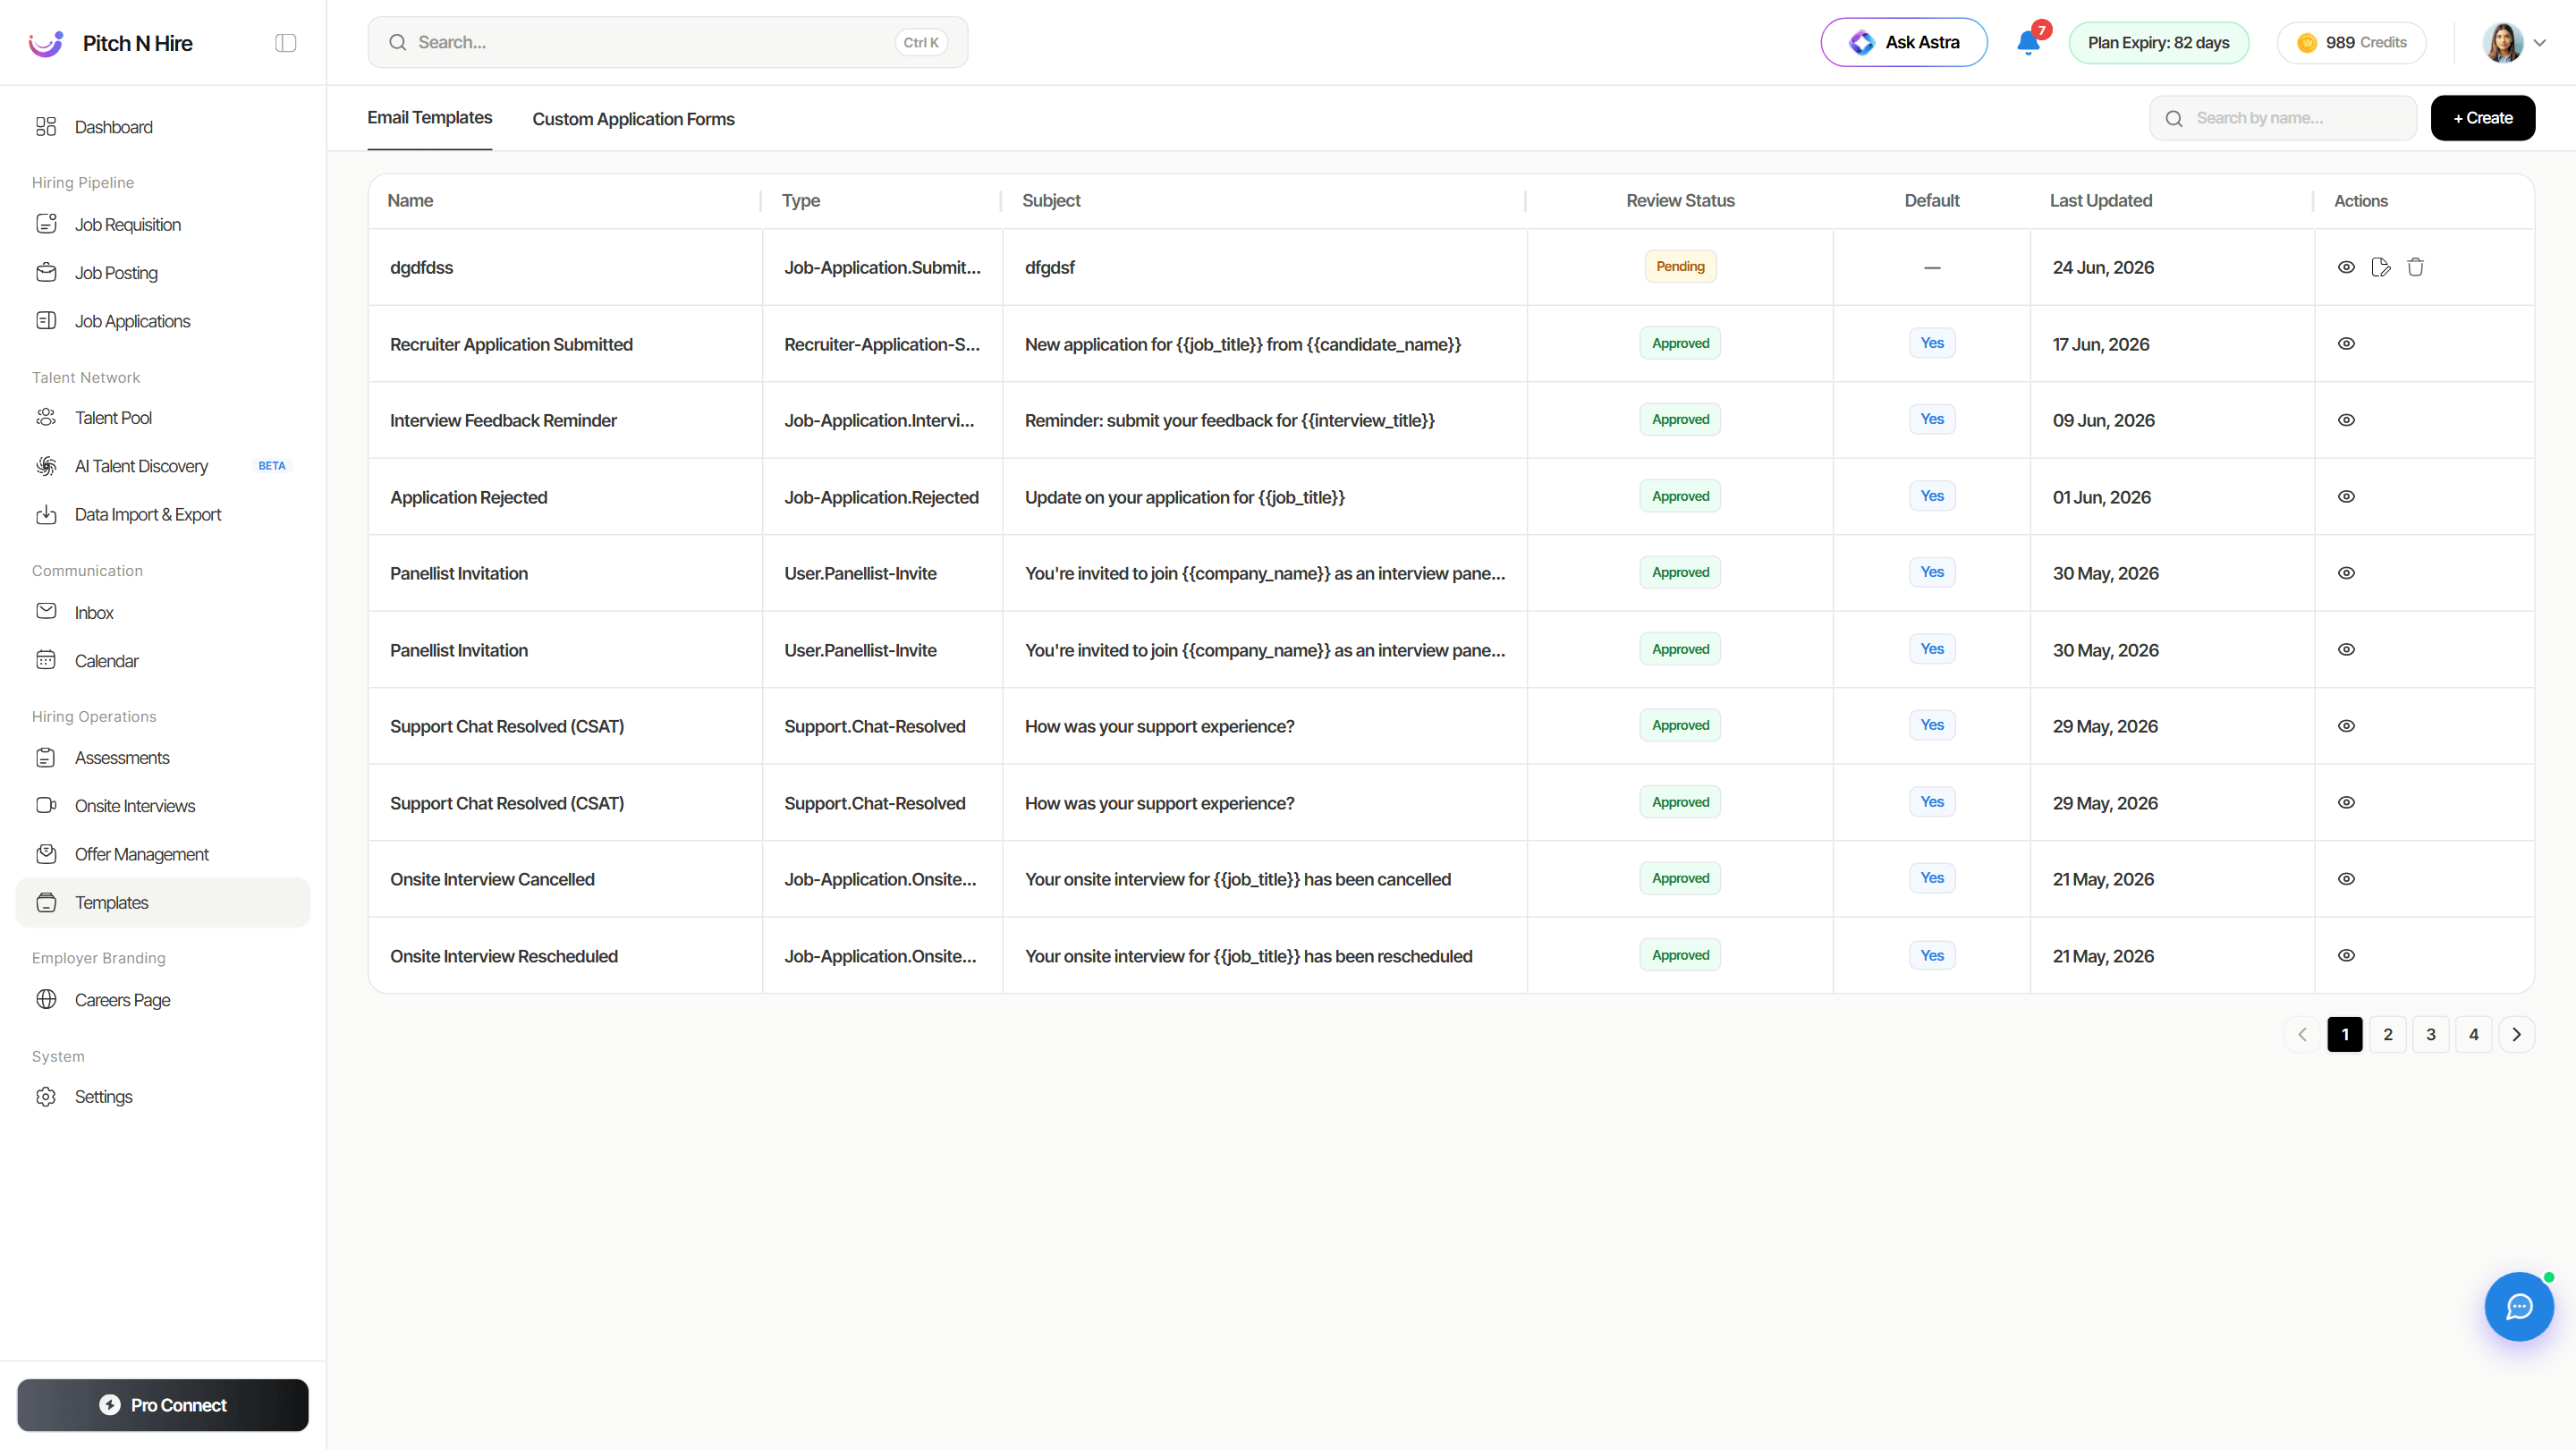
Two kinds of template share the list:
- Custom — the ones you write. These carry the full view, edit and delete actions.
- System templates — the ones Pitch N Hire sends on your behalf for built-in events (
Gdpr.Consent…,Vendor.Job-Update,Vendor.Performance,Entity.Shared…). These are view-only and usually marked Default: Yes, so the platform always has a message to fall back on.
Create or edit an email template
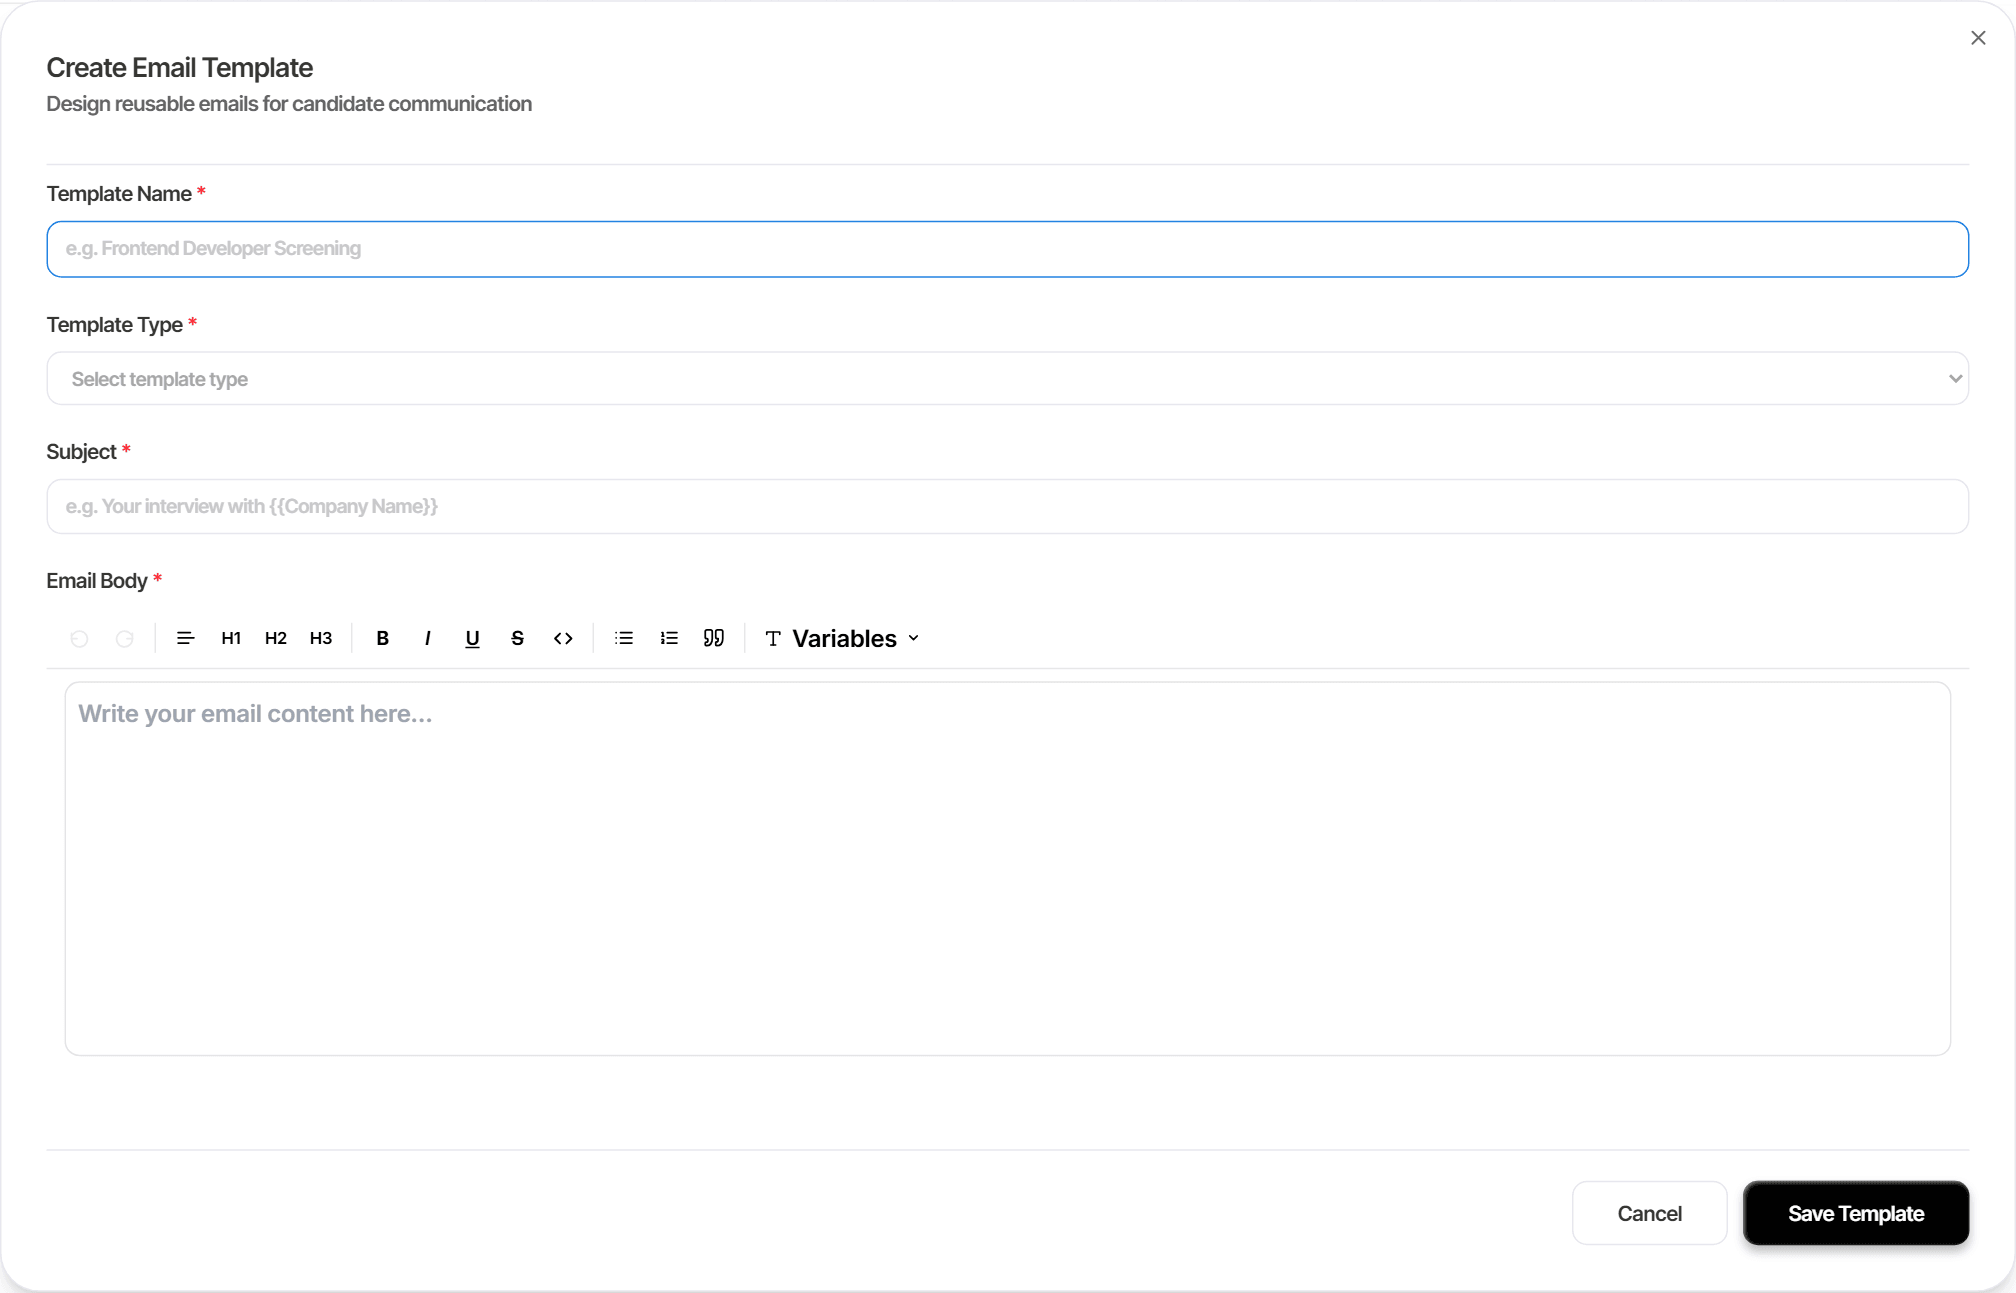
Click + Create (or the edit action on a row) to open Create Email Template — “Design reusable emails for candidate communication.” Four fields, all required:
- Template Name — an internal name so your team can find it later, e.g. “Frontend Developer Screening”.
- Template Type — the event the template serves, chosen from Select Template Type. This is what makes the template available at the right moment (for example a Job Application (Stage Updated) template can be mapped to a pipeline stage).
- Subject — the subject line, which can itself contain variables: “Your interview with {{Company Name}}”.
- Email Body — a rich-text editor with headings (H1–H3), font size and colour, alignment, links, tables, bold / italic / underline / strikethrough, lists, quotes, a code view and full-screen mode — plus the Variables dropdown described below.
Click Save Template when you’re done.
Dynamic variables
Variables (also called merge fields or placeholders) are what turn one template into hundreds of personalised emails. Write {{candidate_name}} once and every recipient sees their own name.
Open the Variables dropdown in the editor toolbar and click a variable to insert it at the cursor. The list is grouped by template type, so you only insert placeholders that can actually be resolved for the event your template serves:
| Group | Variables available |
|---|---|
| Job Application (Stage Updated) | {{job_title}} · {{candidate_name}} · {{stage_name}} |
| Job Application (Submitted) | {{candidate_name}} · {{job_title}} |
| Job (Talent Invite) | {{candidate_name}} · {{job_title}} |
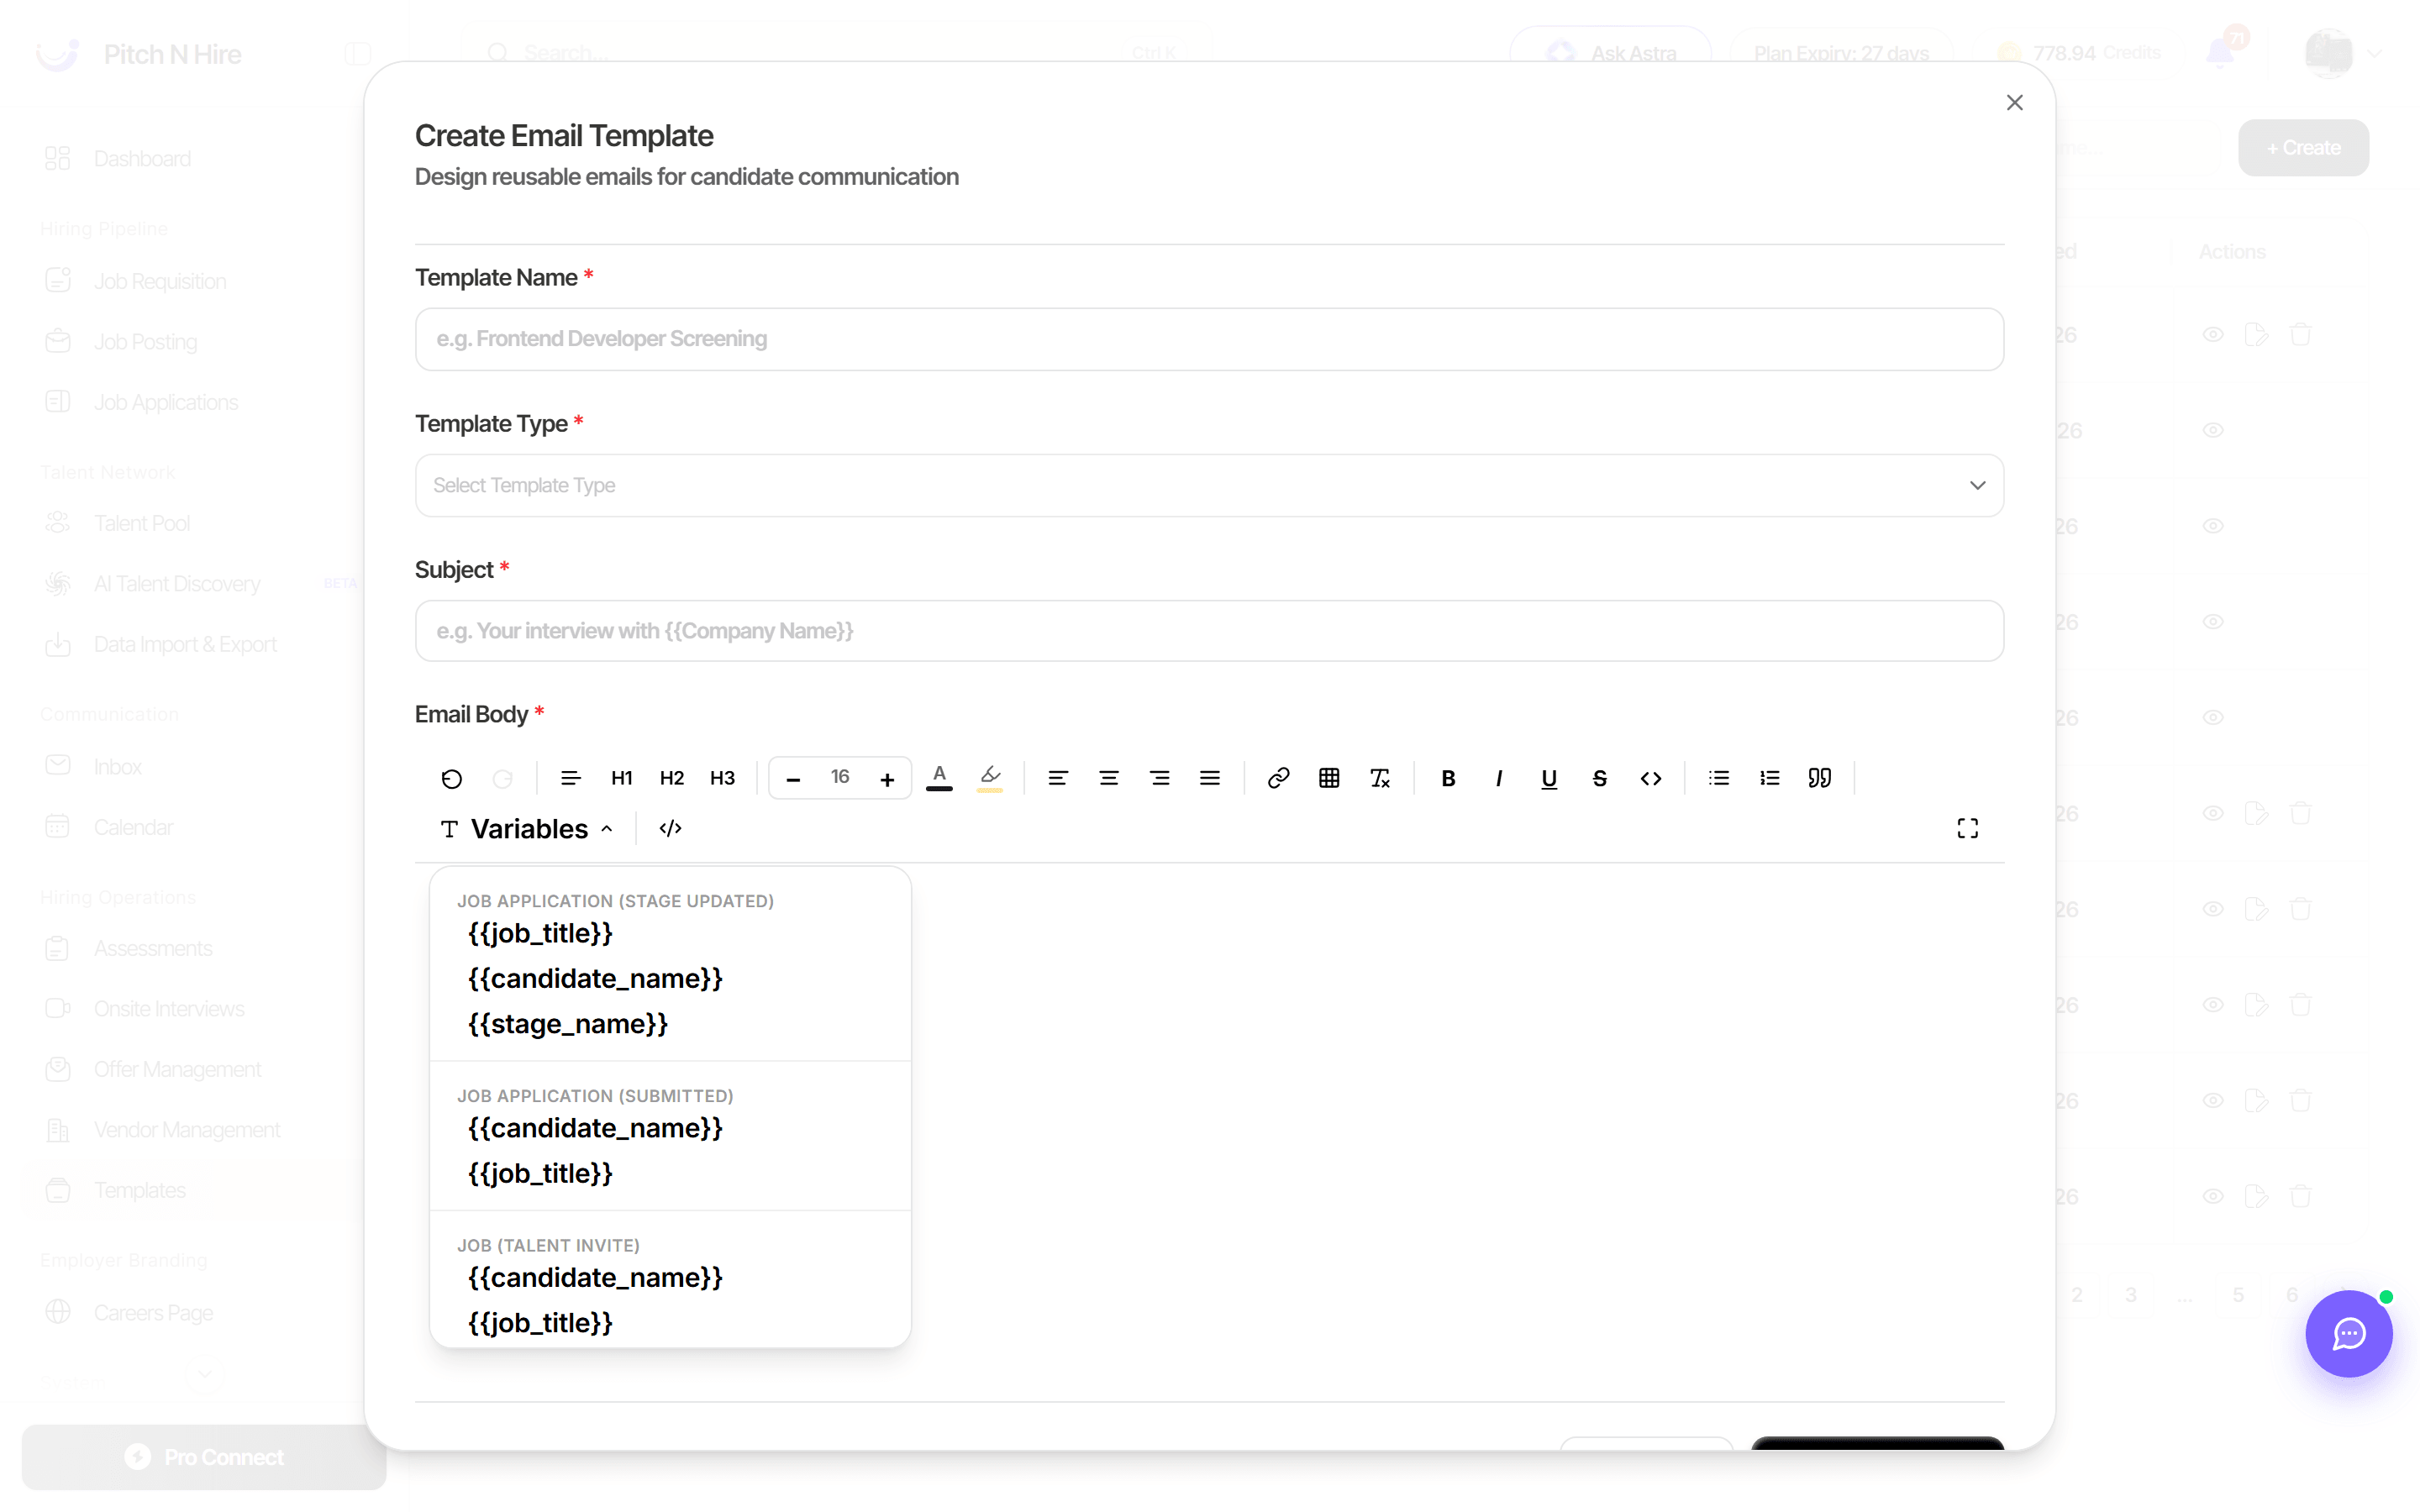
Variables work in the Subject as well as the body. When the email is actually sent, Pitch N Hire fills every placeholder in against that specific candidate and job before the message leaves.
Where your templates get used
A saved, Approved template becomes available everywhere Pitch N Hire sends candidate email:
- One candidate at a time — the Emails tab on a candidate’s application. See Email a single candidate.
- A whole batch at once — Bulk Emailing from the applications list or pipeline board. See Bulk email candidates.
- Automatically, on a stage change — map a template to a pipeline stage so every candidate moved into it receives that email. See Set the email for a stage.
- From the Inbox — pick a template when composing in Inbox.
Email template key points
- Type categorises each template by the event it serves, so the right message is available at the right moment.
- Review Status shows Approved or Pending_verification — only Approved templates can be picked when sending or mapped to a stage.
- Default marks the template (Yes) used automatically for its type.
- Use the Actions column to view, edit or delete a template, and Search by name… to find one quickly.
Custom Application Forms
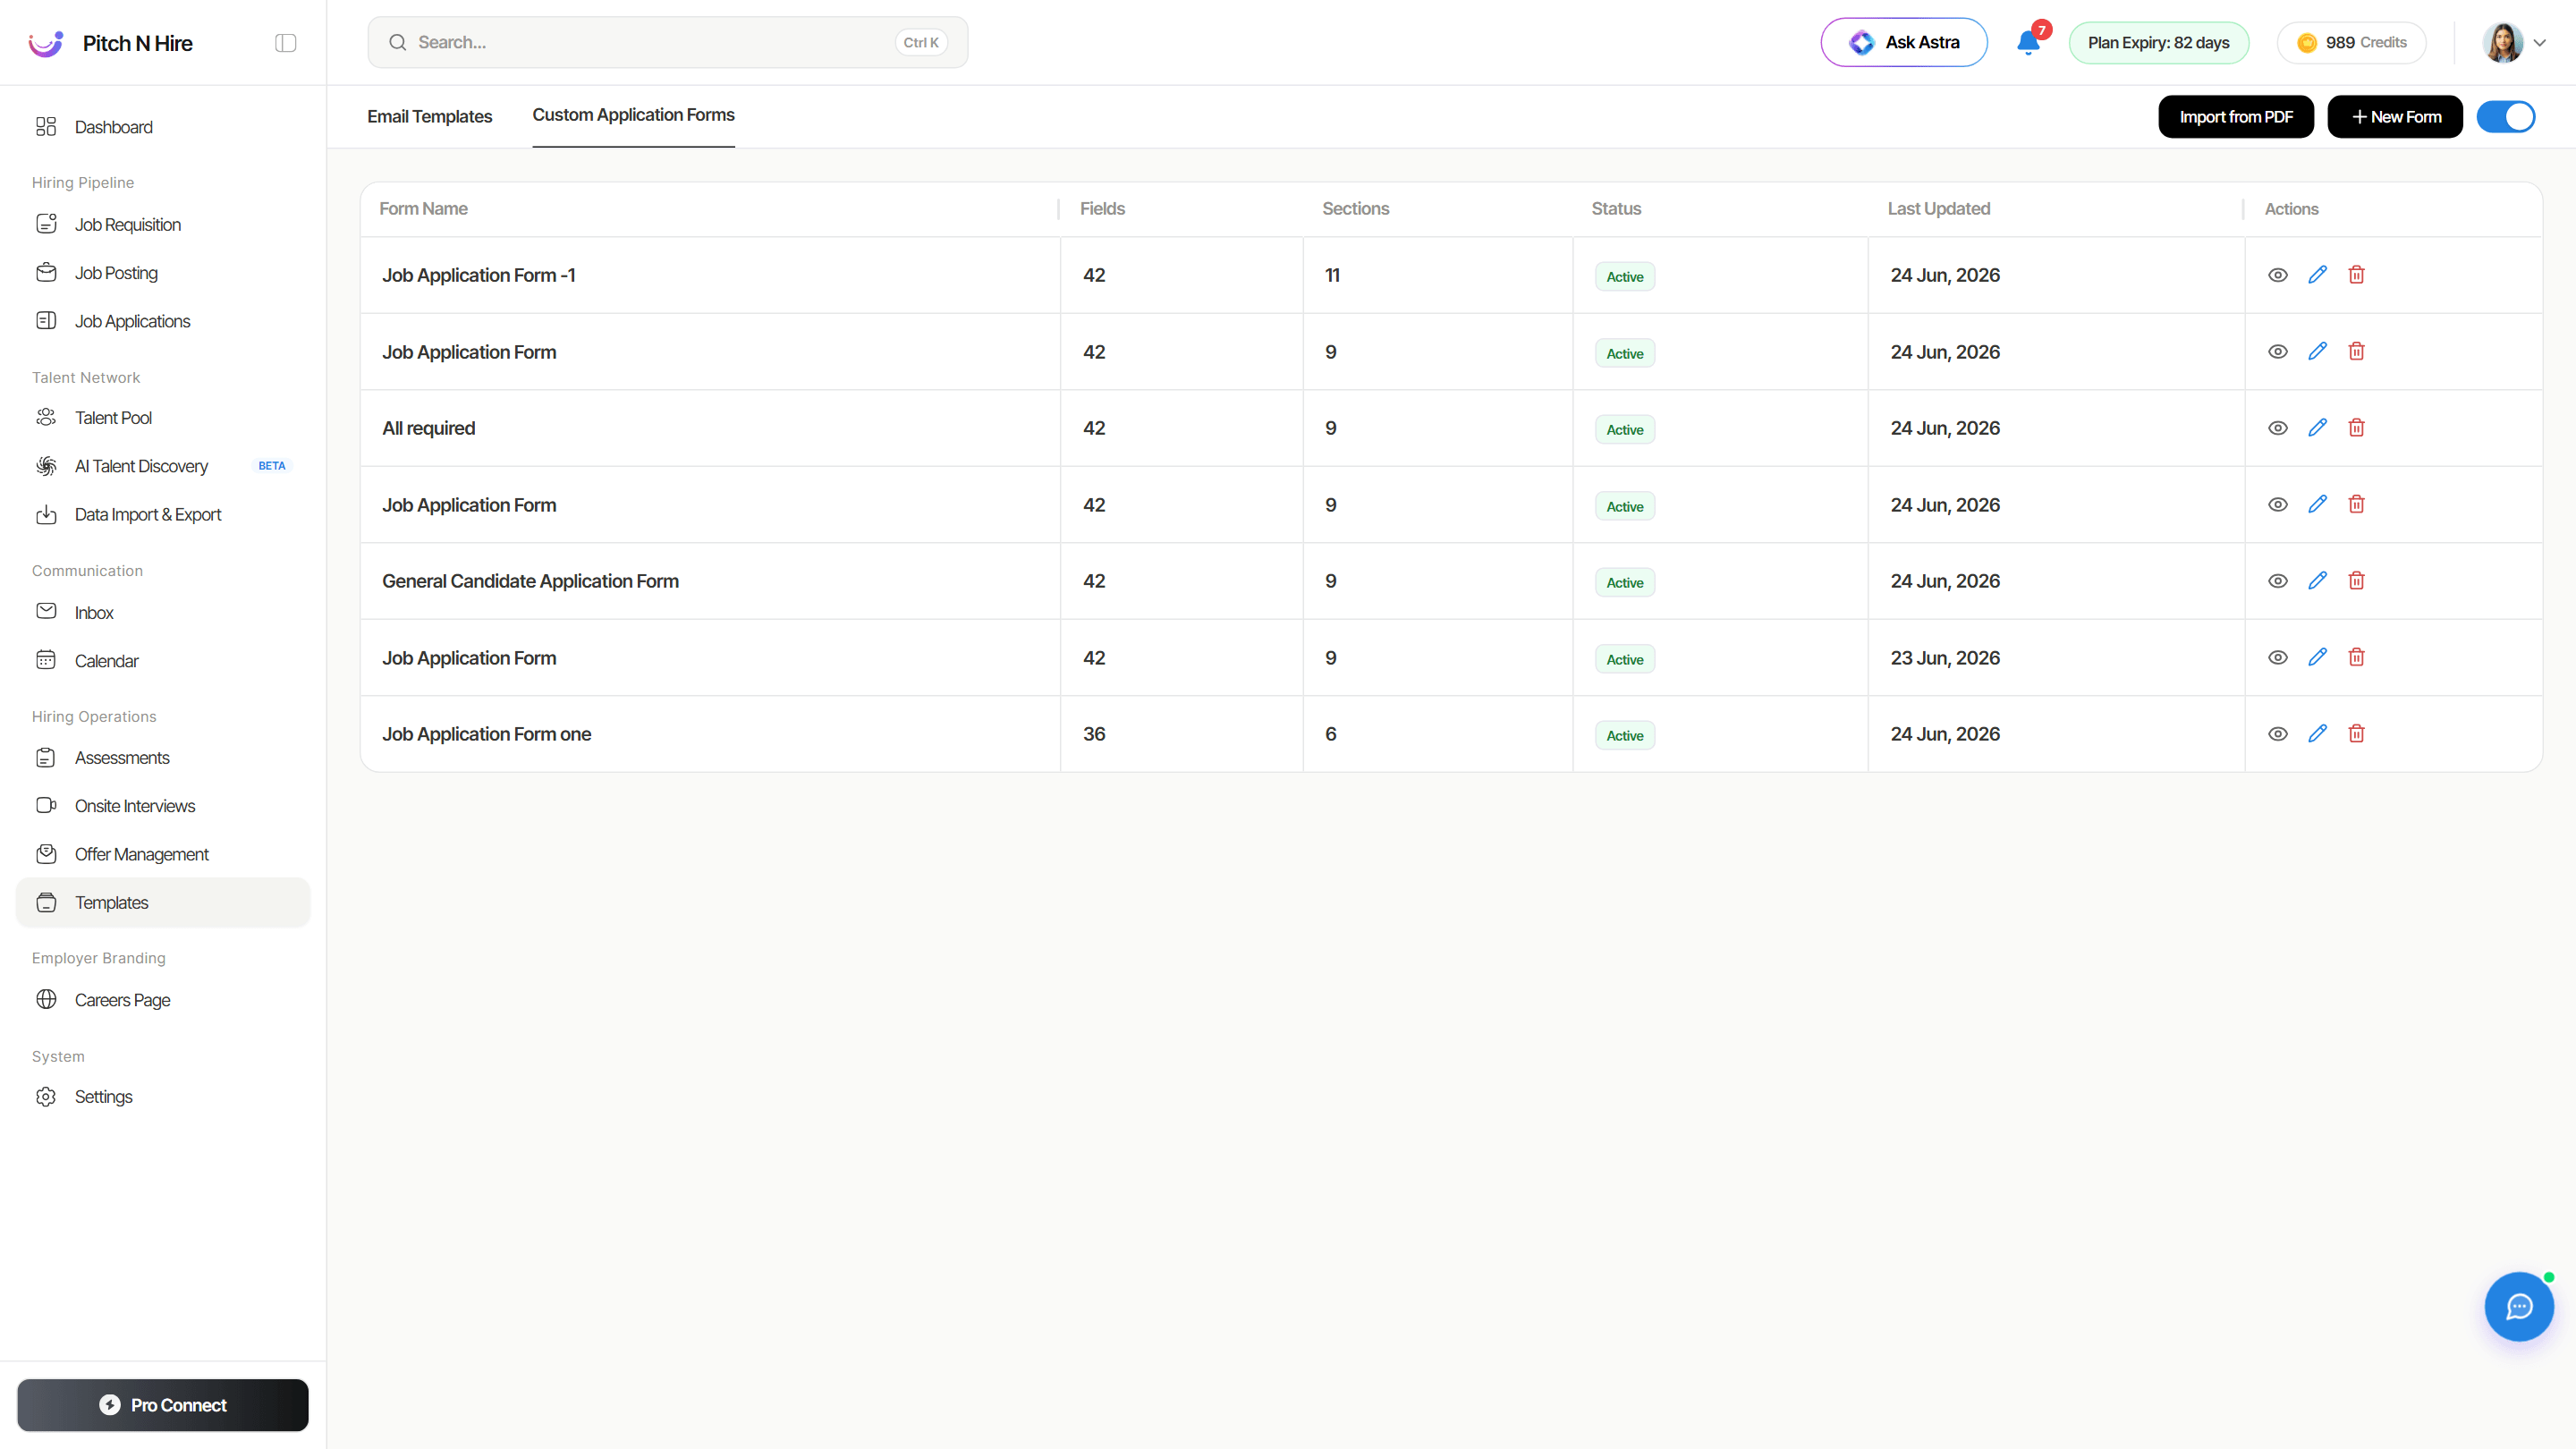
The Custom Application Forms tab is where you design the form candidates complete when they apply to your jobs. Each row in the list shows the Form Name, the number of Fields and Sections, its Status (Active), the Last Updated date, and Actions (preview, edit, delete). At the top right you’ll find Import from PDF, + New Form, and a toggle to turn custom forms on or off for your company.
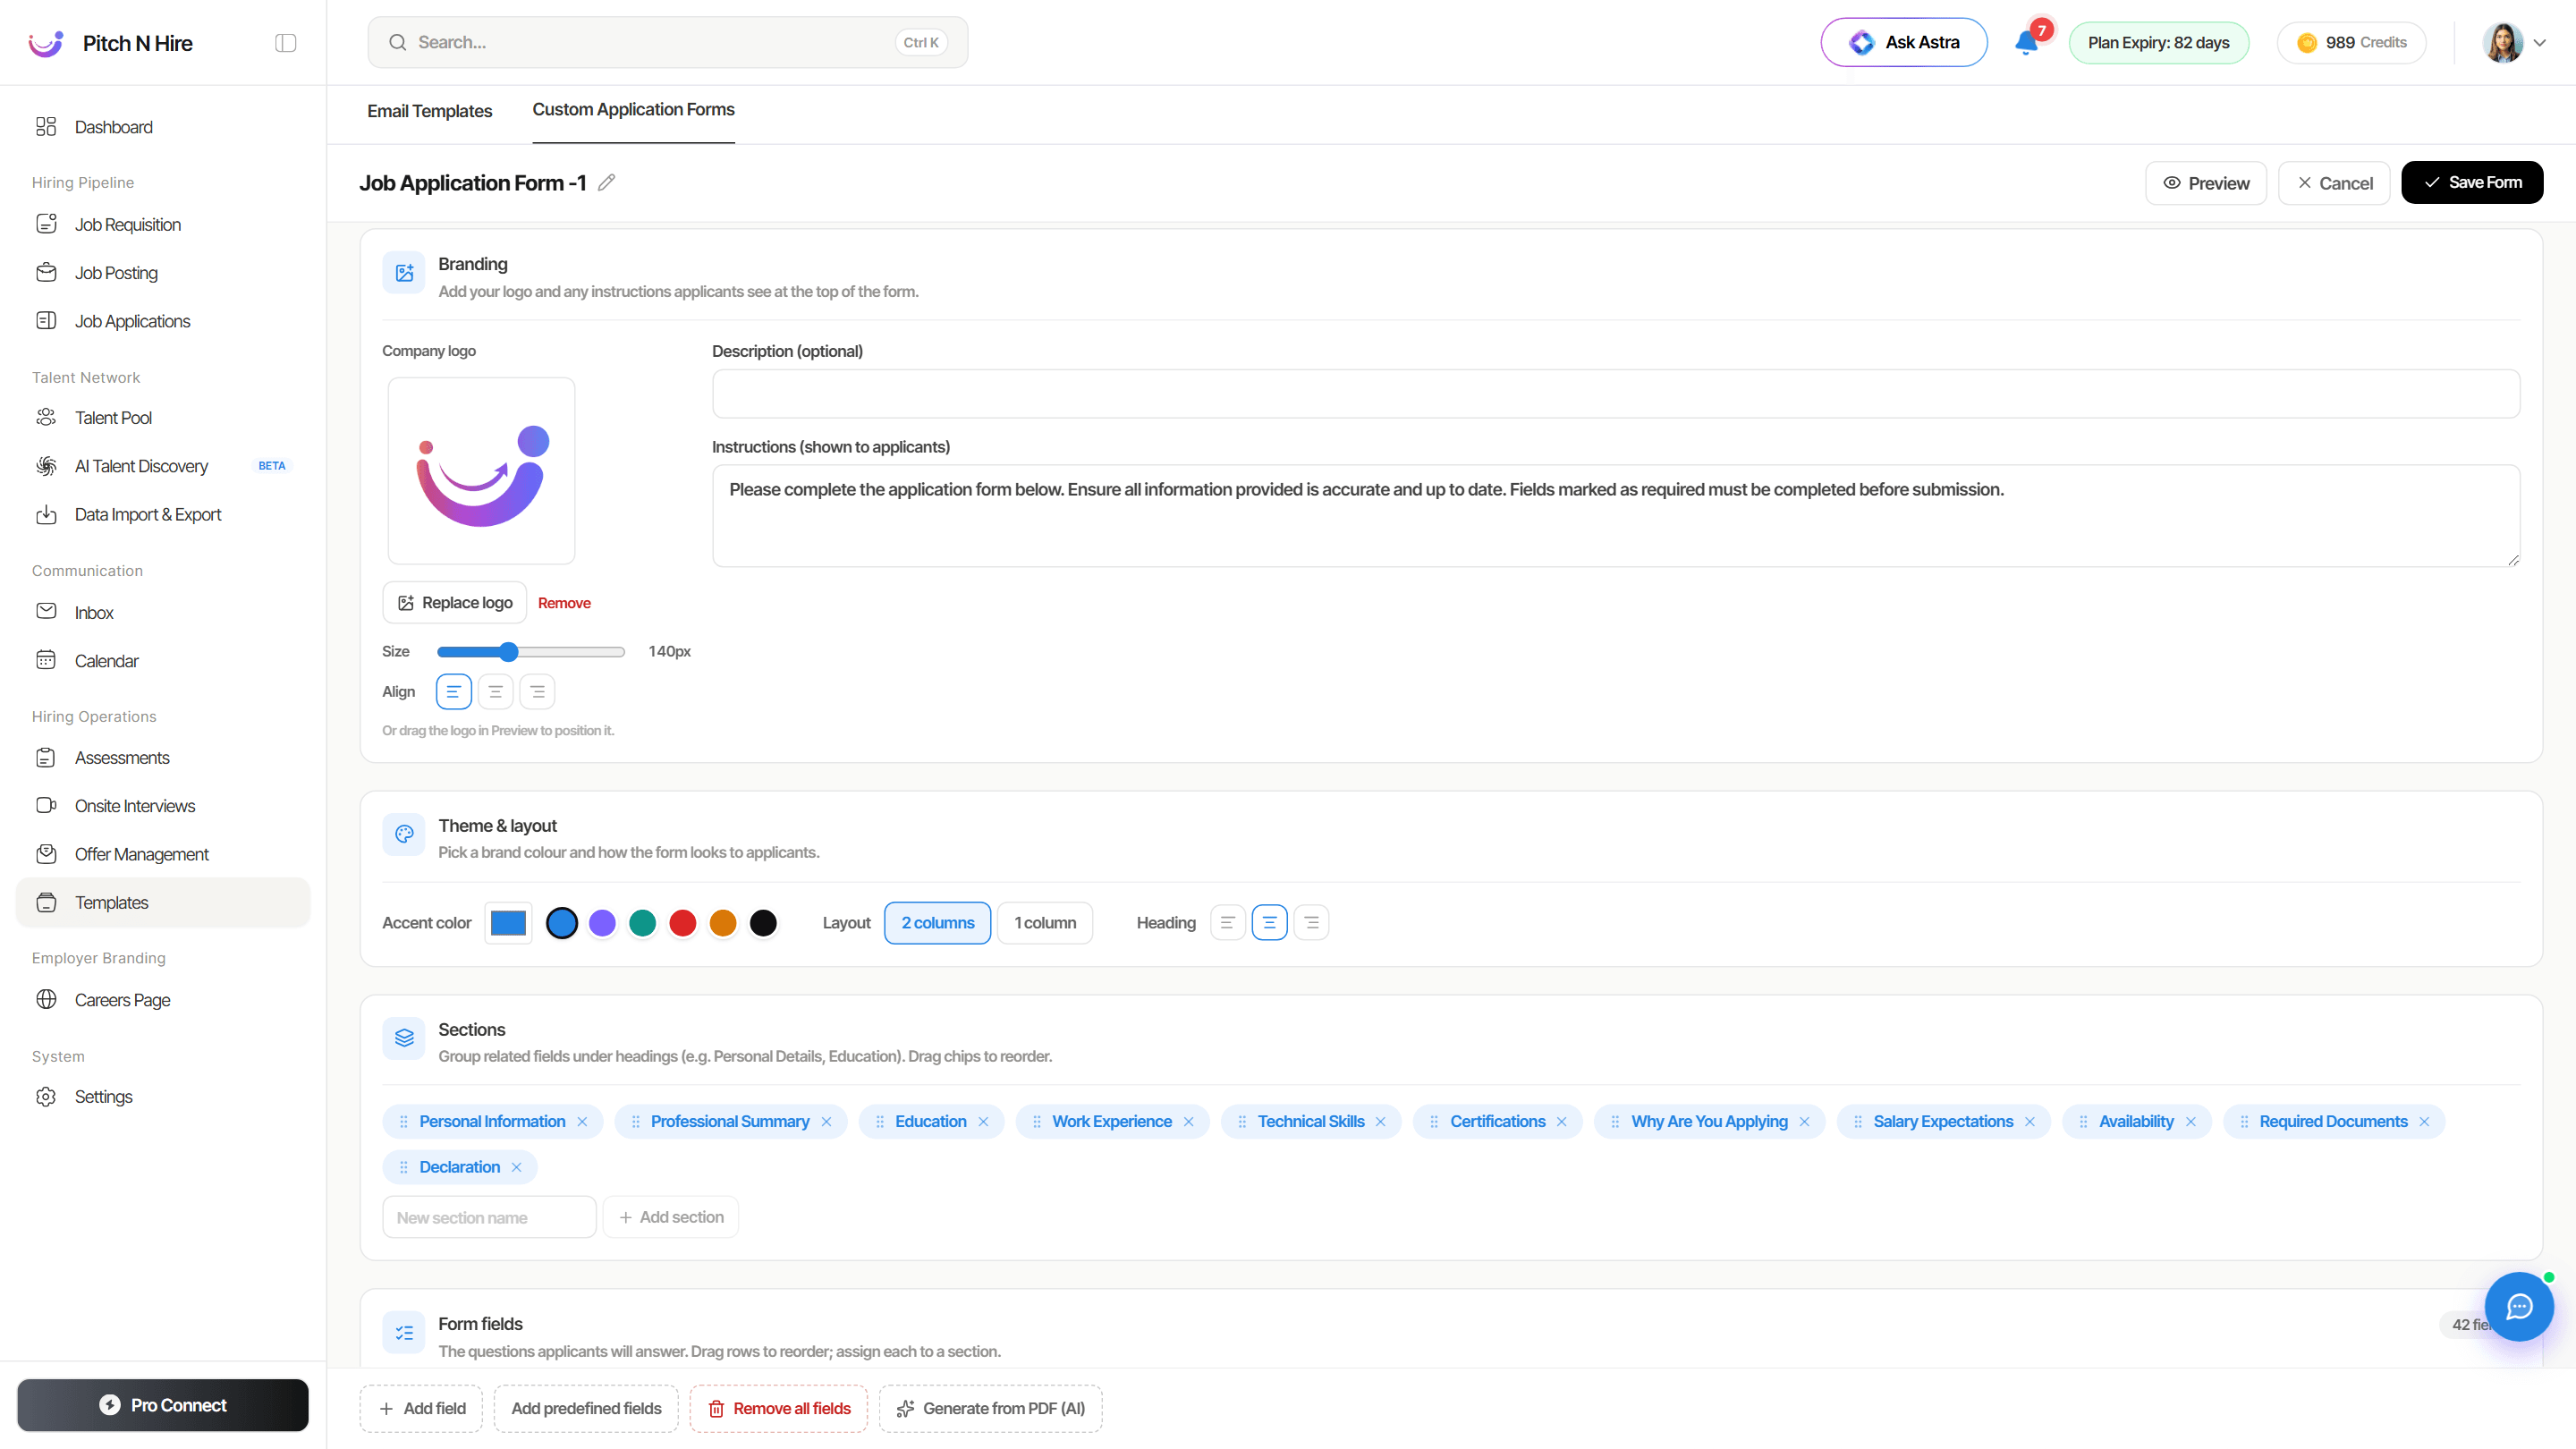
The form builder
Click + New Form or edit an existing form to open the builder. It’s organized into clear blocks:
- Branding — add your company logo, an optional description, and instructions shown to applicants at the top of the form.
- Theme & layout — pick an accent color, choose a 1-column or 2-column layout, and set the heading alignment so the form matches your brand.
- Sections — group related fields under headings (e.g. Personal Details, Education, Work Experience, Documents, Declaration). Drag the section chips to reorder them, or type a name and Add section.
- Form fields — the questions applicants answer. Add field one at a time, Add predefined fields from a ready-made set, Remove all fields, or Generate from PDF (AI) to build the form automatically from an uploaded document. Drag rows to reorder and assign each field to a section.
Use Preview to see the form as candidates will, Cancel to discard, or Save Form to publish your changes.
Import from PDF
Already have an application form as a PDF? Use Import from PDF (or Generate from PDF (AI) inside the builder) to upload it and let Pitch N Hire create the matching sections and fields for you — then fine-tune them in the builder instead of building from scratch.
Tips
Common issues & fixes
- Merge field shows as raw text in the sent email — check the field name matches the supported syntax exactly (for example
{{job_title}}, including the double curly braces). If a template type requires certain variables, add them before saving. - Wrong email template sent automatically — confirm which template is set as Default (Yes) for that type and update it.
- Custom form fields aren’t appearing for candidates — make sure the form’s Status is Active, that custom forms are enabled with the toggle, and that the form is saved with Save Form.
- Can’t find a template or form — clear any search, search by Name, and check the next page using the pagination controls.