Job Posting
Job Posting is where an approved role becomes a live opening that candidates can apply to. From this module you create new jobs through a guided form, control their visibility, publish them to your career page, and manage every posting across its lifecycle, from draft to published, and on to expired or closed.
Overview
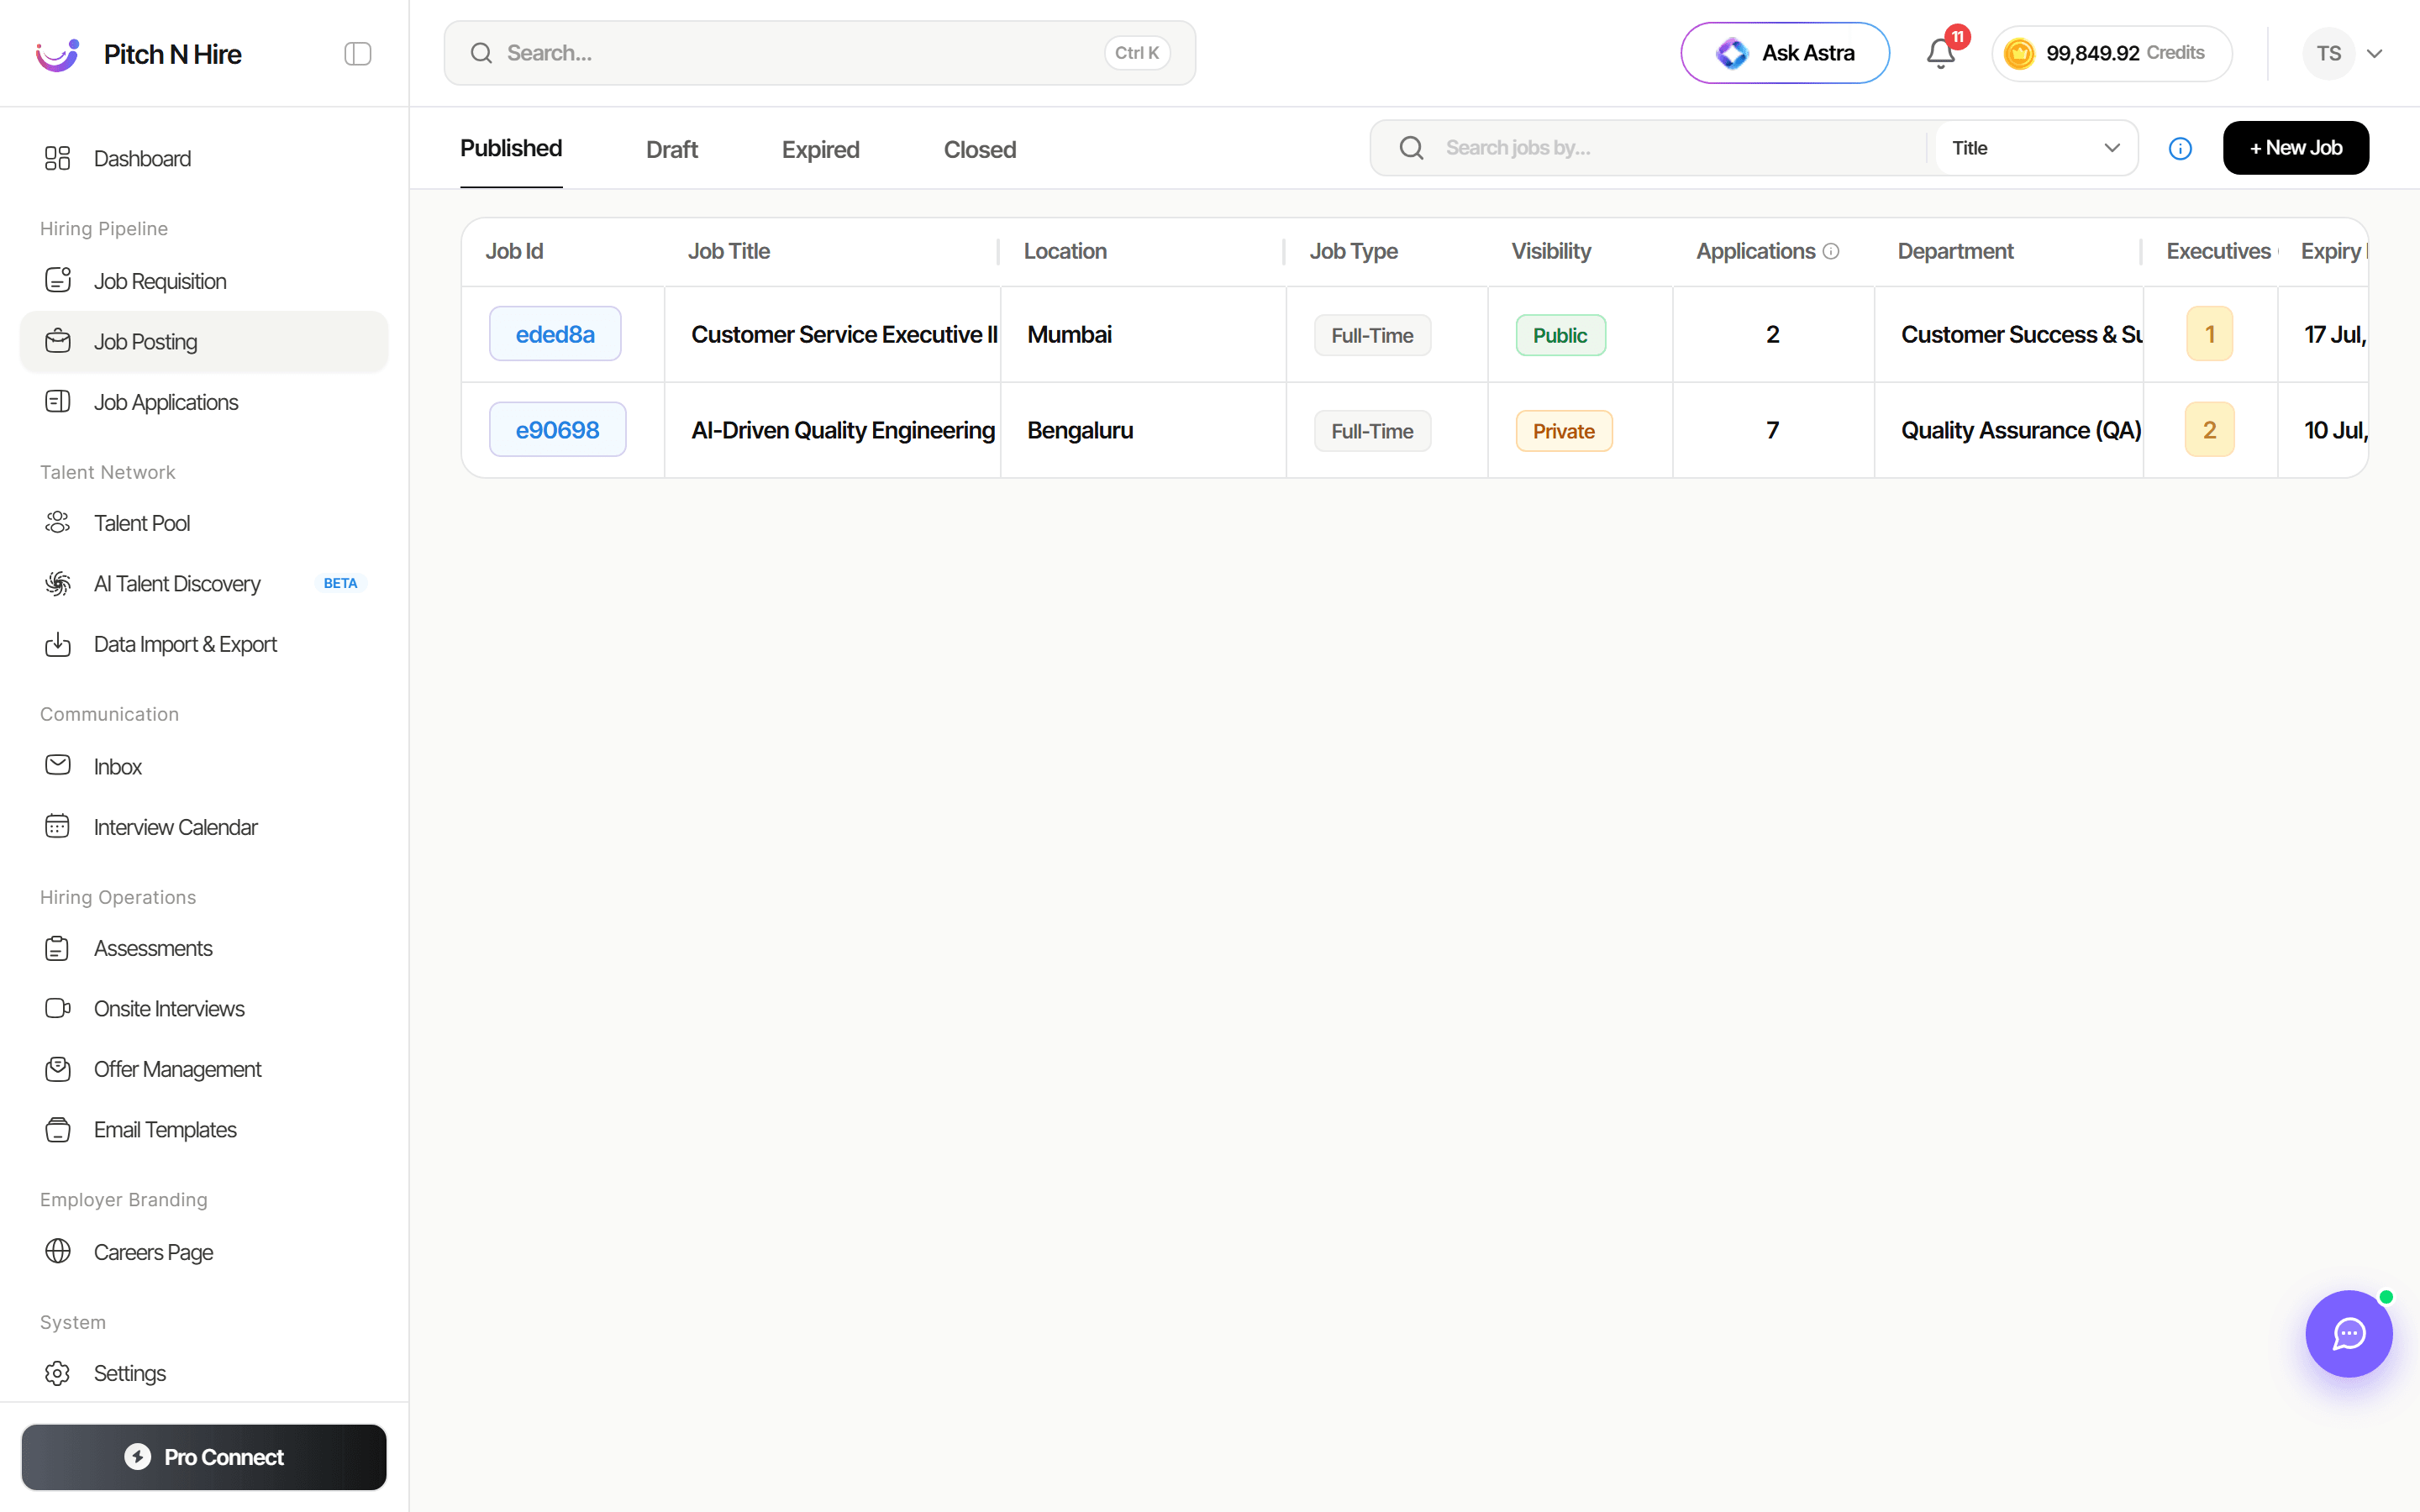
The Job Posting list organises your openings under four tabs, Published, Draft, Expired and Closed, so you always see jobs at the right stage. Each posting appears as a row with its ID, title, location, type and visibility, plus live application and team counts. A search box, a sort control and a + New Job button sit above the table.
Key features
- Published / Draft / Expired / Closed tabs to filter postings by lifecycle stage.
- Posting table with columns for Job Id, Job Title, Location, Job Type (e.g. Full-Time), Visibility (Public or Private), Applications, Department, Executives and Expiry.
- Visibility badges that show at a glance whether a role is Public (on the career page) or Private.
- Applications counter on each row so you can see candidate volume without opening the job.
- Search jobs box and a Title sort dropdown to find postings quickly.
- + New Job button that opens a two-section guided form, Job Details and Application Setup — or drafts the whole posting for you from a job description with Create Job With AI.
- Job quality analysis scoring every posting on content quality, completeness, compliance and SEO, with one-click fixes.
Step-by-step
Create a job with AI
Clicking + New Job opens Create New Job, which asks how you want to start:
| Option | Use it when |
|---|---|
| Create Job With AI (New) | You already have a job description — “Upload a job description and we fill the details in for you.” |
| Create Job Without Requisition | You want to write the posting manually from scratch. |
| Create Job From Requisition | The role has already been approved as a job requisition. |
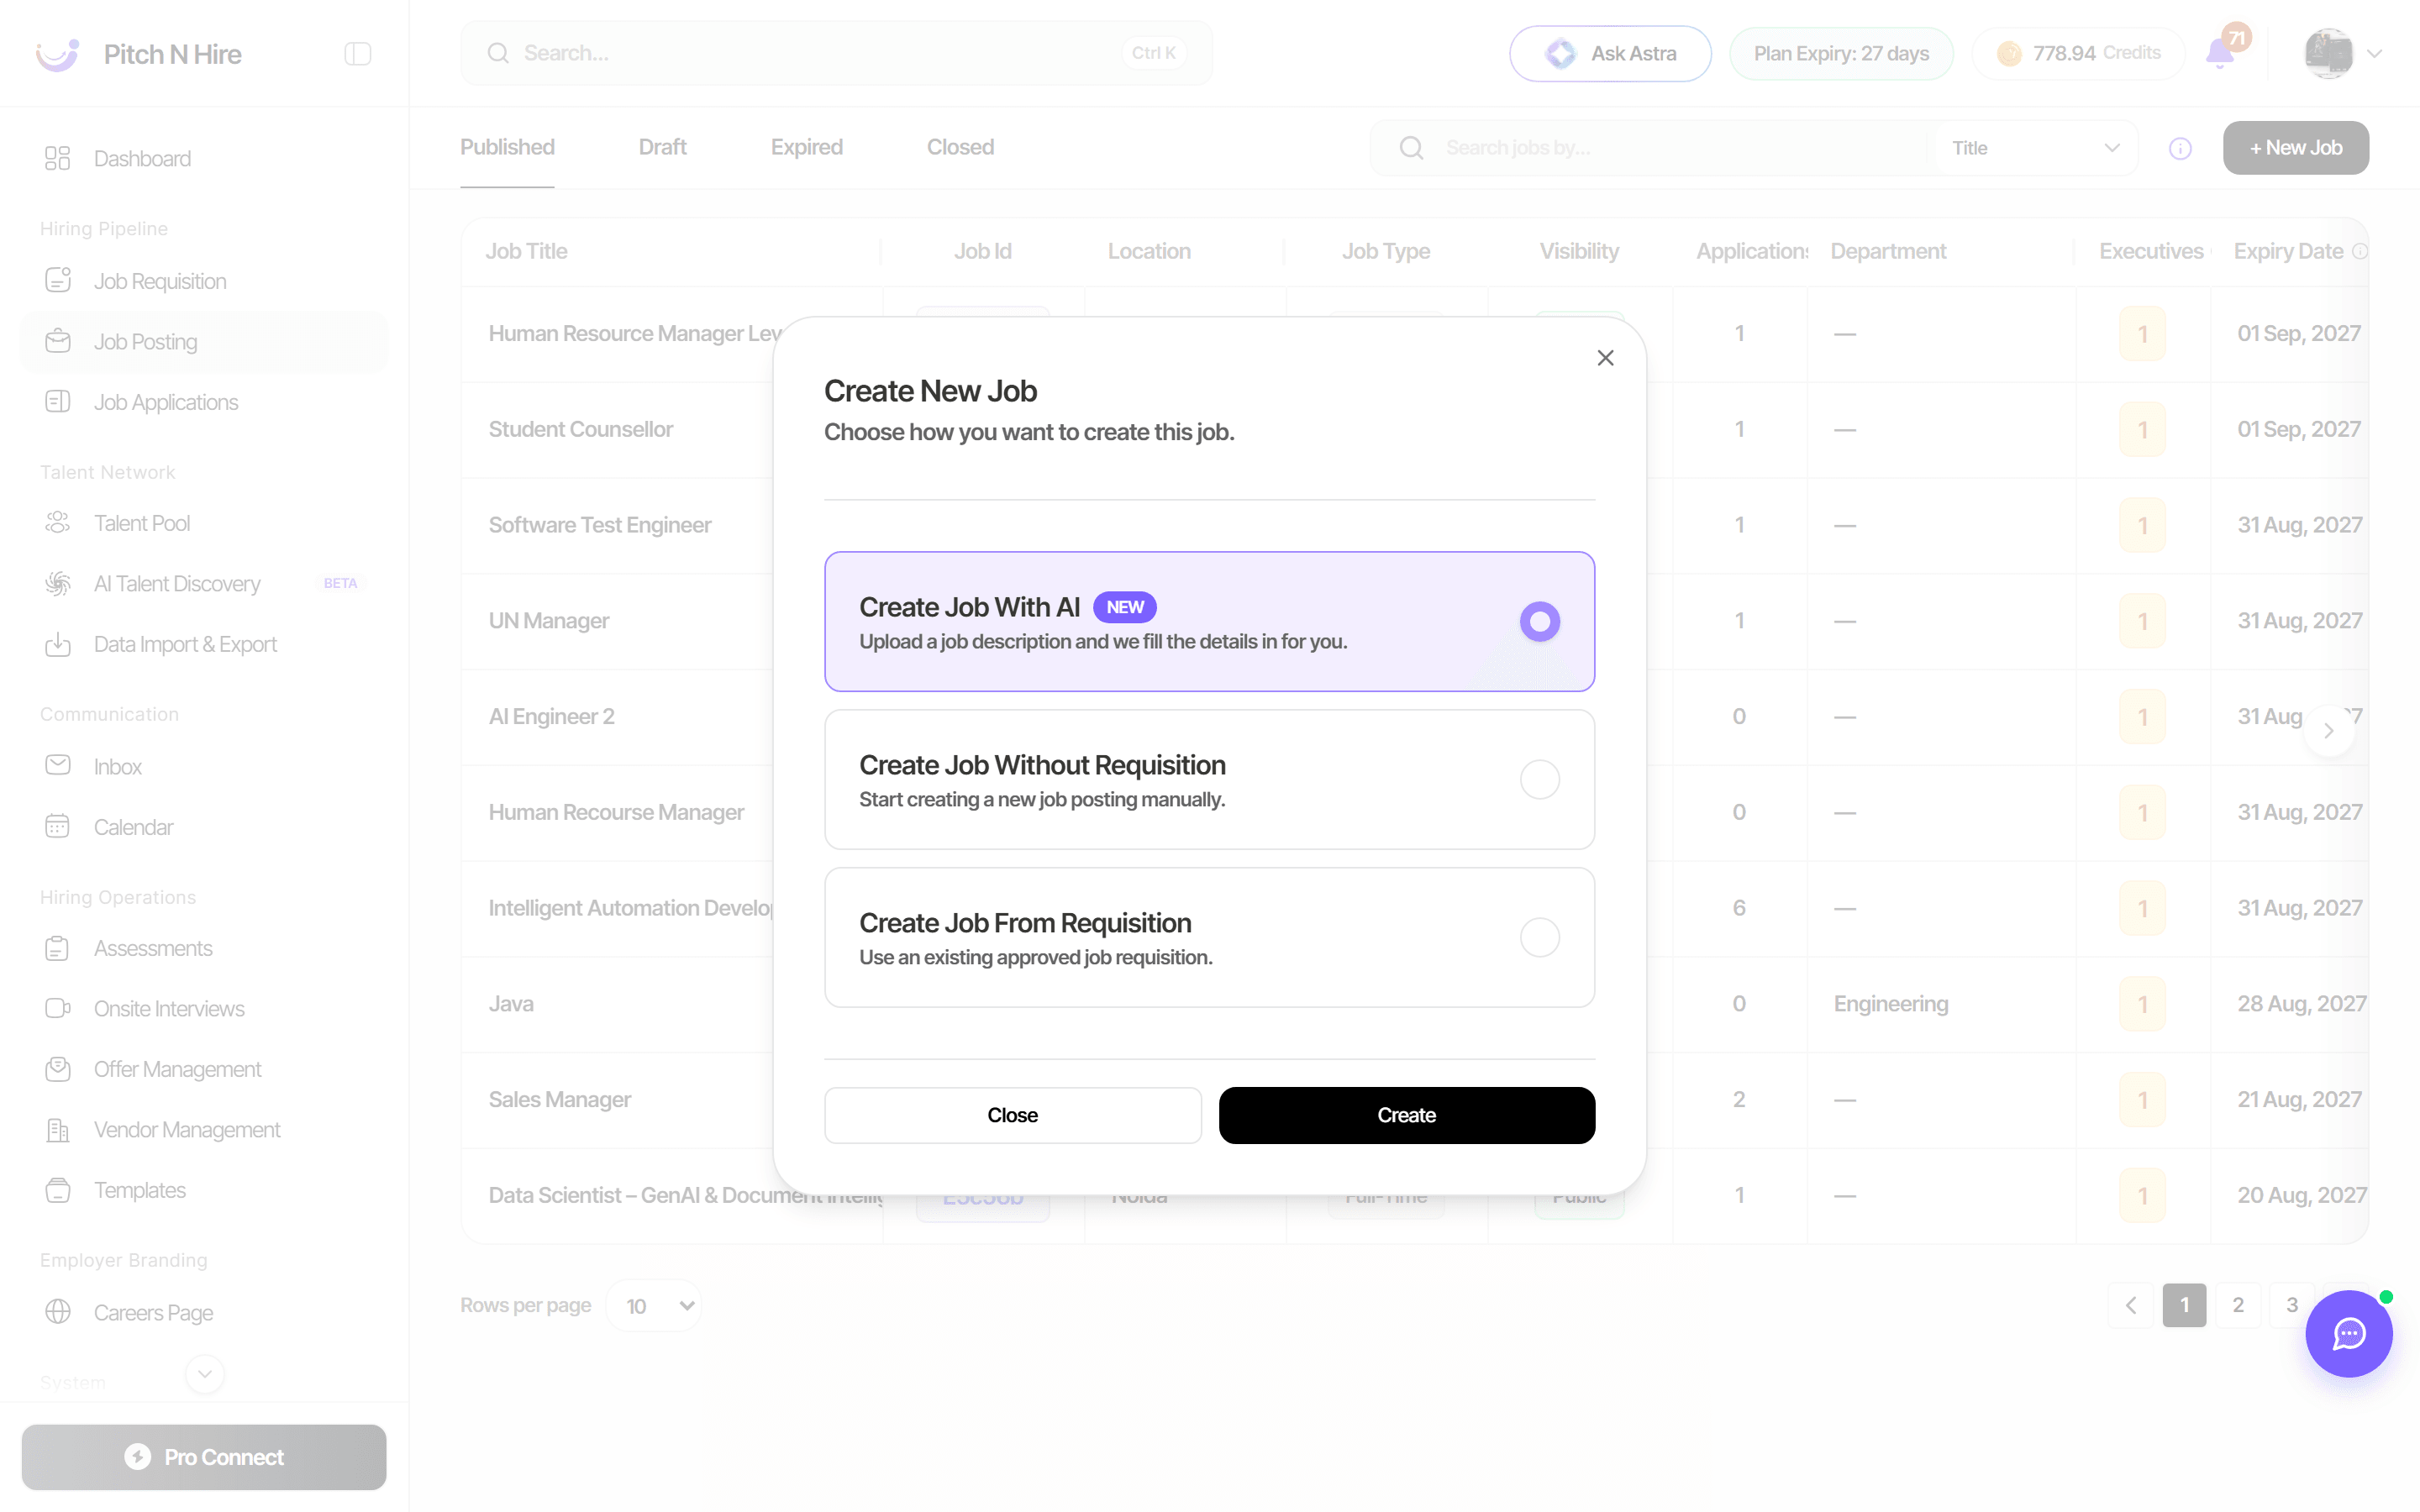
Choosing Create Job With AI opens Create a job from a description — “Upload the JD or paste it in. We fill the job in for you.”
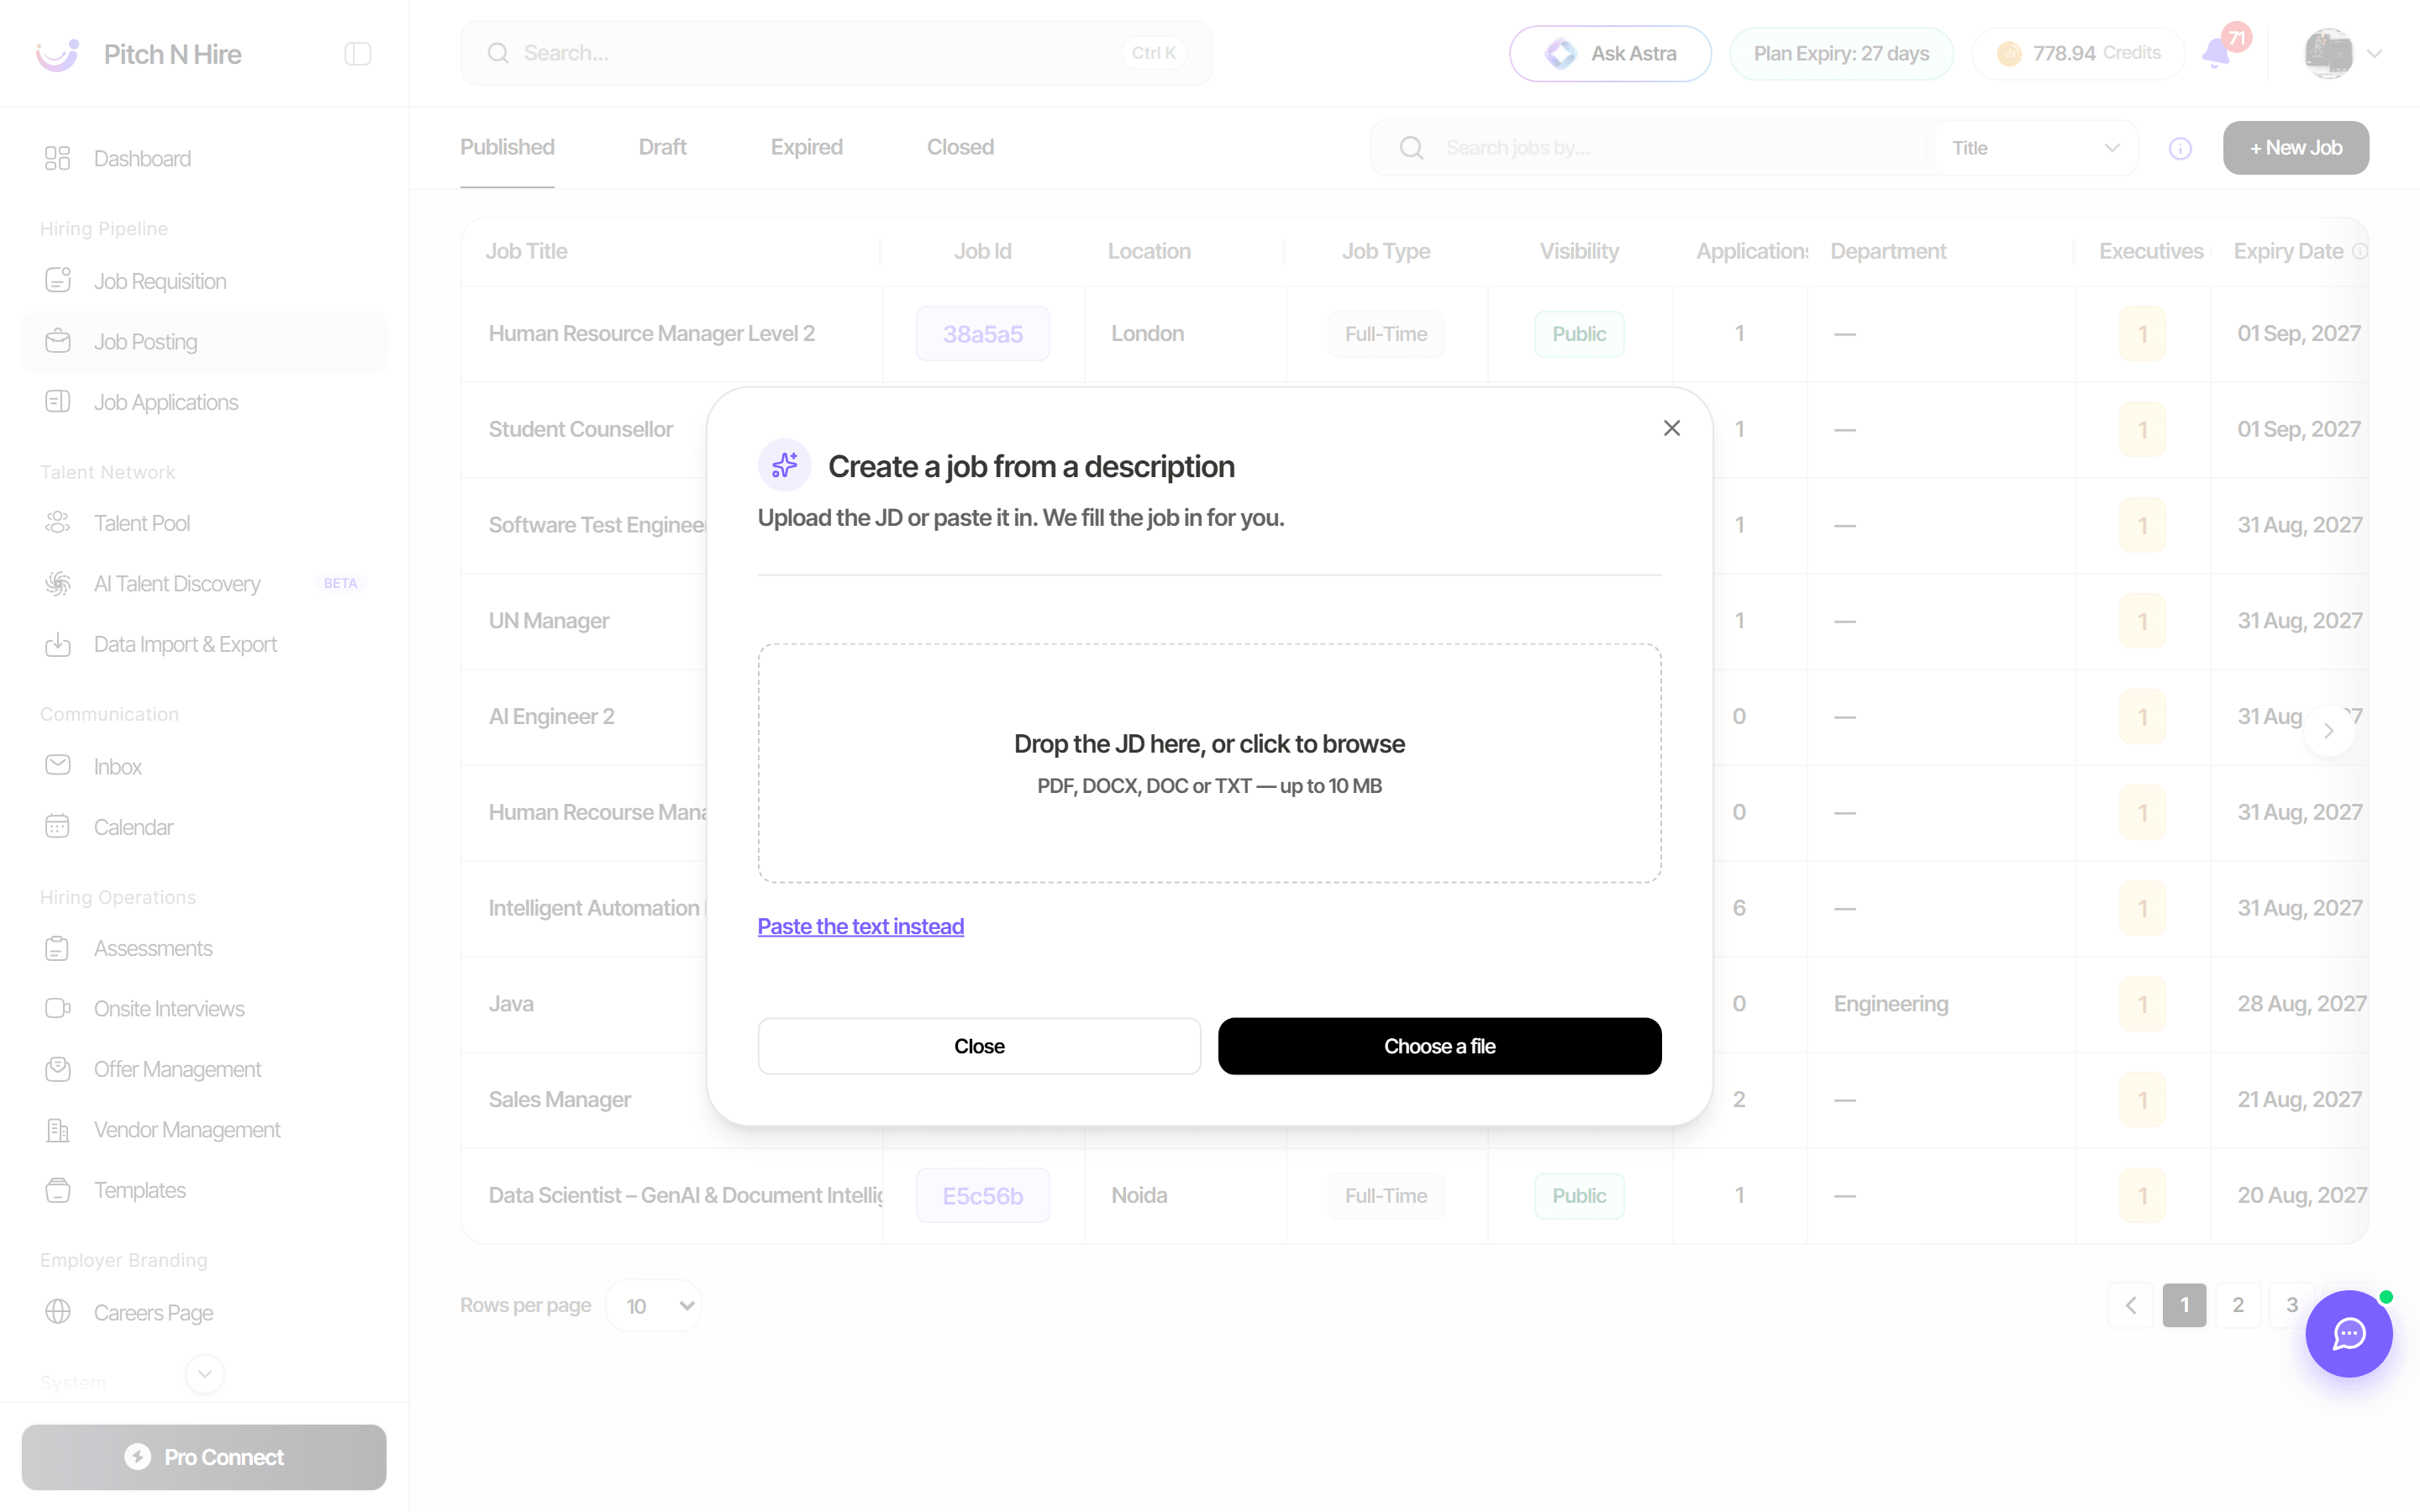
- Drop the JD in, or click to browse — PDF, DOCX, DOC or TXT, up to 10 MB. No file to hand? Click Paste the text instead and paste the description.
- Pitch N Hire reads it and asks a short series of clarifying questions — anything the description left ambiguous, such as seniority, location or employment type. Answer each one; some let you select several options.
- Review the “Here is what we read” summary of everything extracted from your JD.
- Confirm, and the job form opens pre-filled — title, skills, experience, description and the rest. Edit anything you disagree with, then save and publish as normal.
Prefer to write it yourself? Choose Create Job Without Requisition and follow Create and publish a job below.
Job quality analysis and SEO
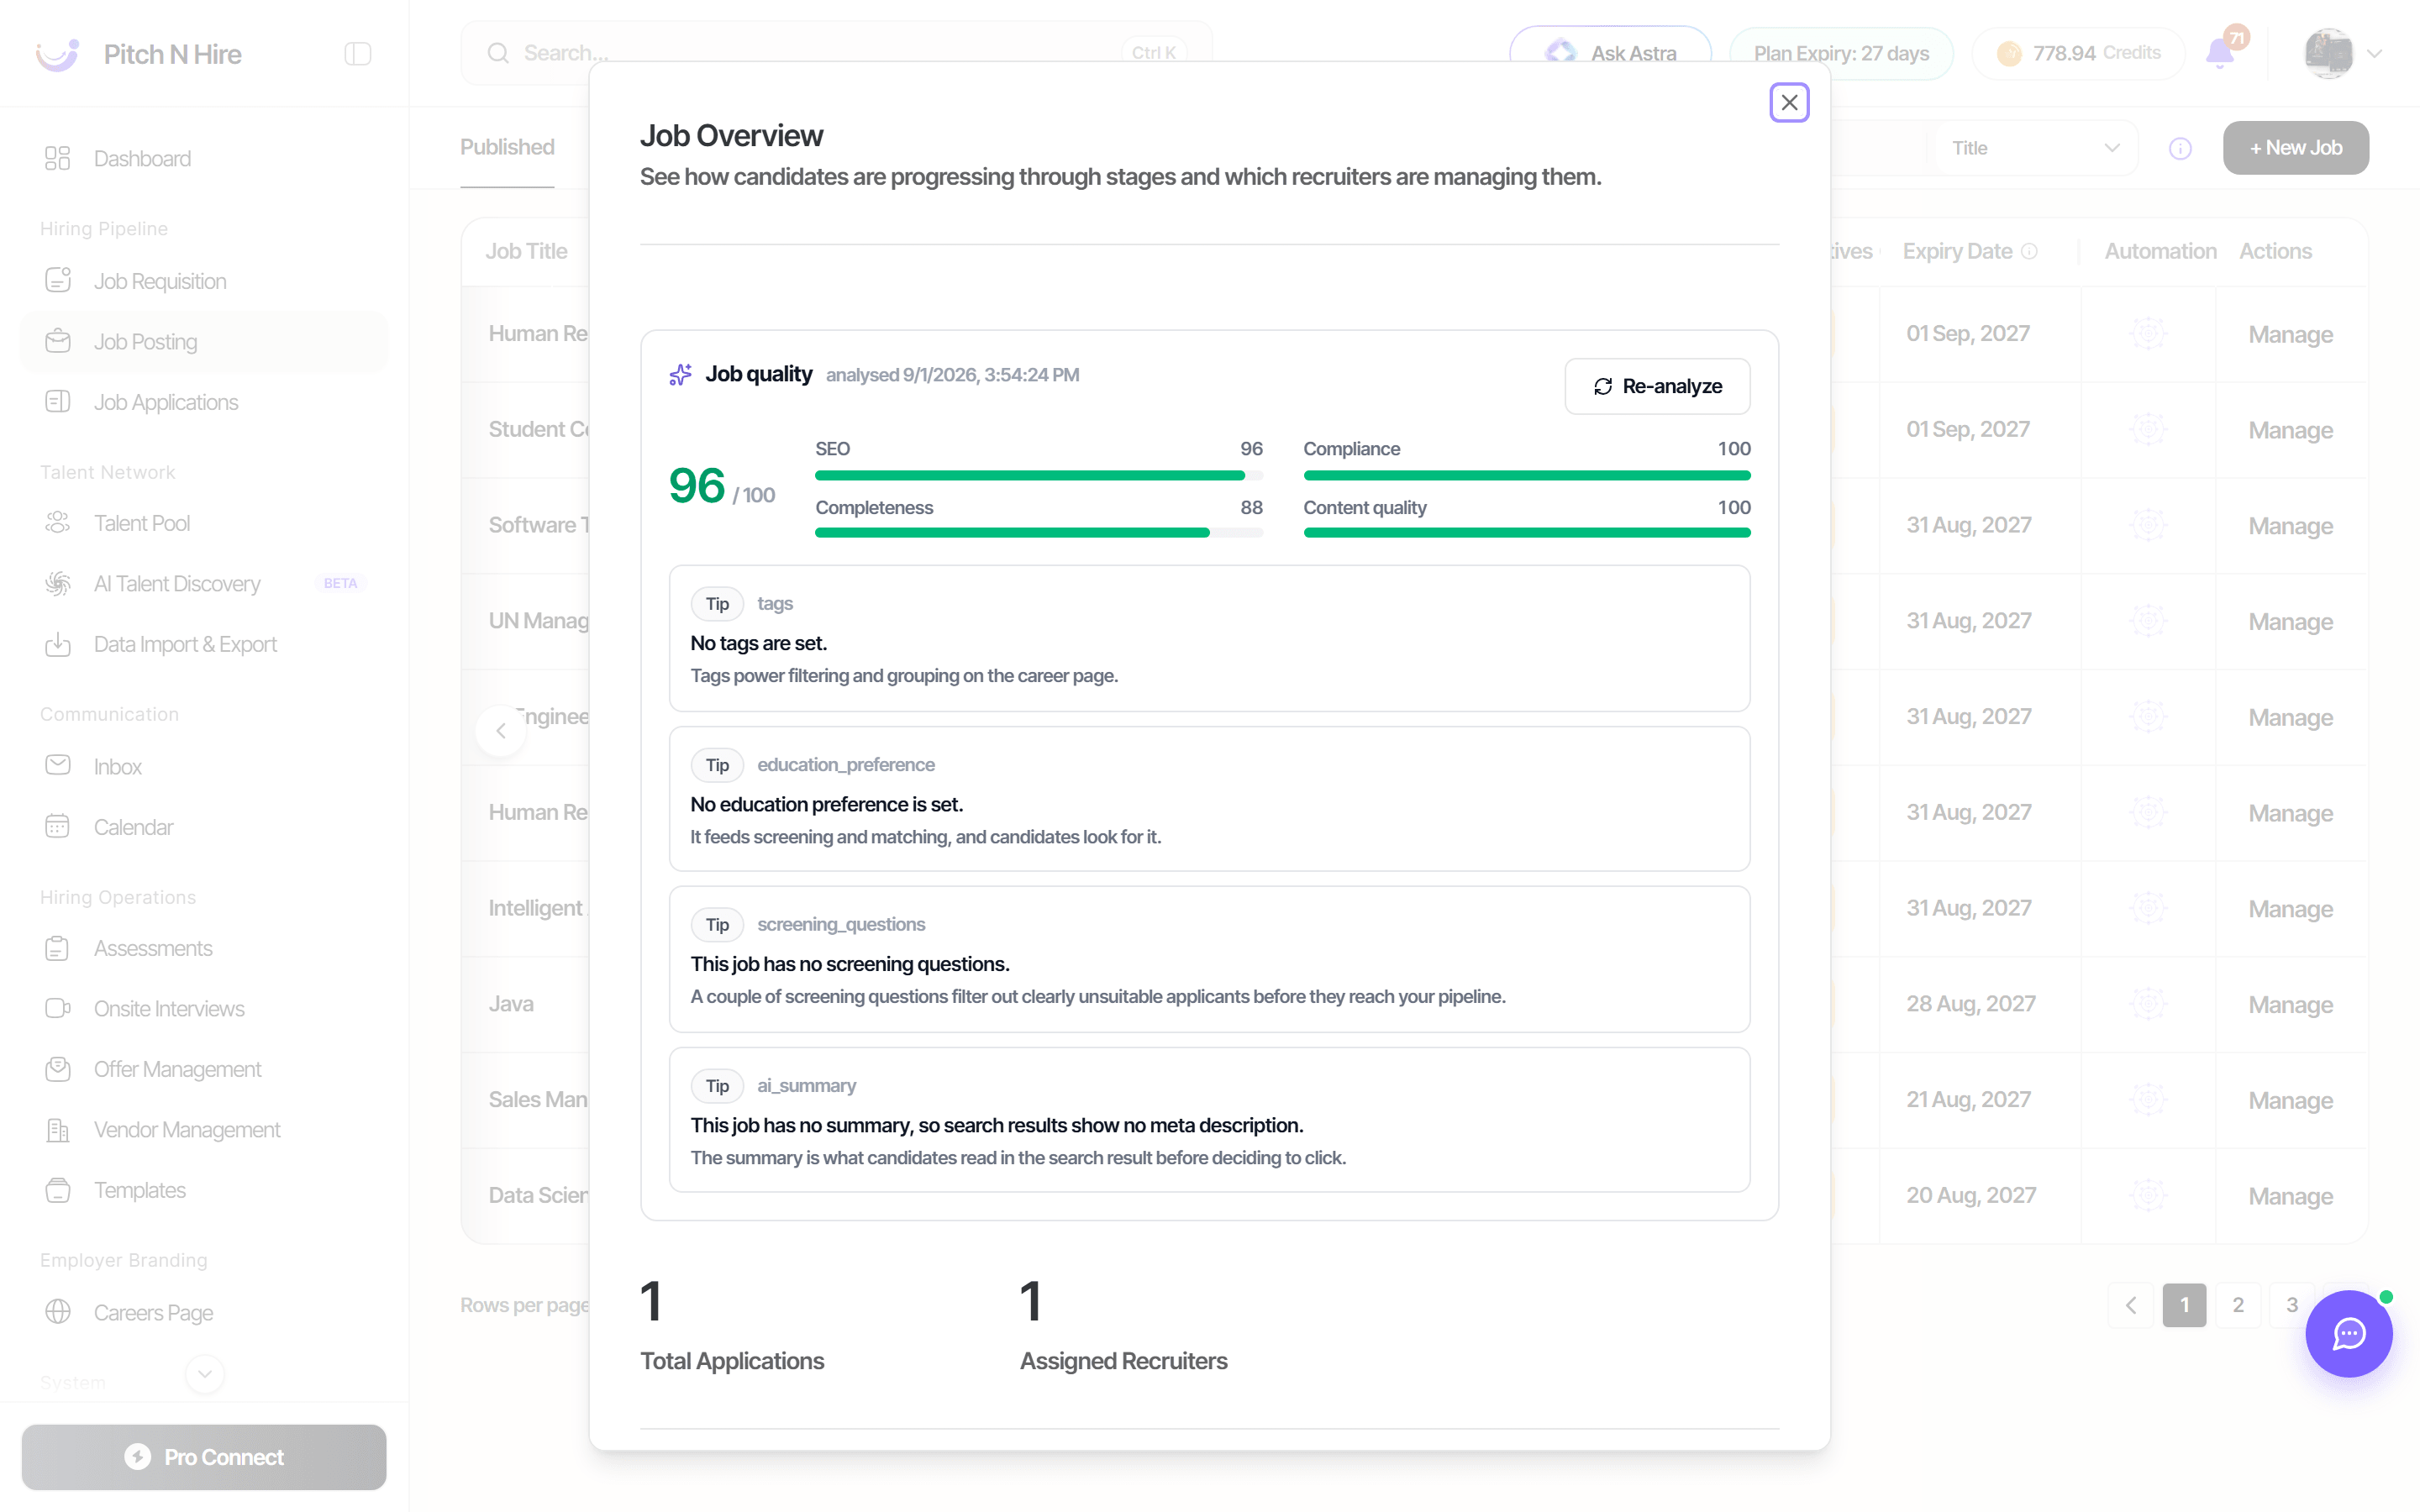
Every job is scored automatically by a Job quality analysis. The card shows an overall score out of 100 plus a breakdown across four dimensions:
- Content quality — how well the posting actually reads.
- Completeness — whether the details candidates and job boards need are present.
- Compliance — wording that could cause a problem.
- SEO — how discoverable the posting is in search, which drives its reach on your careers page and job boards.
Under the score sits a list of findings, each tagged with its severity and the field it concerns — for example a Tip on tags reading “No tags are set. Tags power filtering and grouping on the career page.”, or one on ai_summary: “This job has no summary, so search results show no meta description.” Where Pitch N Hire can supply the correction itself, an Apply fix button accepts it in one click.
The card is stamped with when it was last analysed, and Re-analyze re-scores the job after you have edited it. A posting with nothing to flag reads: “No issues found — this job reads well, is complete, and has no compliance or SEO problems.”
Create and publish a job
- Open Hiring Pipeline -> Job Posting and click + New Job.
- On the Job Details section, fill in Basic Info:
- Client Company and Assign to (the owner/recruiter).
- Job Title (required) - the Slug is auto-generated from the title and used in the public job URL.
- No. of Positions (total open headcount) and the Show on Career Page option.
- Status - note you must save the job first before you can change its status.
- Complete Role Requirements: set Work Experience (years range), required Skills (required), Education, and Tags (required, used for filtering and searchability on the career page).
- Add the Description of the role further down the form.
- Use Preview at the top right to check how the posting will look, then click Save & Continue.
- Move to the Application Setup section to define how candidates apply, then save.
- Set the job Status to publish it, published public jobs appear under the Published tab and on your career page.
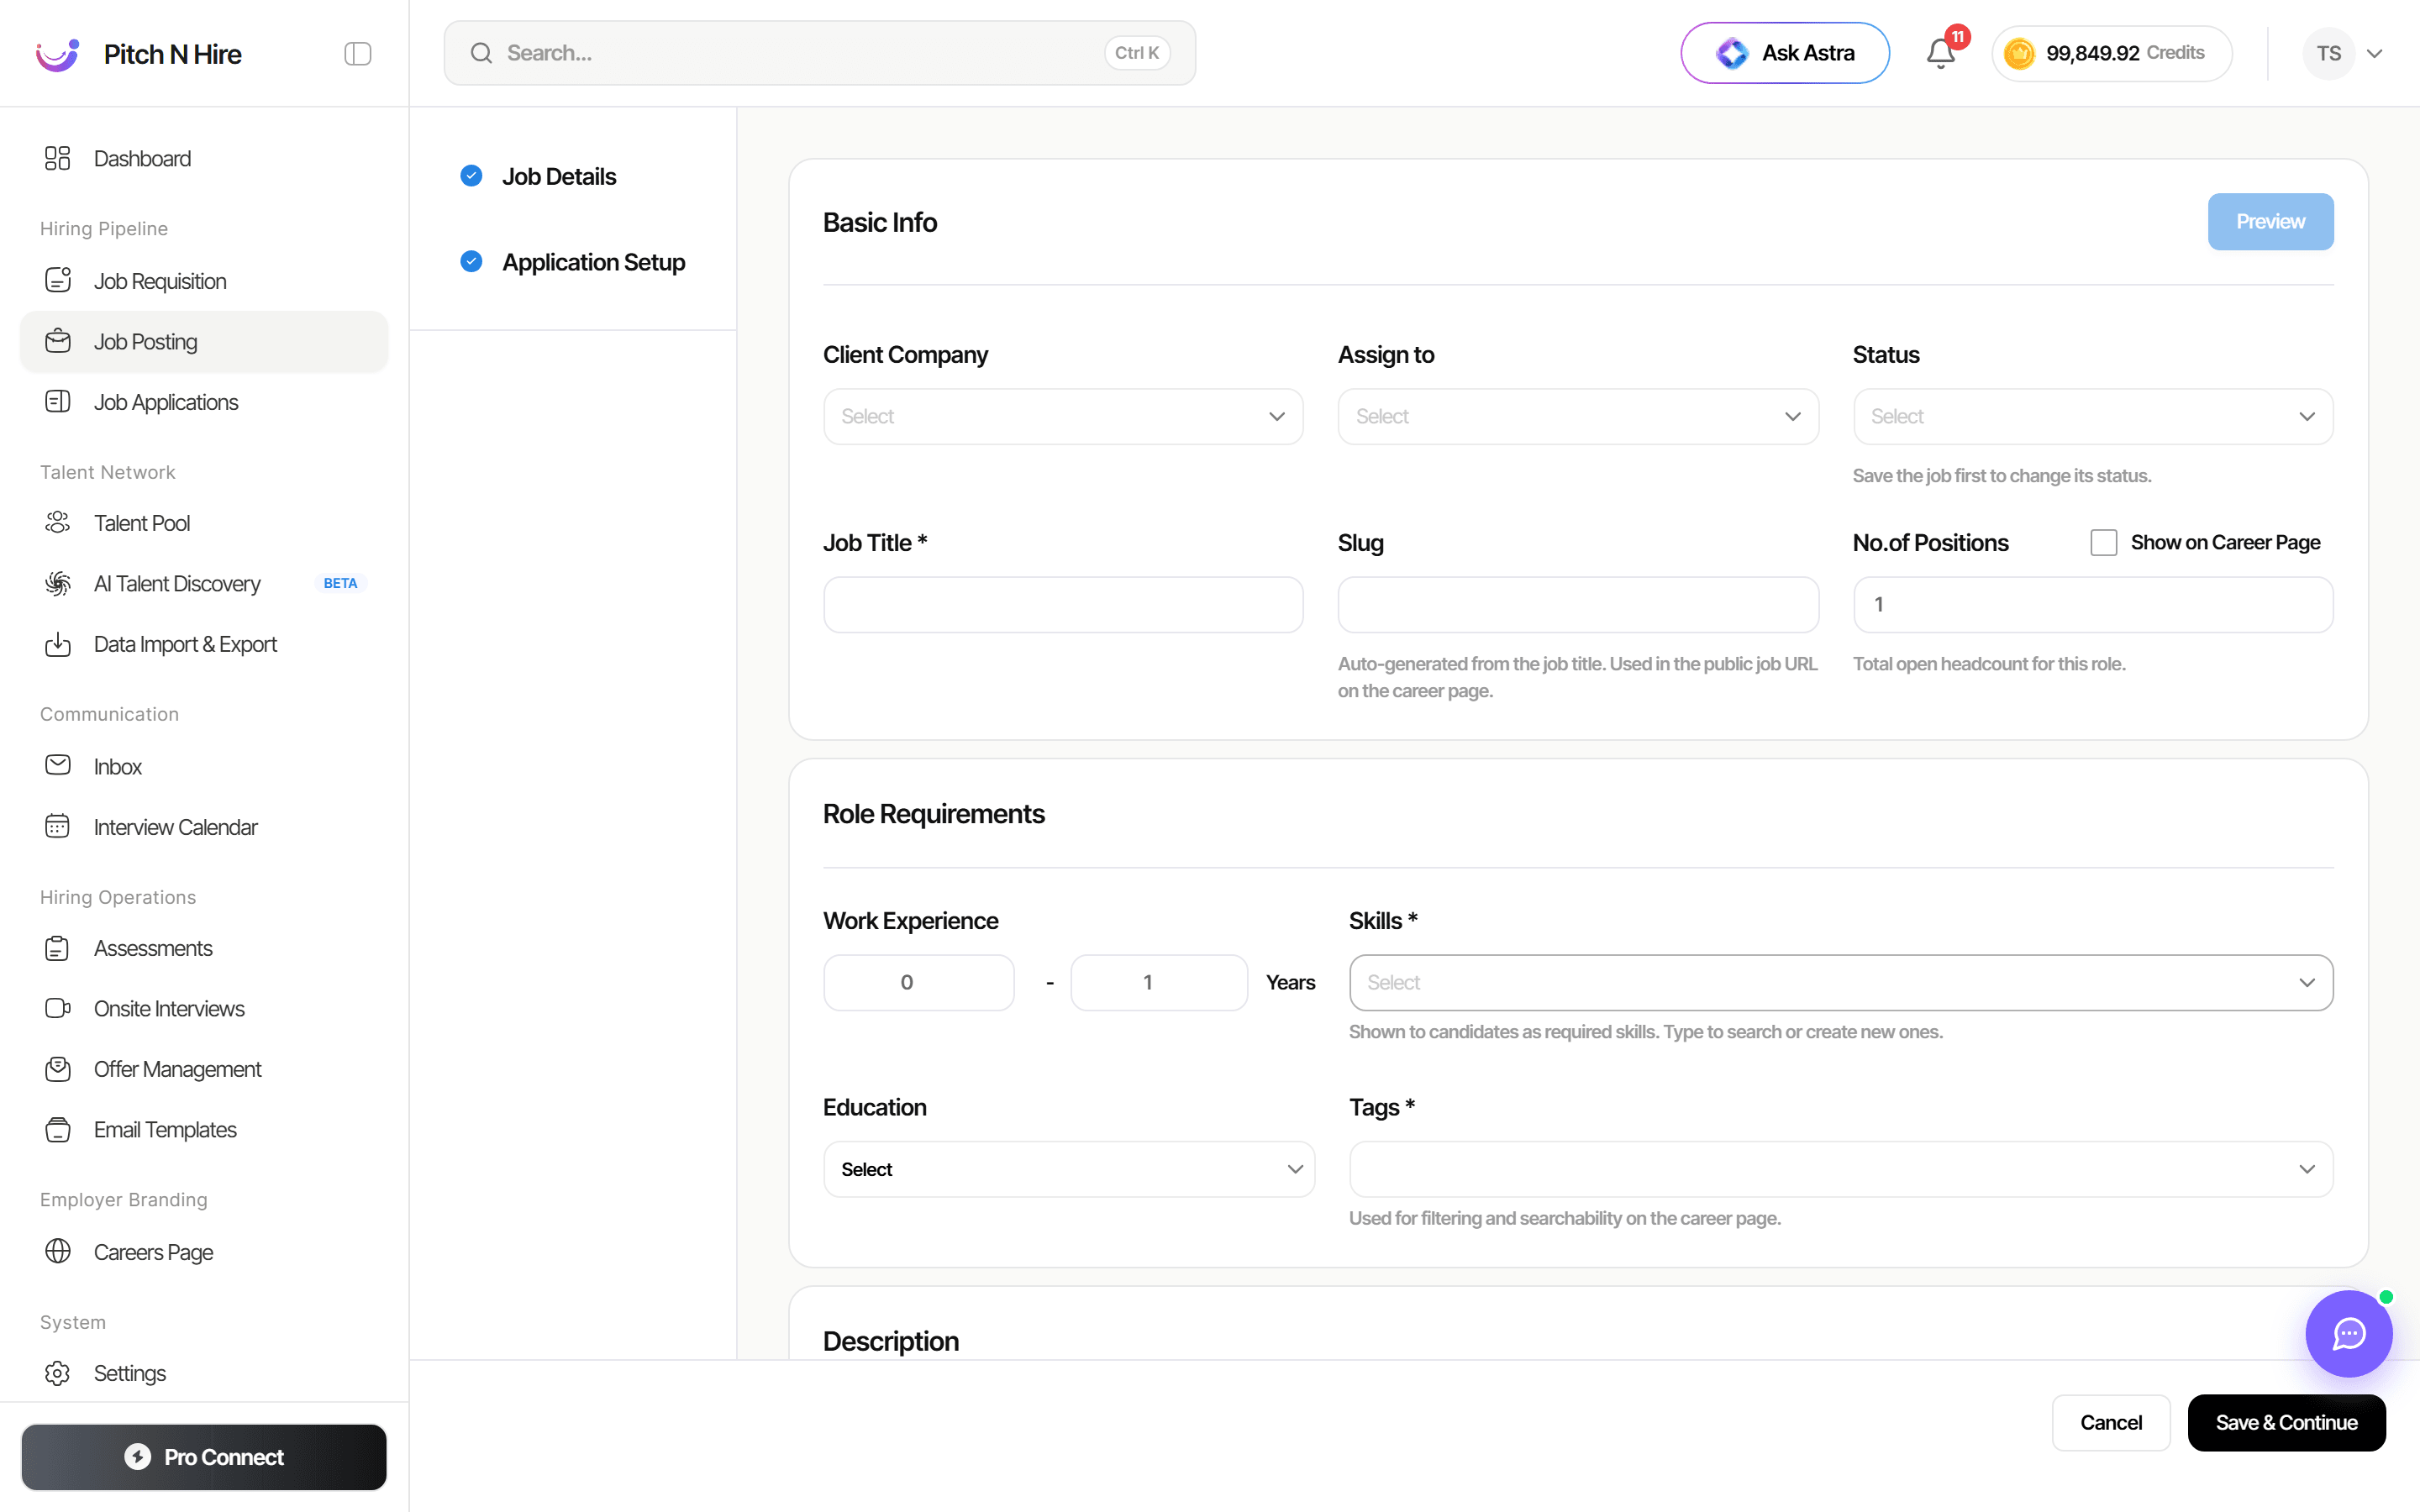
Choose the application form candidates fill
In the Basic Info step you can decide exactly which form candidates complete when they apply to this job. When custom application forms are enabled for your company, an Application Form dropdown appears here.
- Open the Application Form dropdown and choose either:
- Default (No Custom Form) — the standard Pitch N Hire application, or
- one of your Custom Application Forms (built under Templates → Custom Application Forms). The list is searchable, so you can type to filter long lists of forms.
- Click Preview beside the selector to see the chosen form exactly as candidates will.
- Save the posting — the selected form is now what applicants fill in for this role. The helper text “Custom form candidates fill when applying” confirms it’s applied.
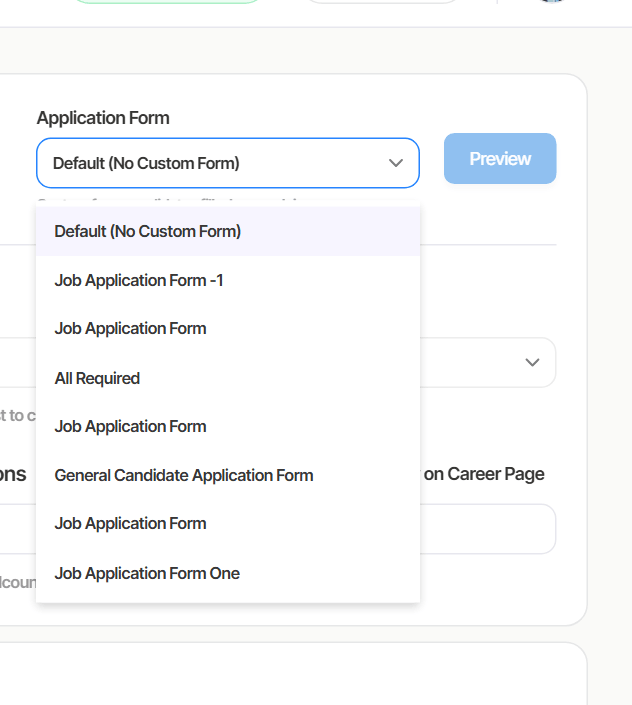
Manage existing postings
- Use the Published, Draft, Expired and Closed tabs to navigate to the stage you need.
- Search by title or use the Title sort dropdown to locate a posting.
- Read the Applications column to gauge interest, then click a Job Title to open the role and review applicants.
- Update a posting’s Status to move it between draft, published and closed as hiring progresses.
The posting Actions menu
Every row has an Actions (⋯) menu on the right with everything you can do to a single posting — edit, change status or expiry, configure automation, invite candidates, share the job, pull suggested candidates and more.
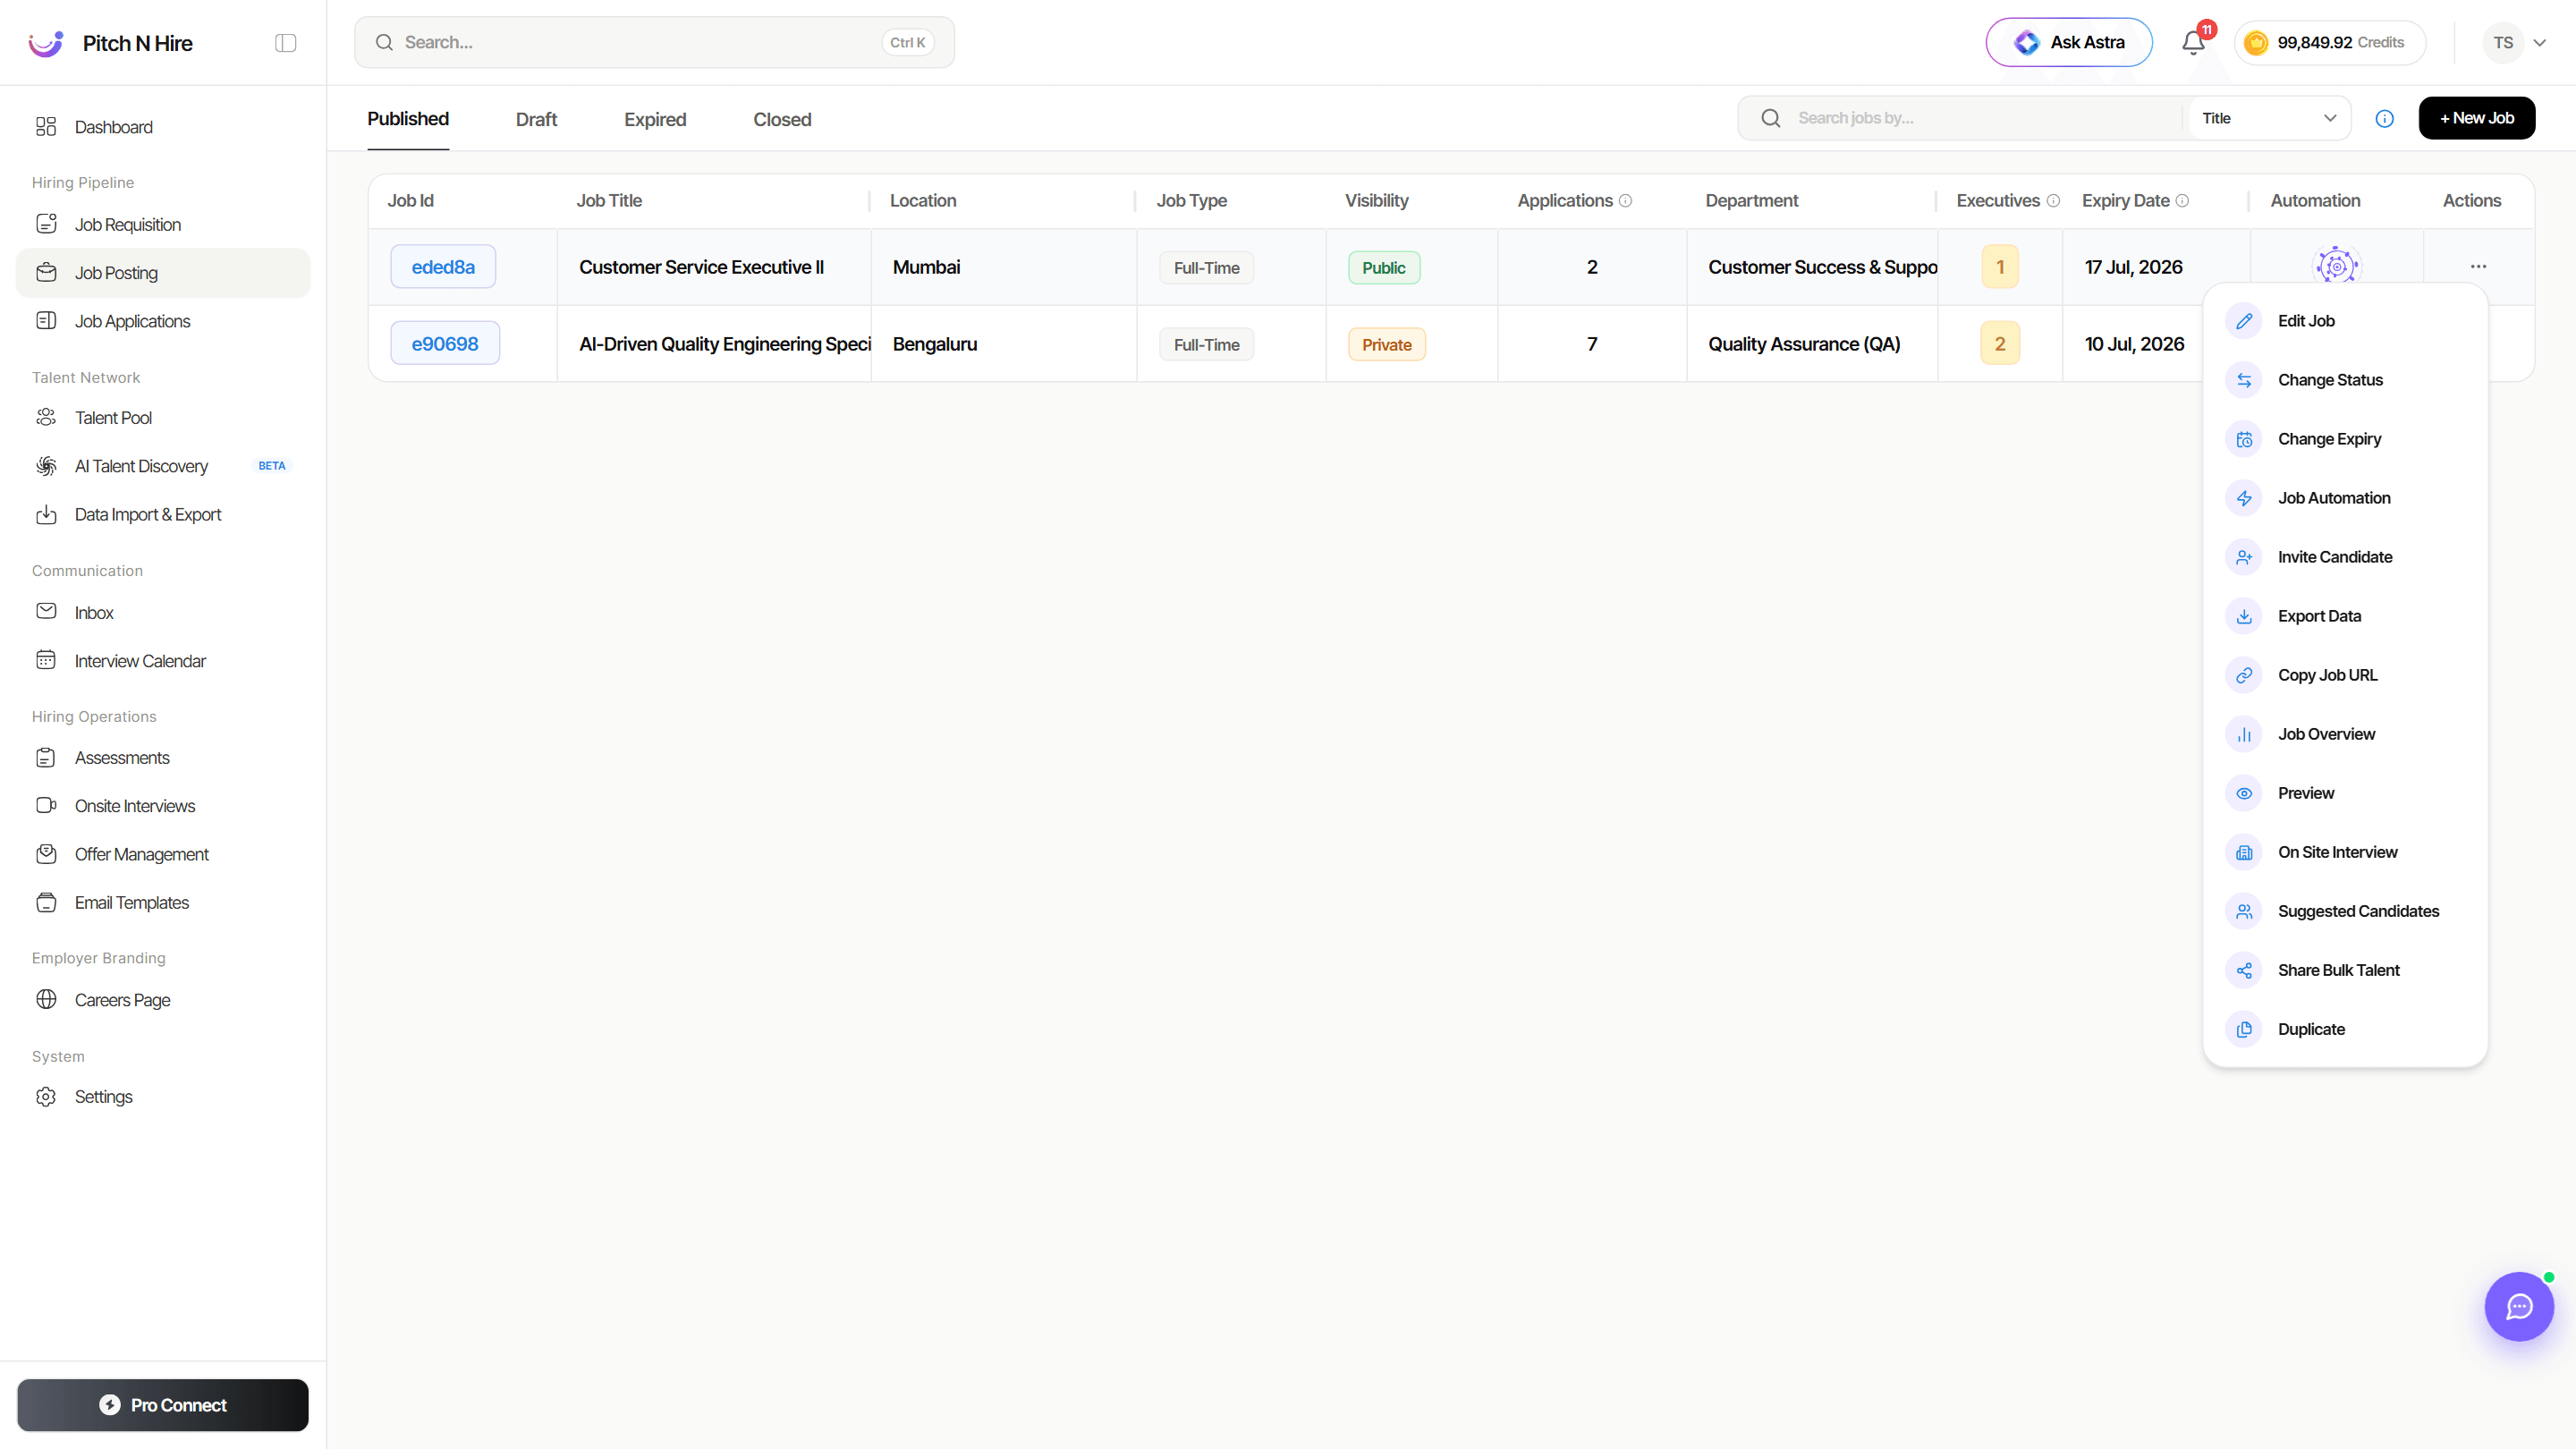
The menu offers: Edit Job, Change Status, Change Expiry, Job Automation, Invite Candidate, Export Data, Copy Job URL, Job Overview, Preview, On Site Interview, Suggested Candidates, Share Bulk Talent and Duplicate.
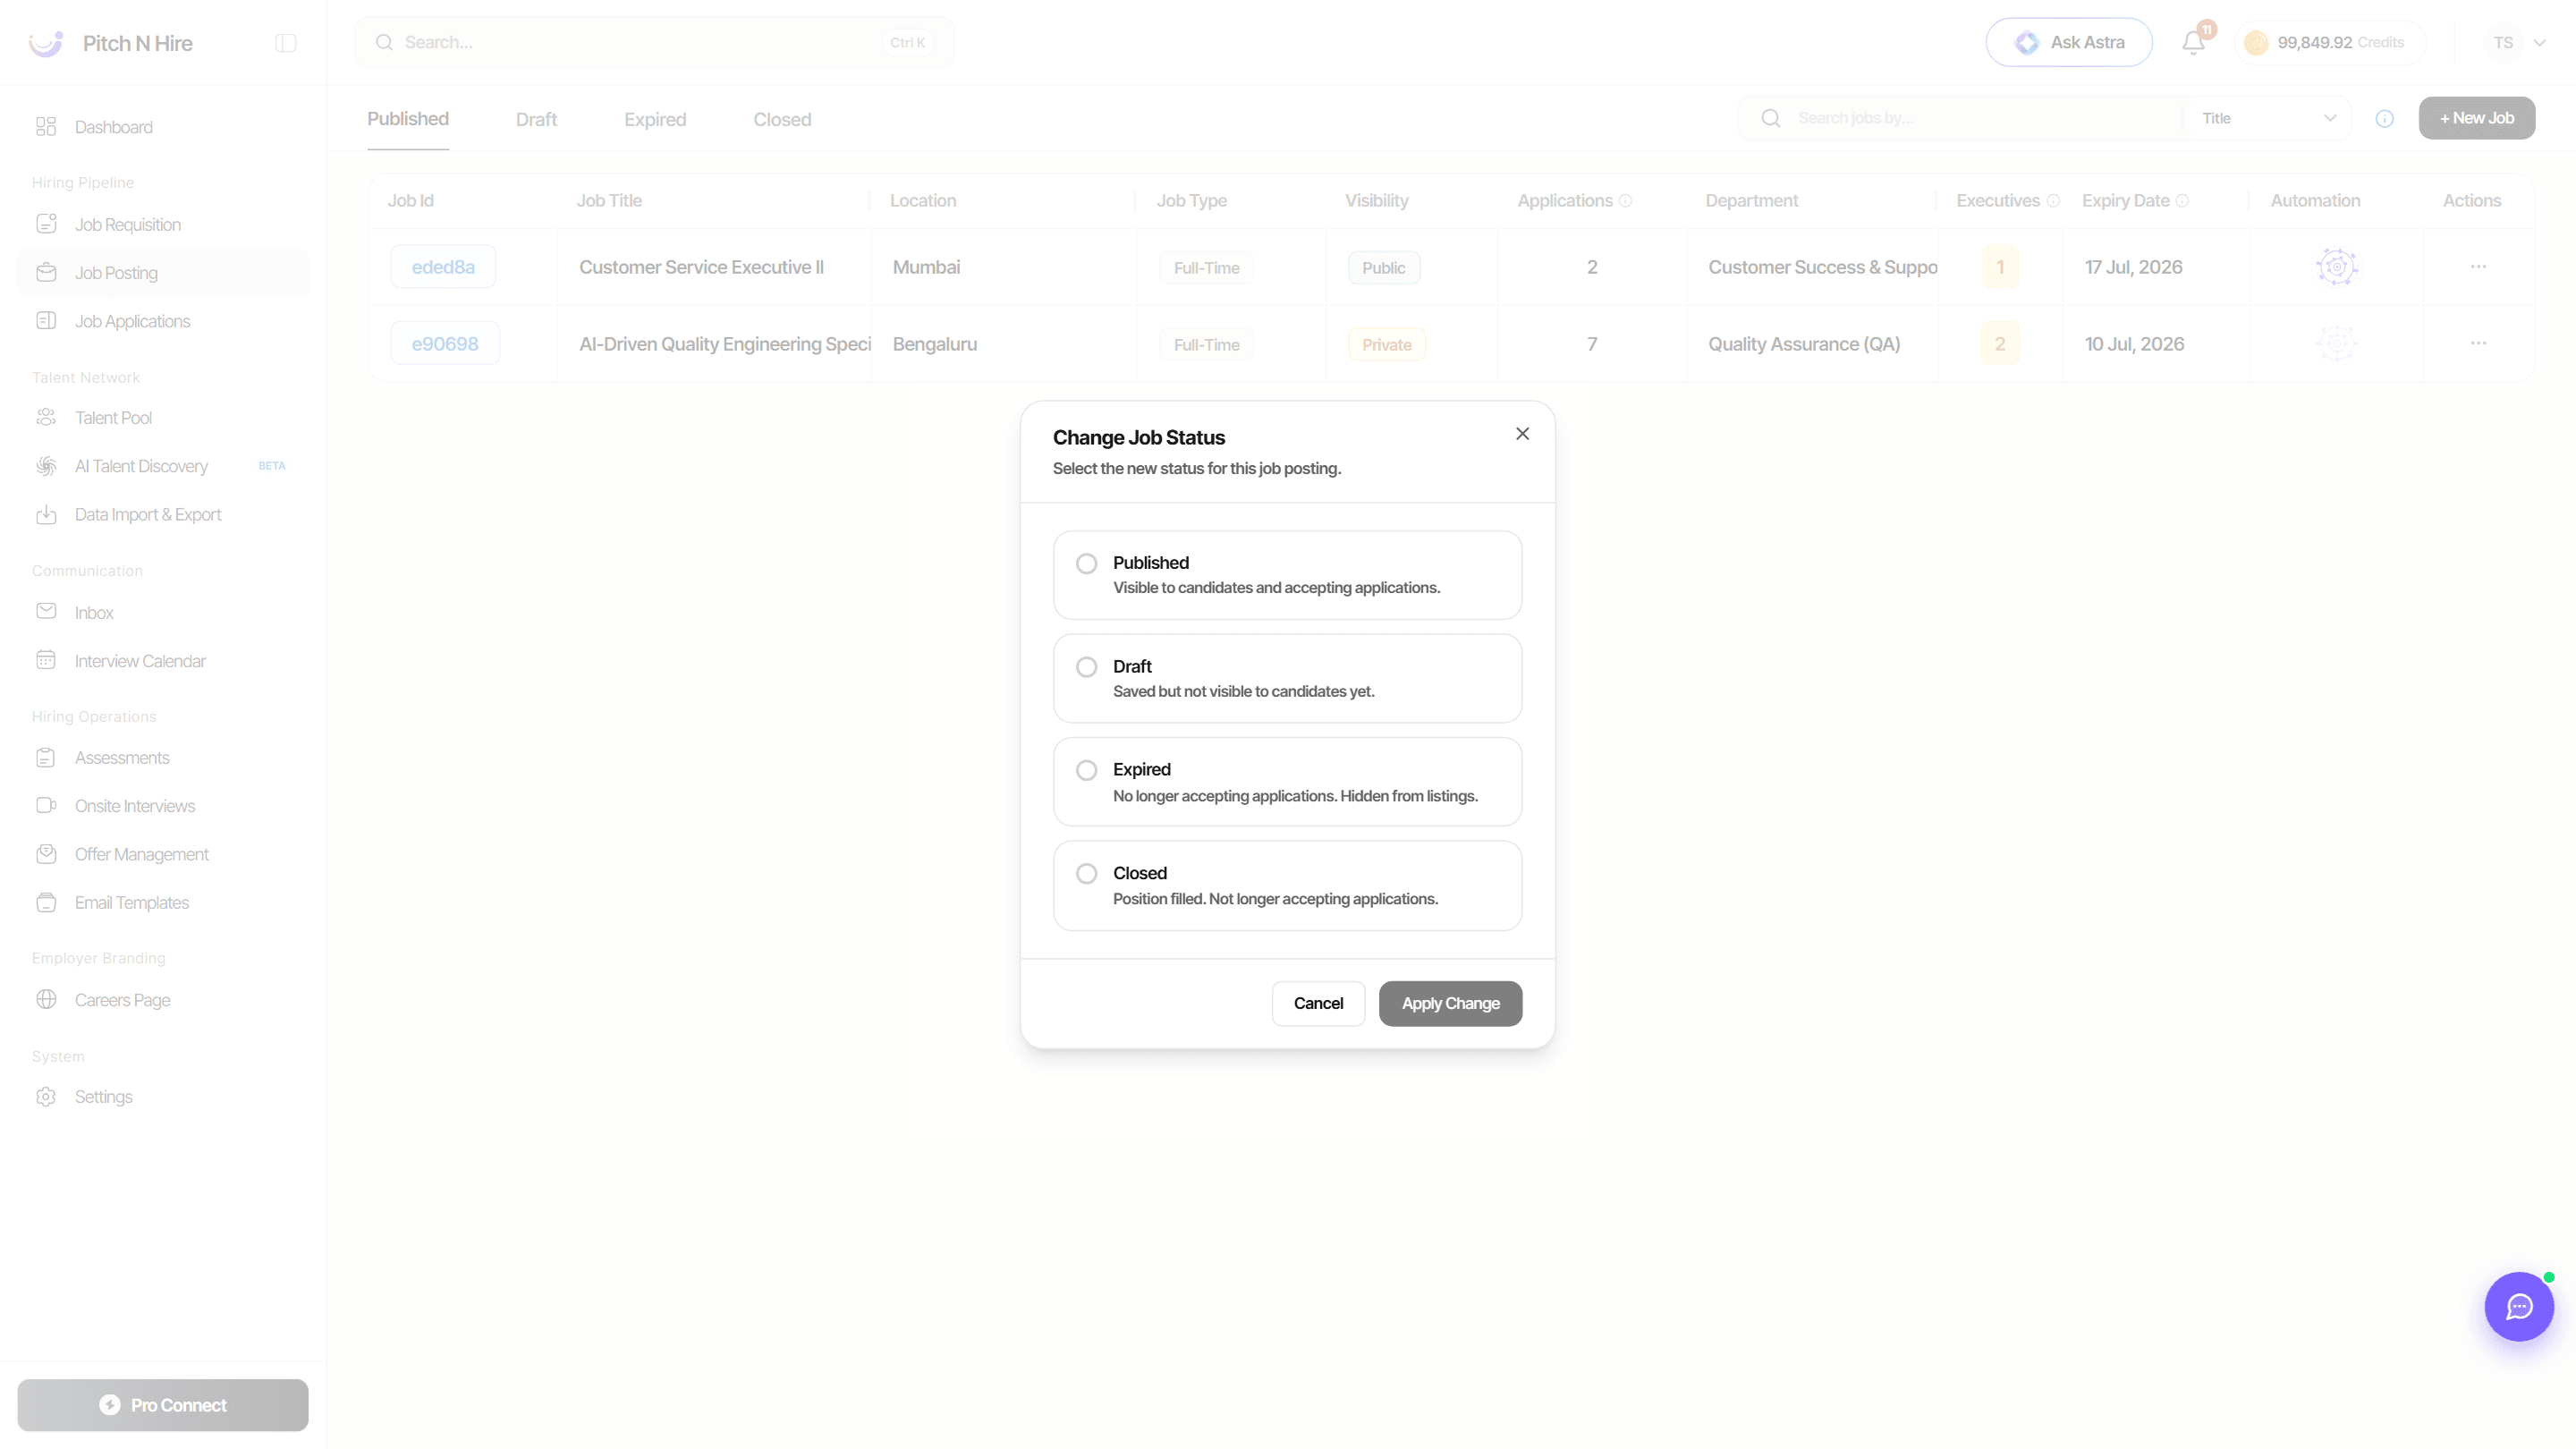
Change Status
Move a posting through its lifecycle: Published (visible and accepting applications), Draft (saved but hidden), Expired (no longer accepting, hidden from listings) or Closed (position filled). Pick a status and click Apply Change.
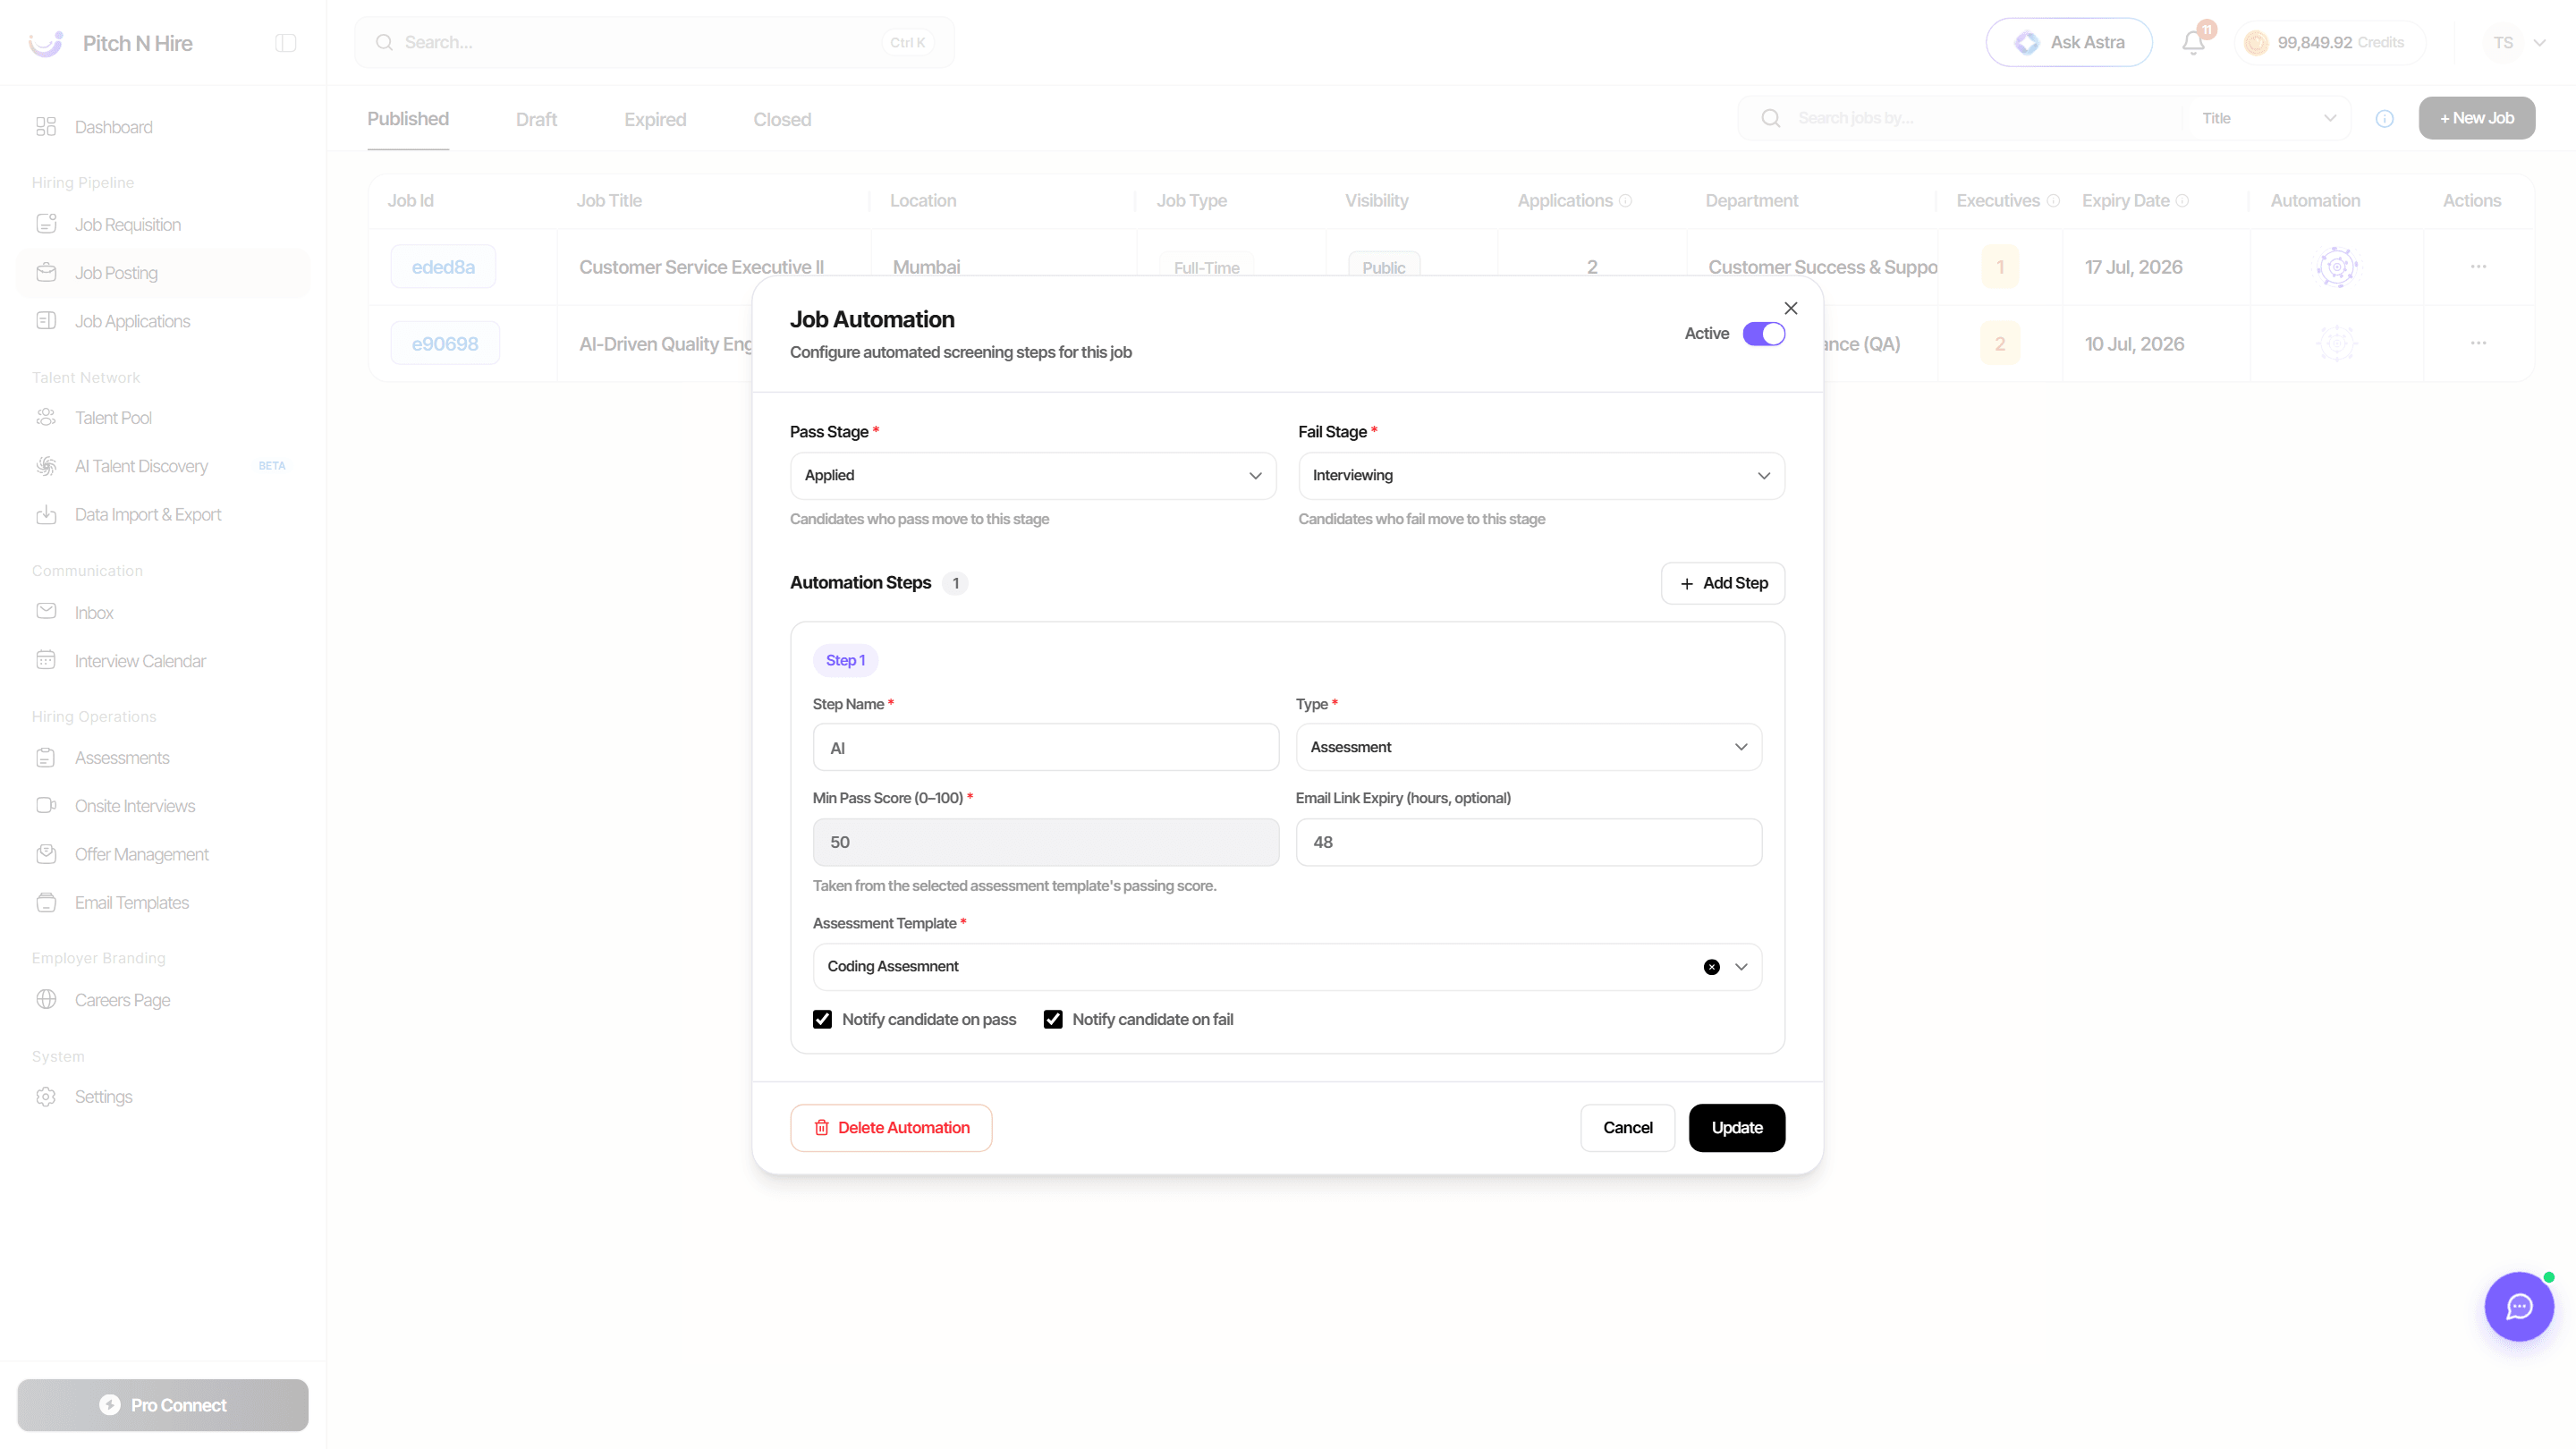
Job Automation
Configure automated screening for the job. Set a Pass Stage and Fail Stage, then add one or more Automation Steps — each with a Step Name, a Type (AI Score or Assessment), a Min Pass Score (0–100), and Notify candidate on pass / on fail options. Toggle the automation Active, then Create (or Update) it. Candidates who pass move to your Pass Stage; those who fail move to the Fail Stage.
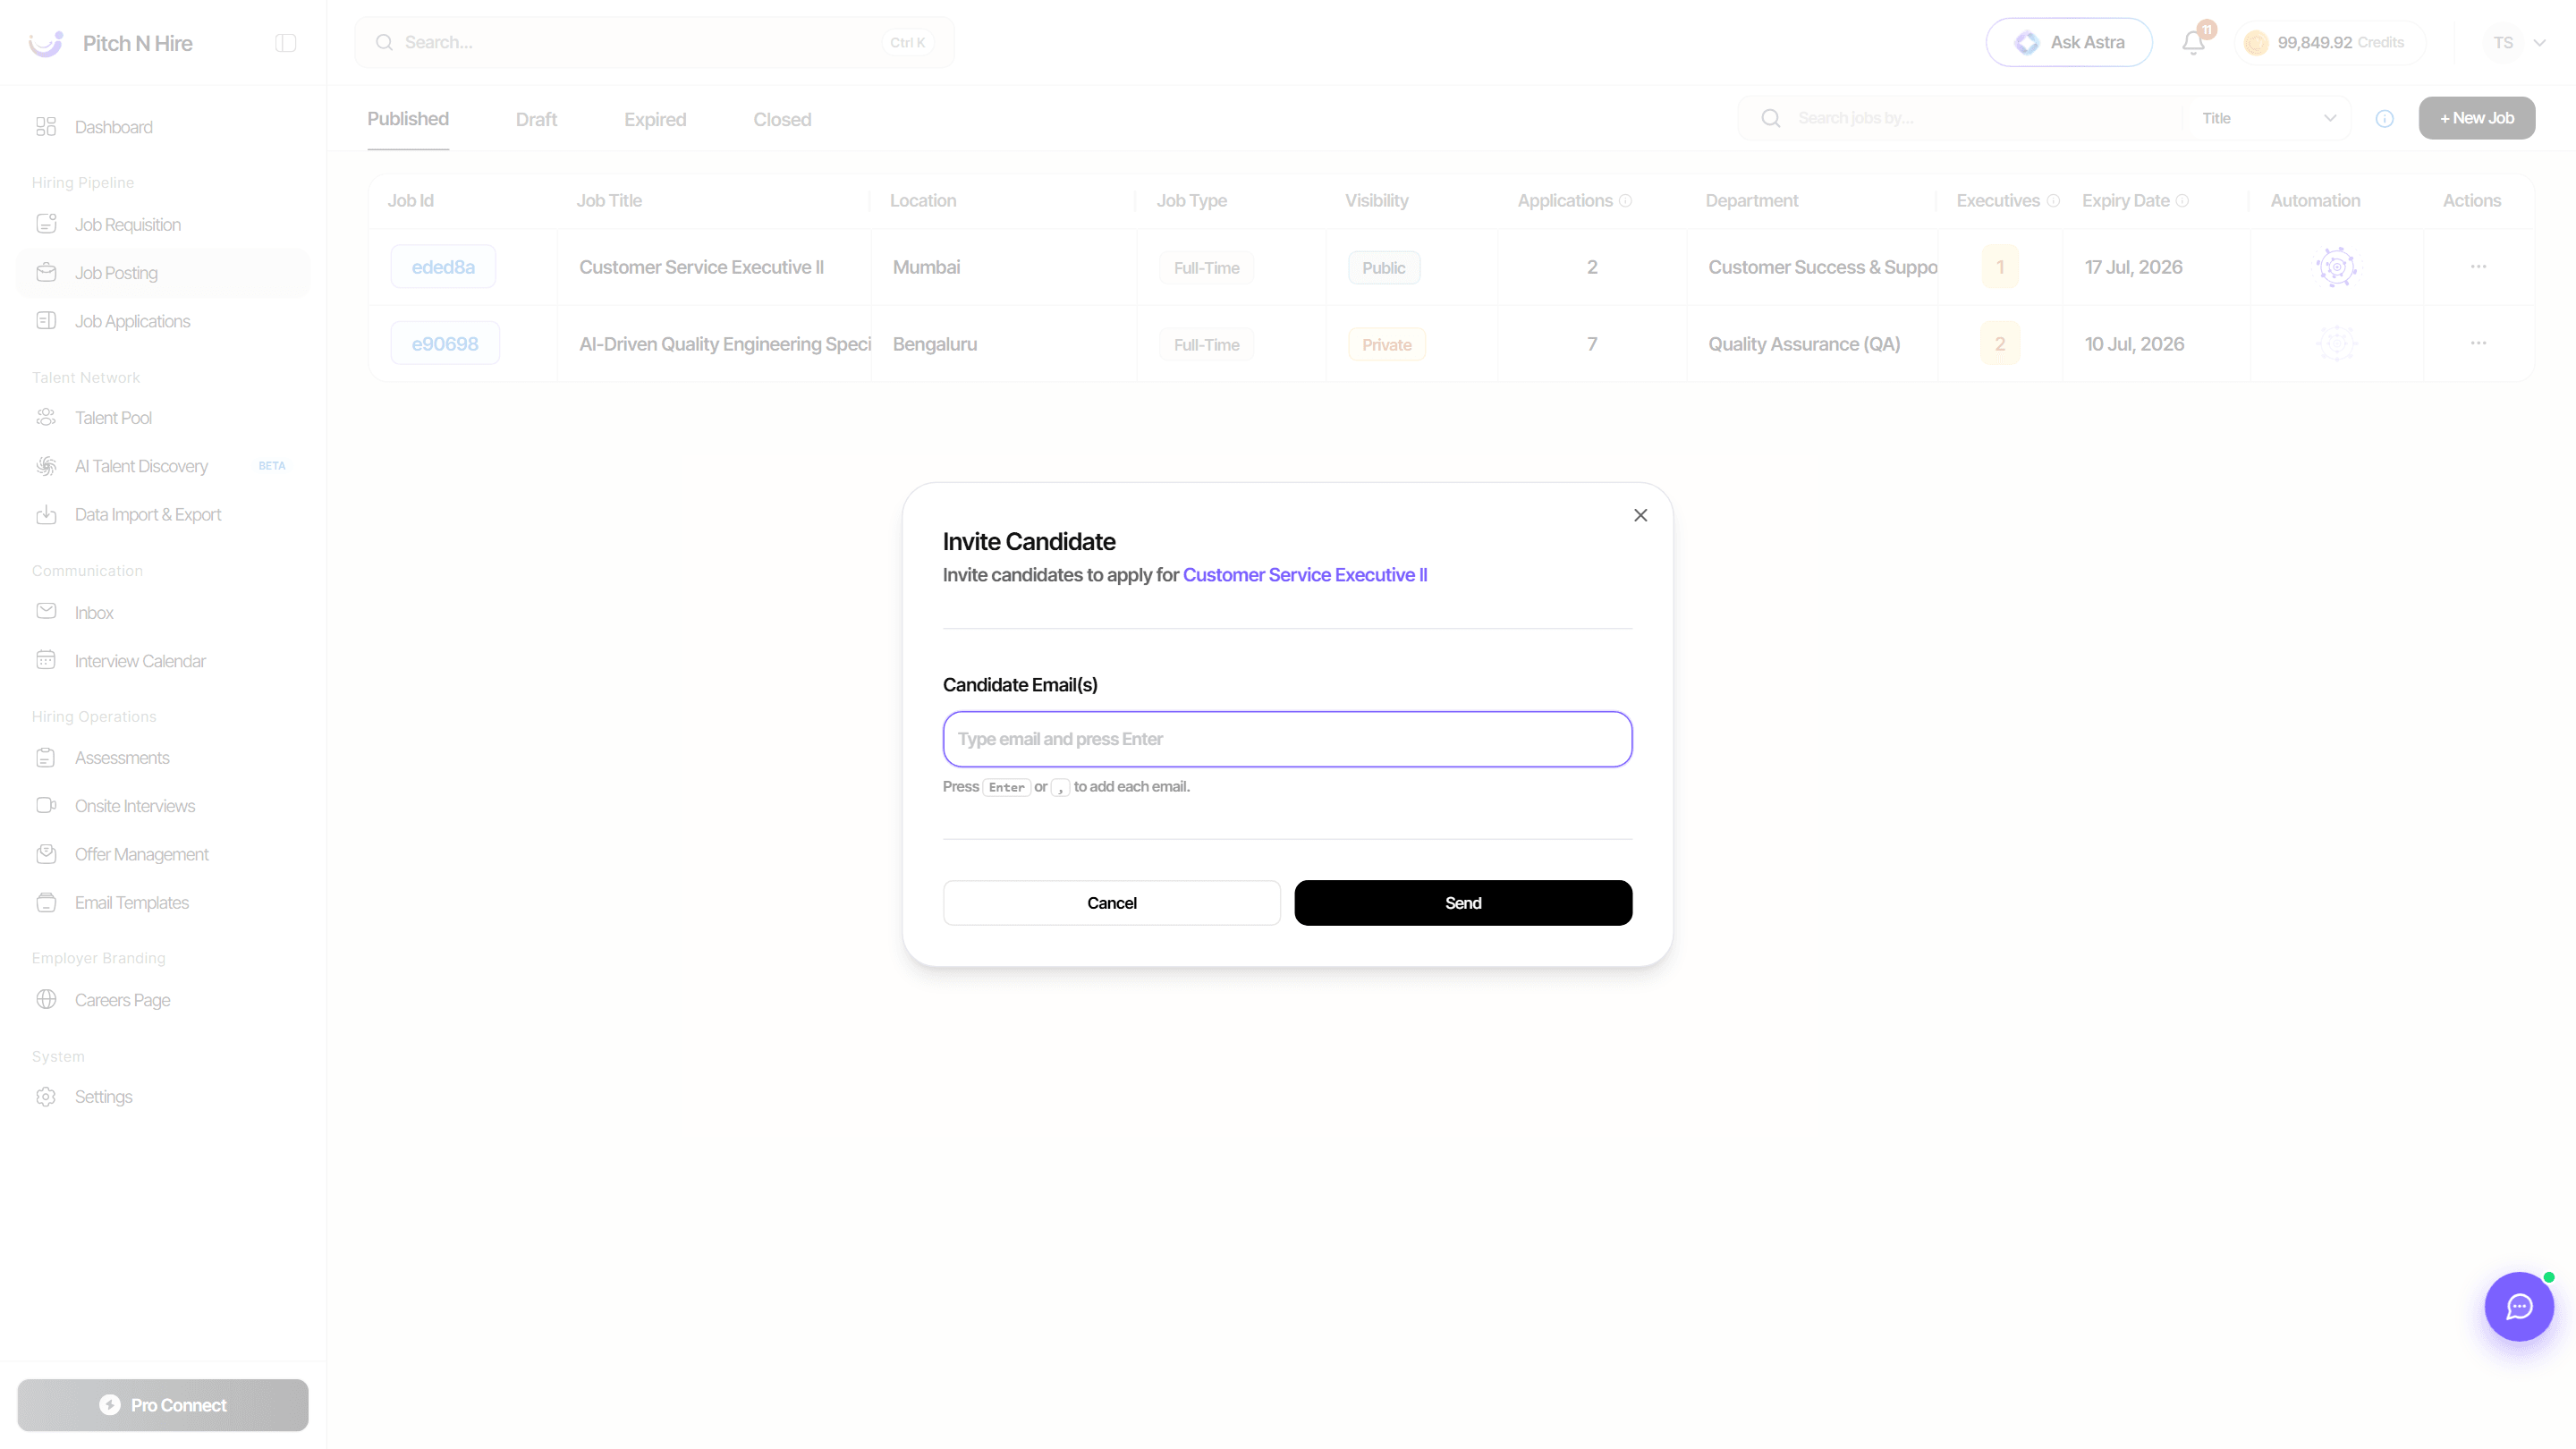
Invite Candidate
Invite people to apply directly. Enter one or more candidate emails (press Enter or comma to add each) and click Send — they receive a link to apply for that specific job.
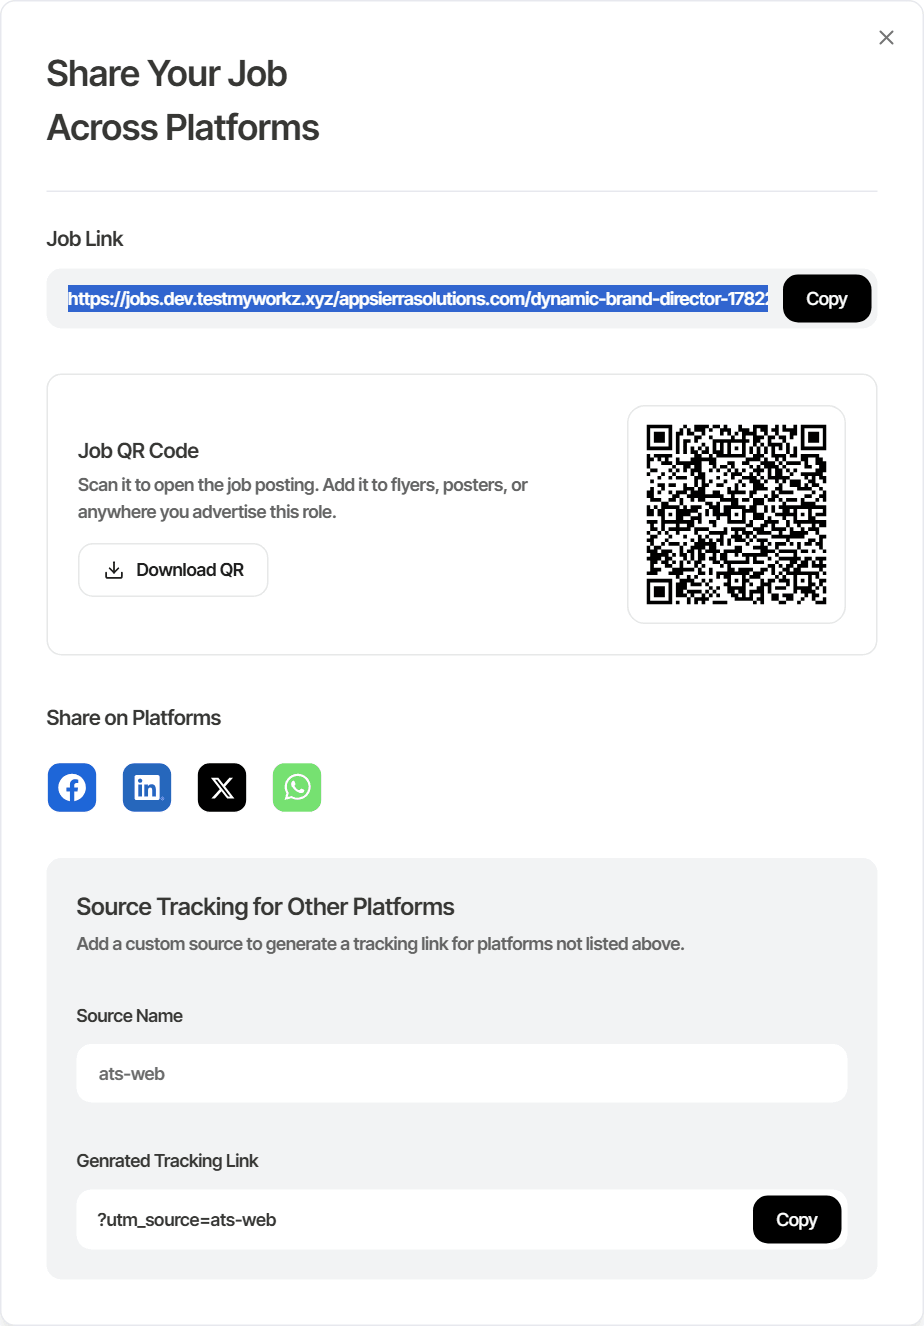
Share your job across platforms
The Share Your Job Across Platforms dialog gives you everything you need to promote a role:
- Job Link — copy the public job URL and paste it anywhere.
- Job QR Code — every posting now has its own scannable QR code. Click Download QR to save the image, then add it to flyers, posters, printed ads, event booths or anywhere you advertise the role — scanning it opens the job posting directly.
- Share on Platforms — post straight to Facebook, LinkedIn, X or WhatsApp with one click.
- Source Tracking for Other Platforms — enter a custom Source Name to generate a
?utm_source=…tracking link, so you can measure where applicants come from on channels that aren’t listed above.
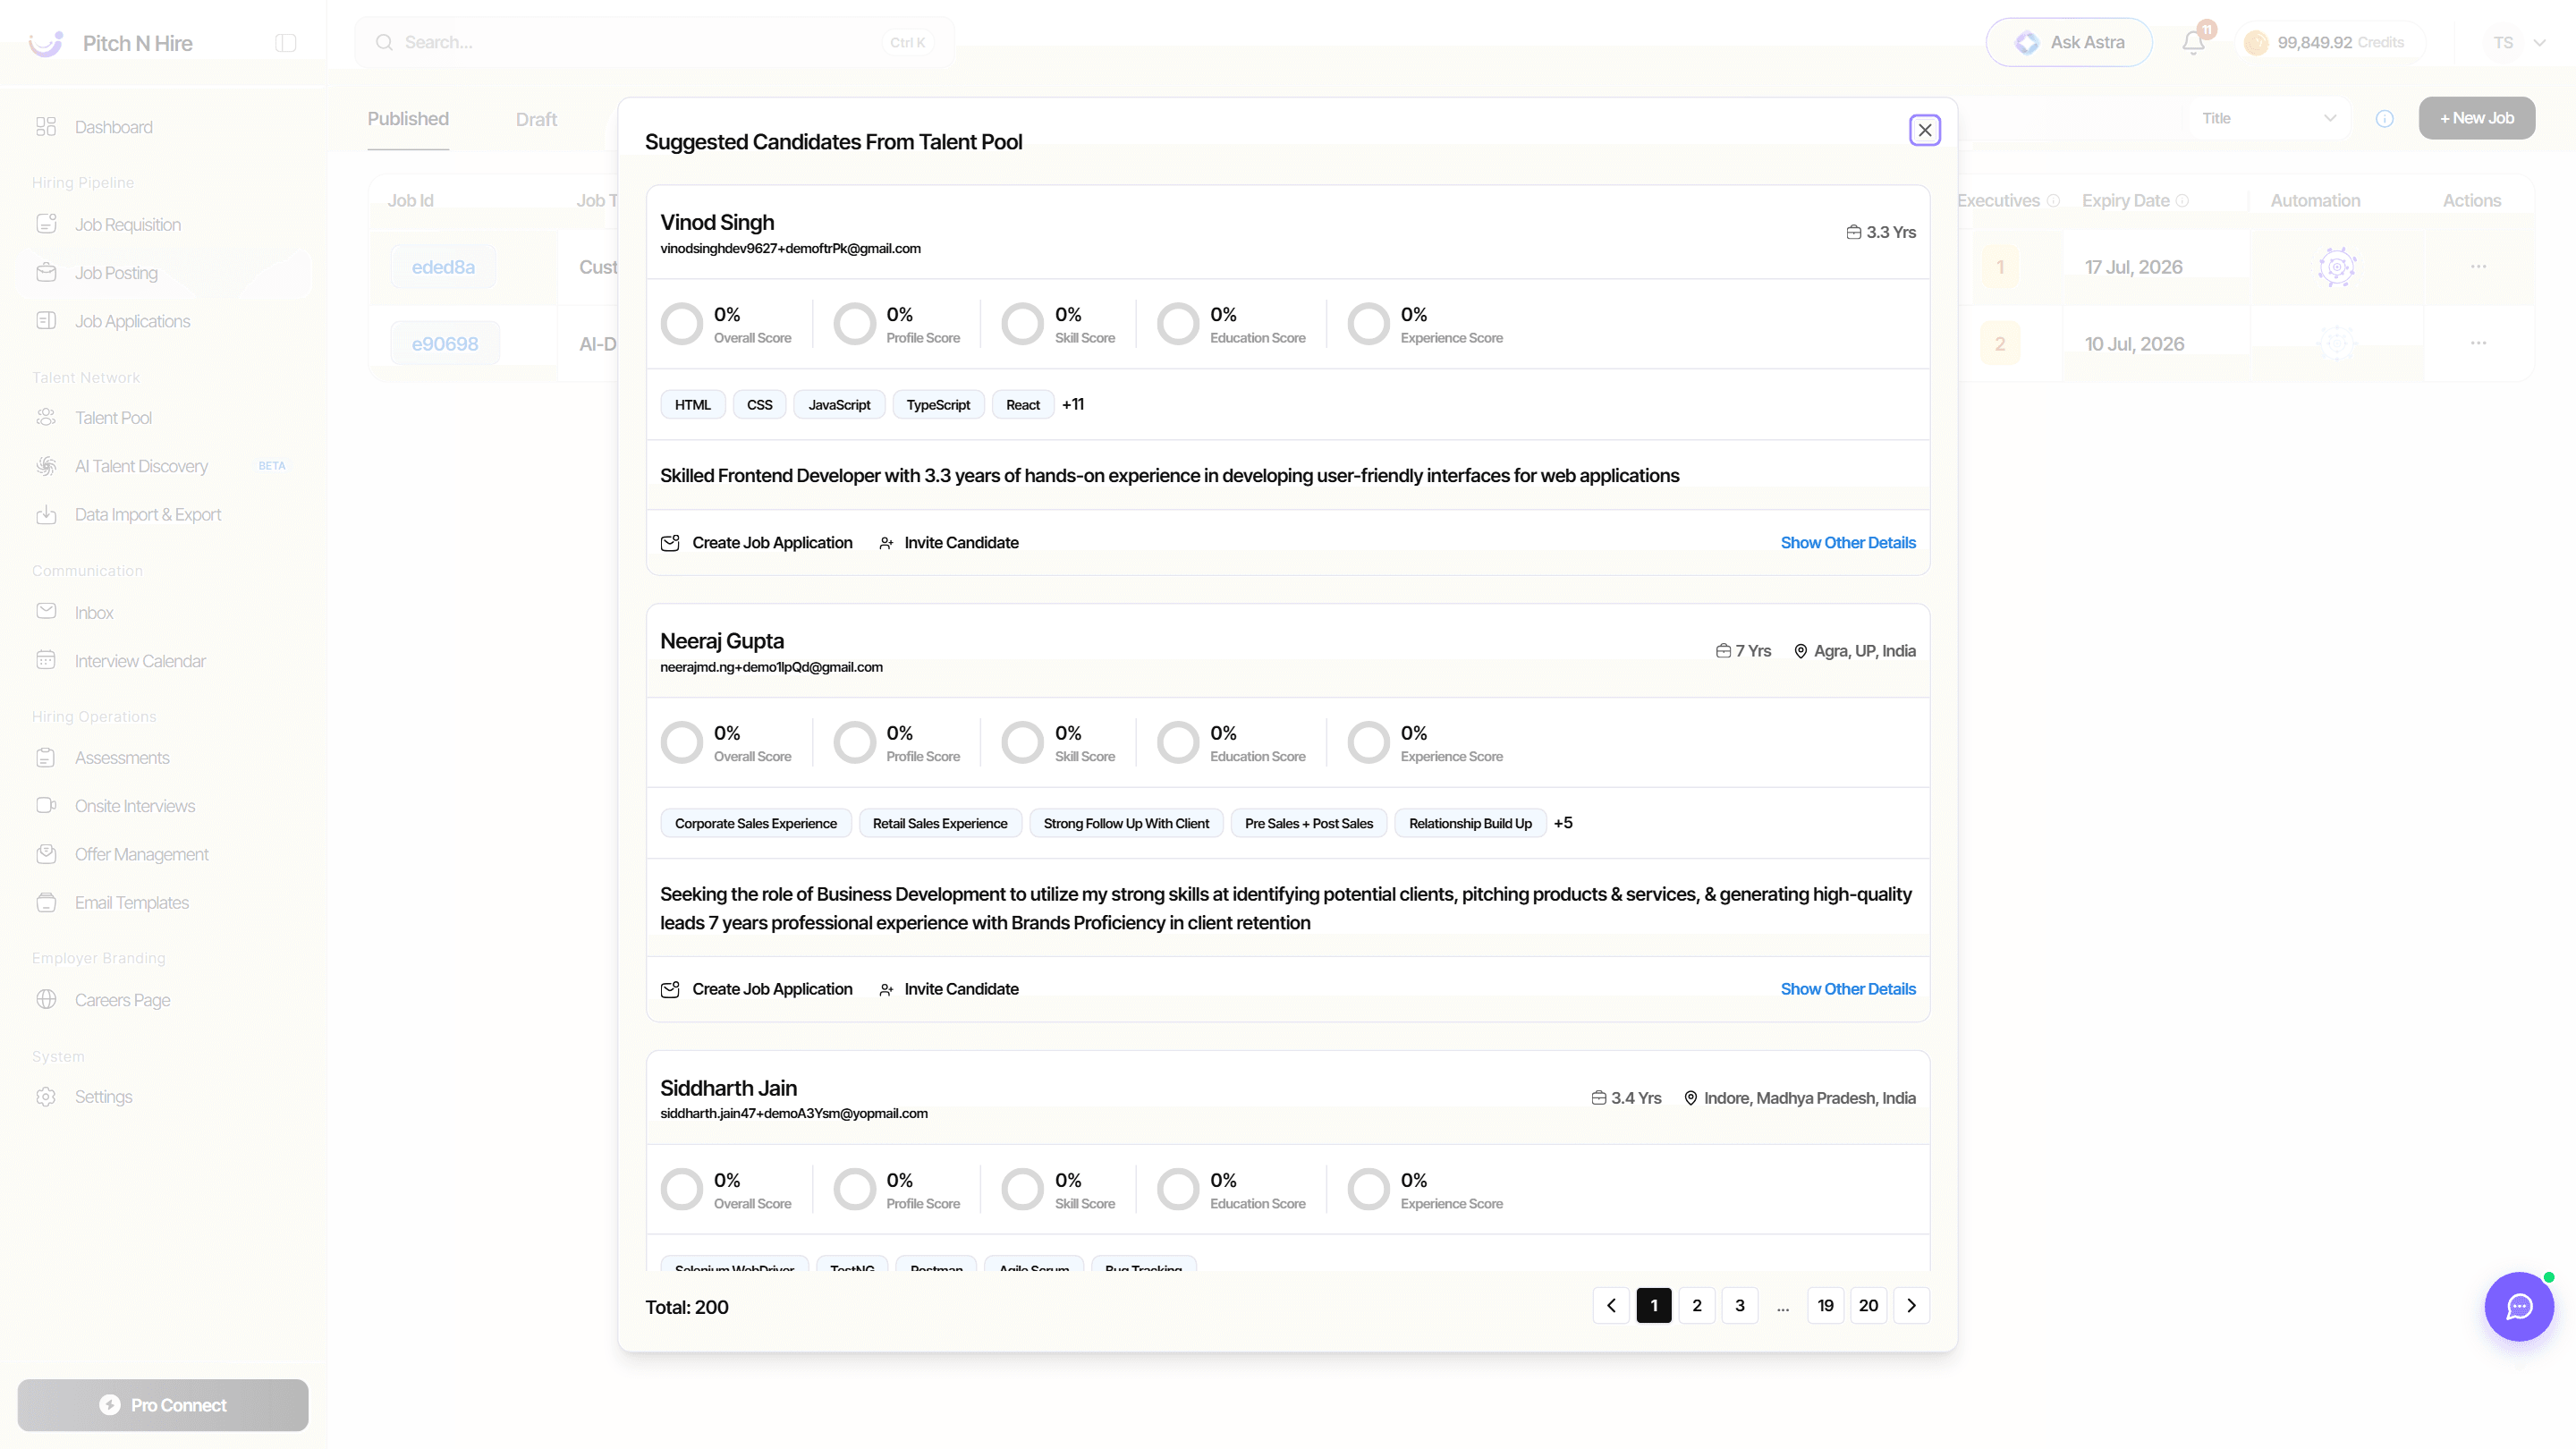
Suggested Candidates
Pull a ranked shortlist from your Talent Pool for this role. Each suggestion shows an Overall, Profile, Skill, Education and Experience score, top skills and a summary, with quick Create Job Application and Invite Candidate actions.
Share Bulk Talent
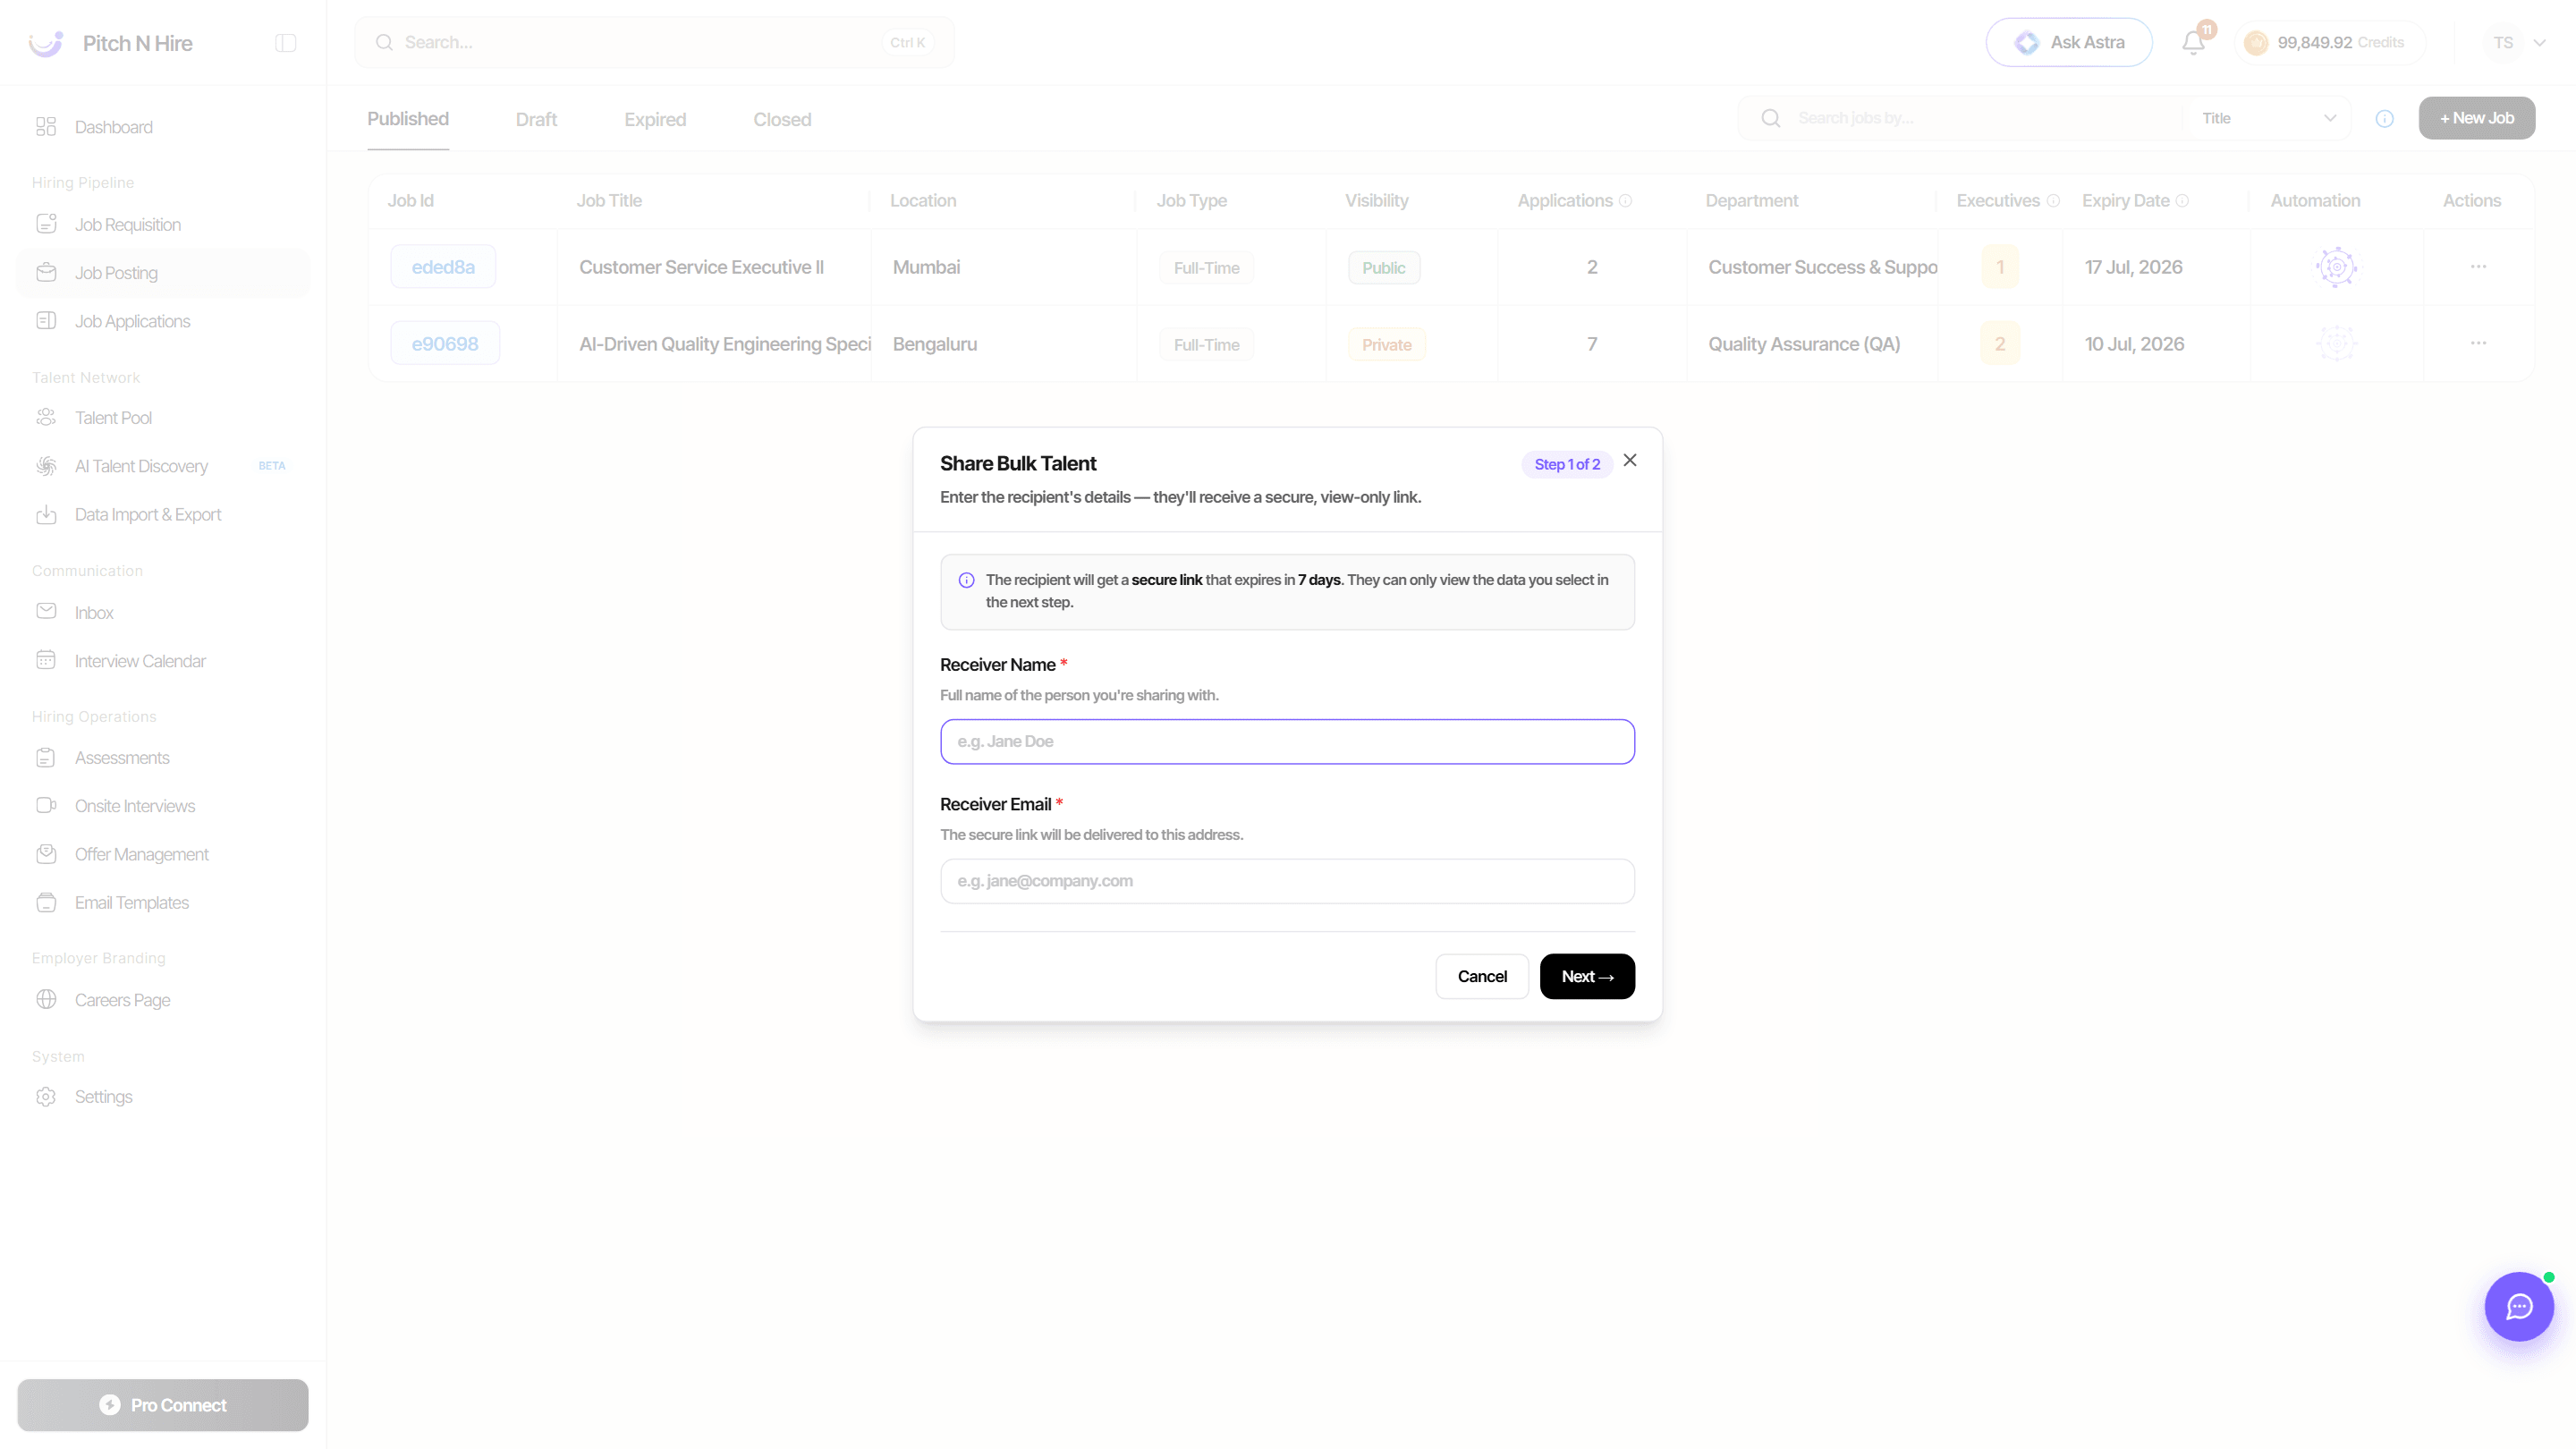
Send a shortlist to an external reviewer (for example a hiring manager or client) for feedback. Enter the Receiver Name and Receiver Email; they get a secure, view-only link that expires in 7 days and shows only the data you choose in the next step.
Tips
Common issues & fixes
- Job not showing on the career page - visibility is Private or “Show on Career Page” is off - set visibility to Public and enable the career-page option, then publish.
- Cannot set a Status on a new job - the job has not been saved yet - click Save & Continue first, then set the status.
- Posting missing from a tab - it is in a different lifecycle stage - check the Draft, Expired or Closed tabs.
- Slug looks wrong in the URL - it auto-generated from an earlier title - edit the Job Title (or slug) and re-save before publishing.