Job Applications
Job Applications is where you review everyone who has applied to a given role and move them through your hiring process. You can work in two ways — a sortable Table View for scanning and bulk actions, or a drag-and-drop Pipeline View (Kanban board) for progressing candidates through stages. Every applicant carries an AI match score, automation status and recent assessments, so reviewing, filtering and actioning candidates all happen in one place.
Overview
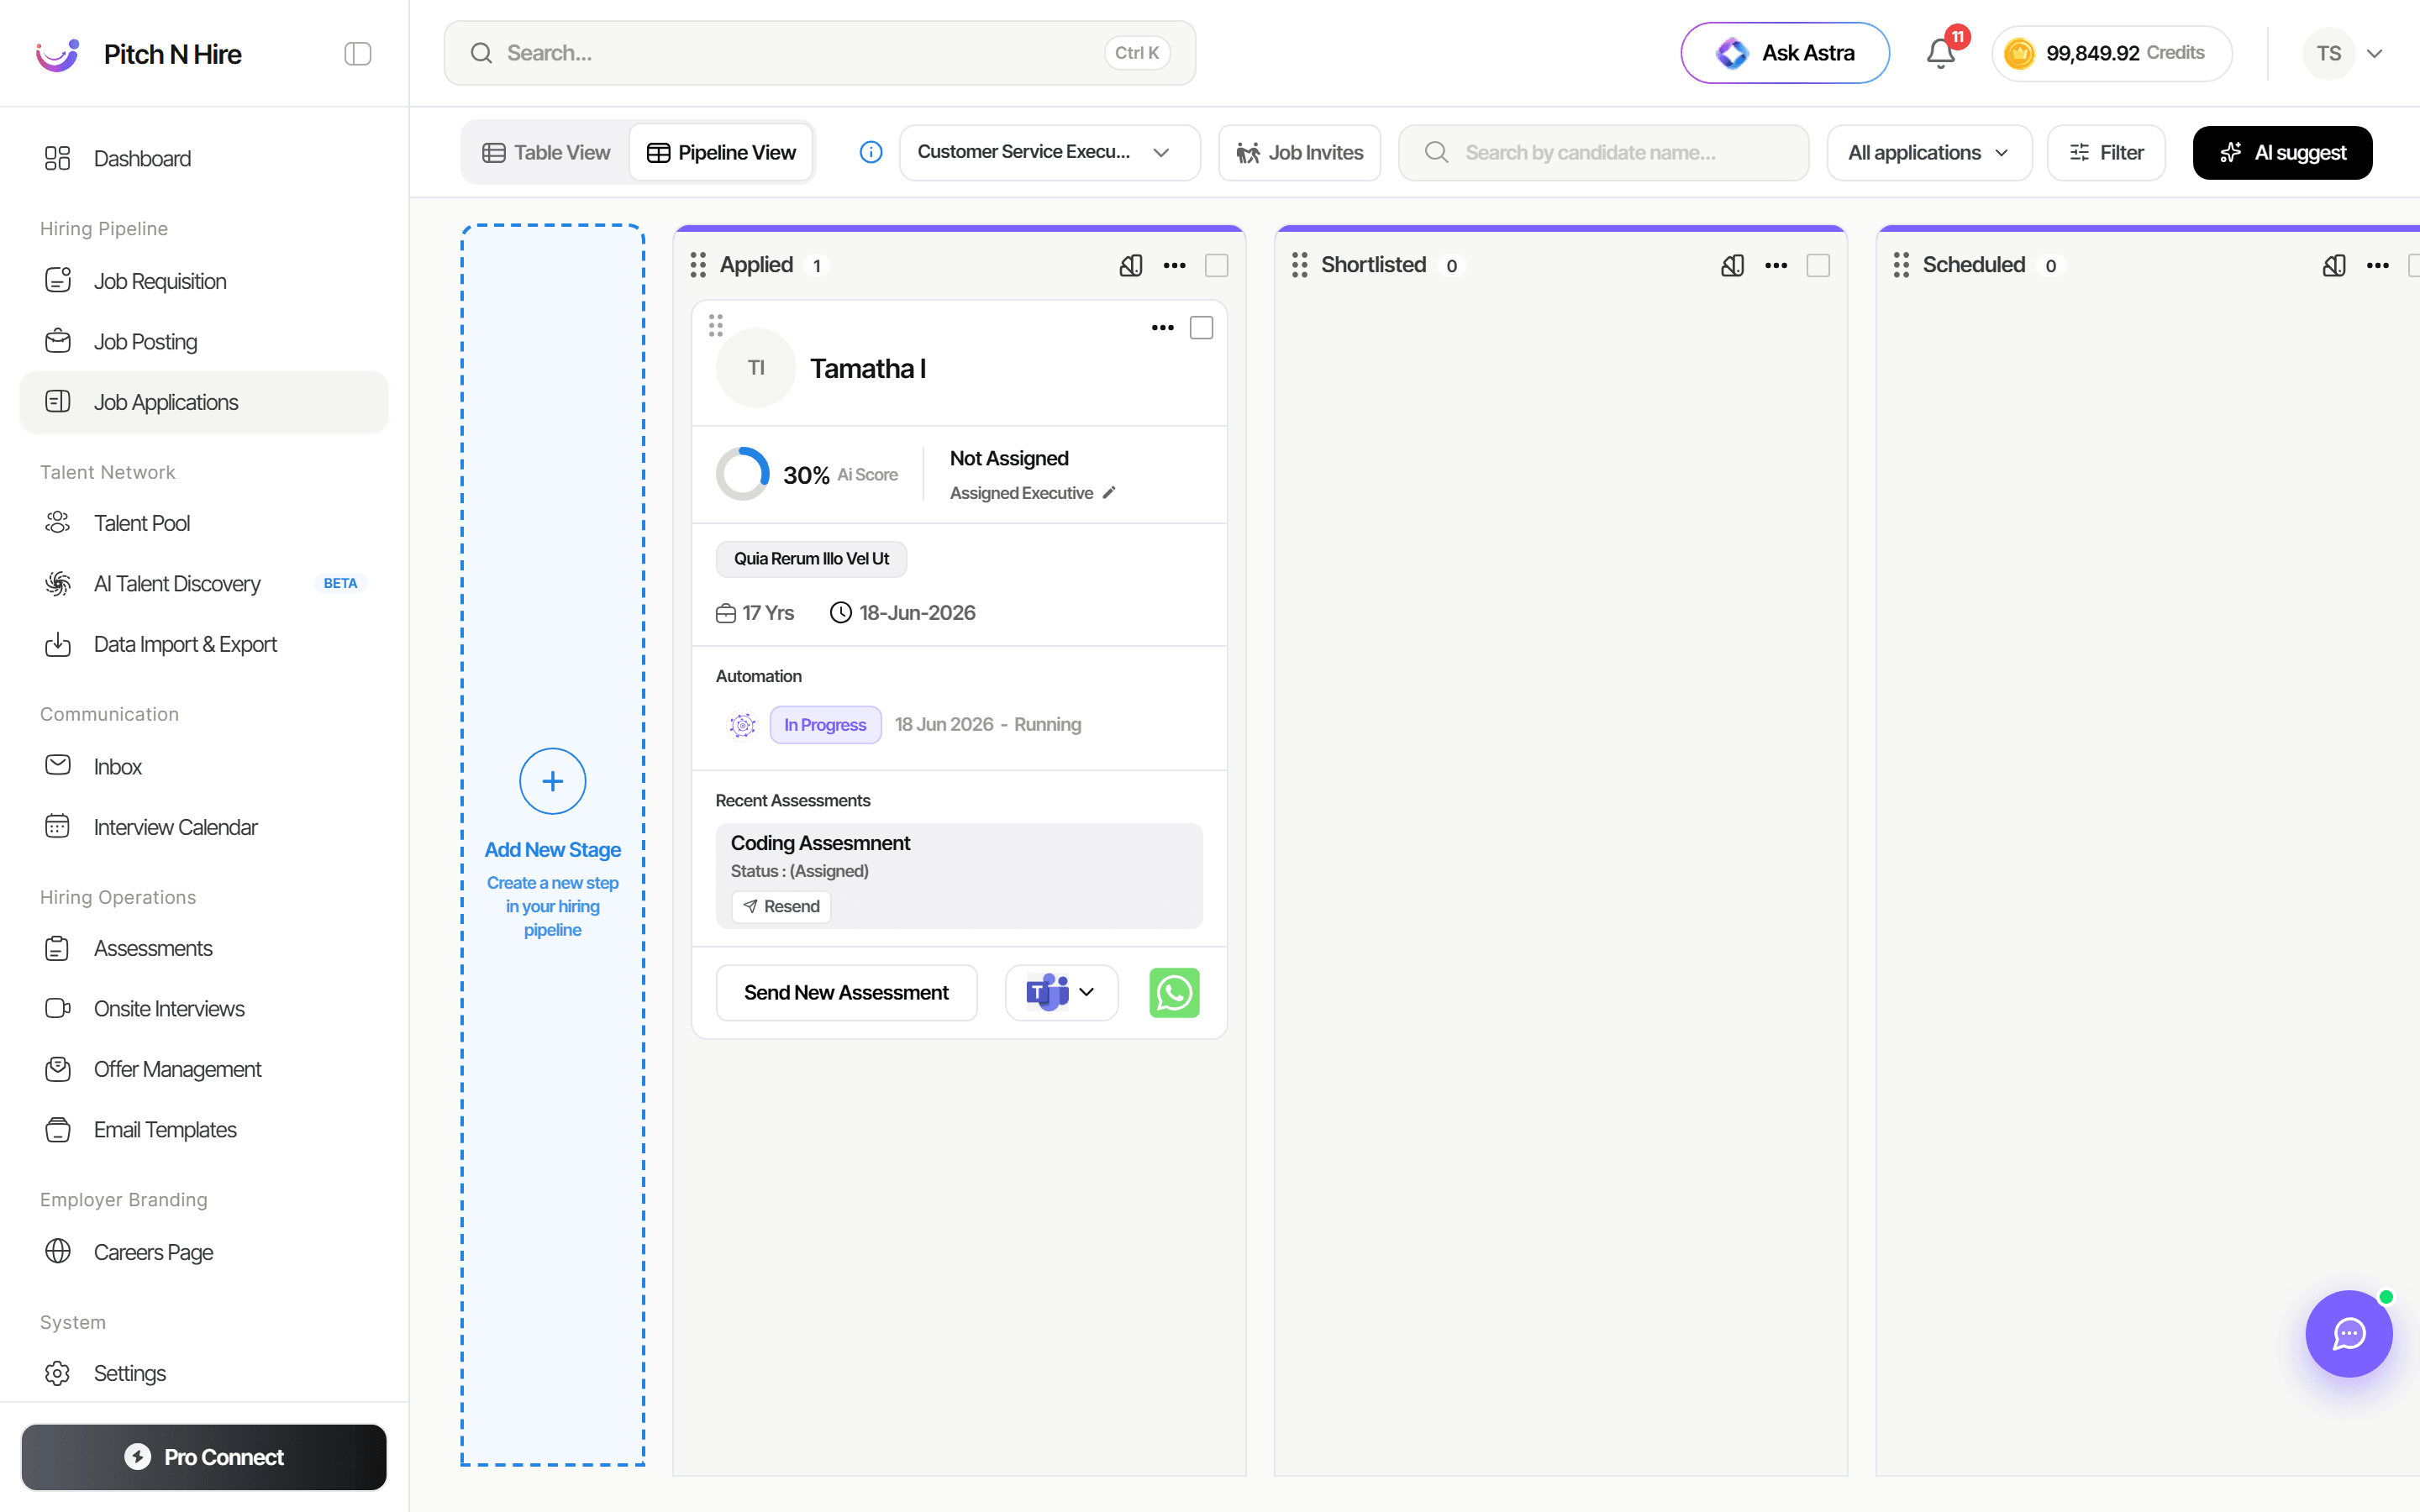
The toolbar at the top lets you toggle Table View / Pipeline View, open Rapid View to review applicants one by one, switch jobs from a dropdown, send Job Invites, pick Columns, search by candidate name, scope with All applications, open Filter, and run AI suggest. Below it, applicants appear either as table rows or as cards grouped into stage columns (Applied, Shortlisted, Scheduled, Interviewing, Qualified, plus any custom stages) — each with a live count.
The two views
Table View
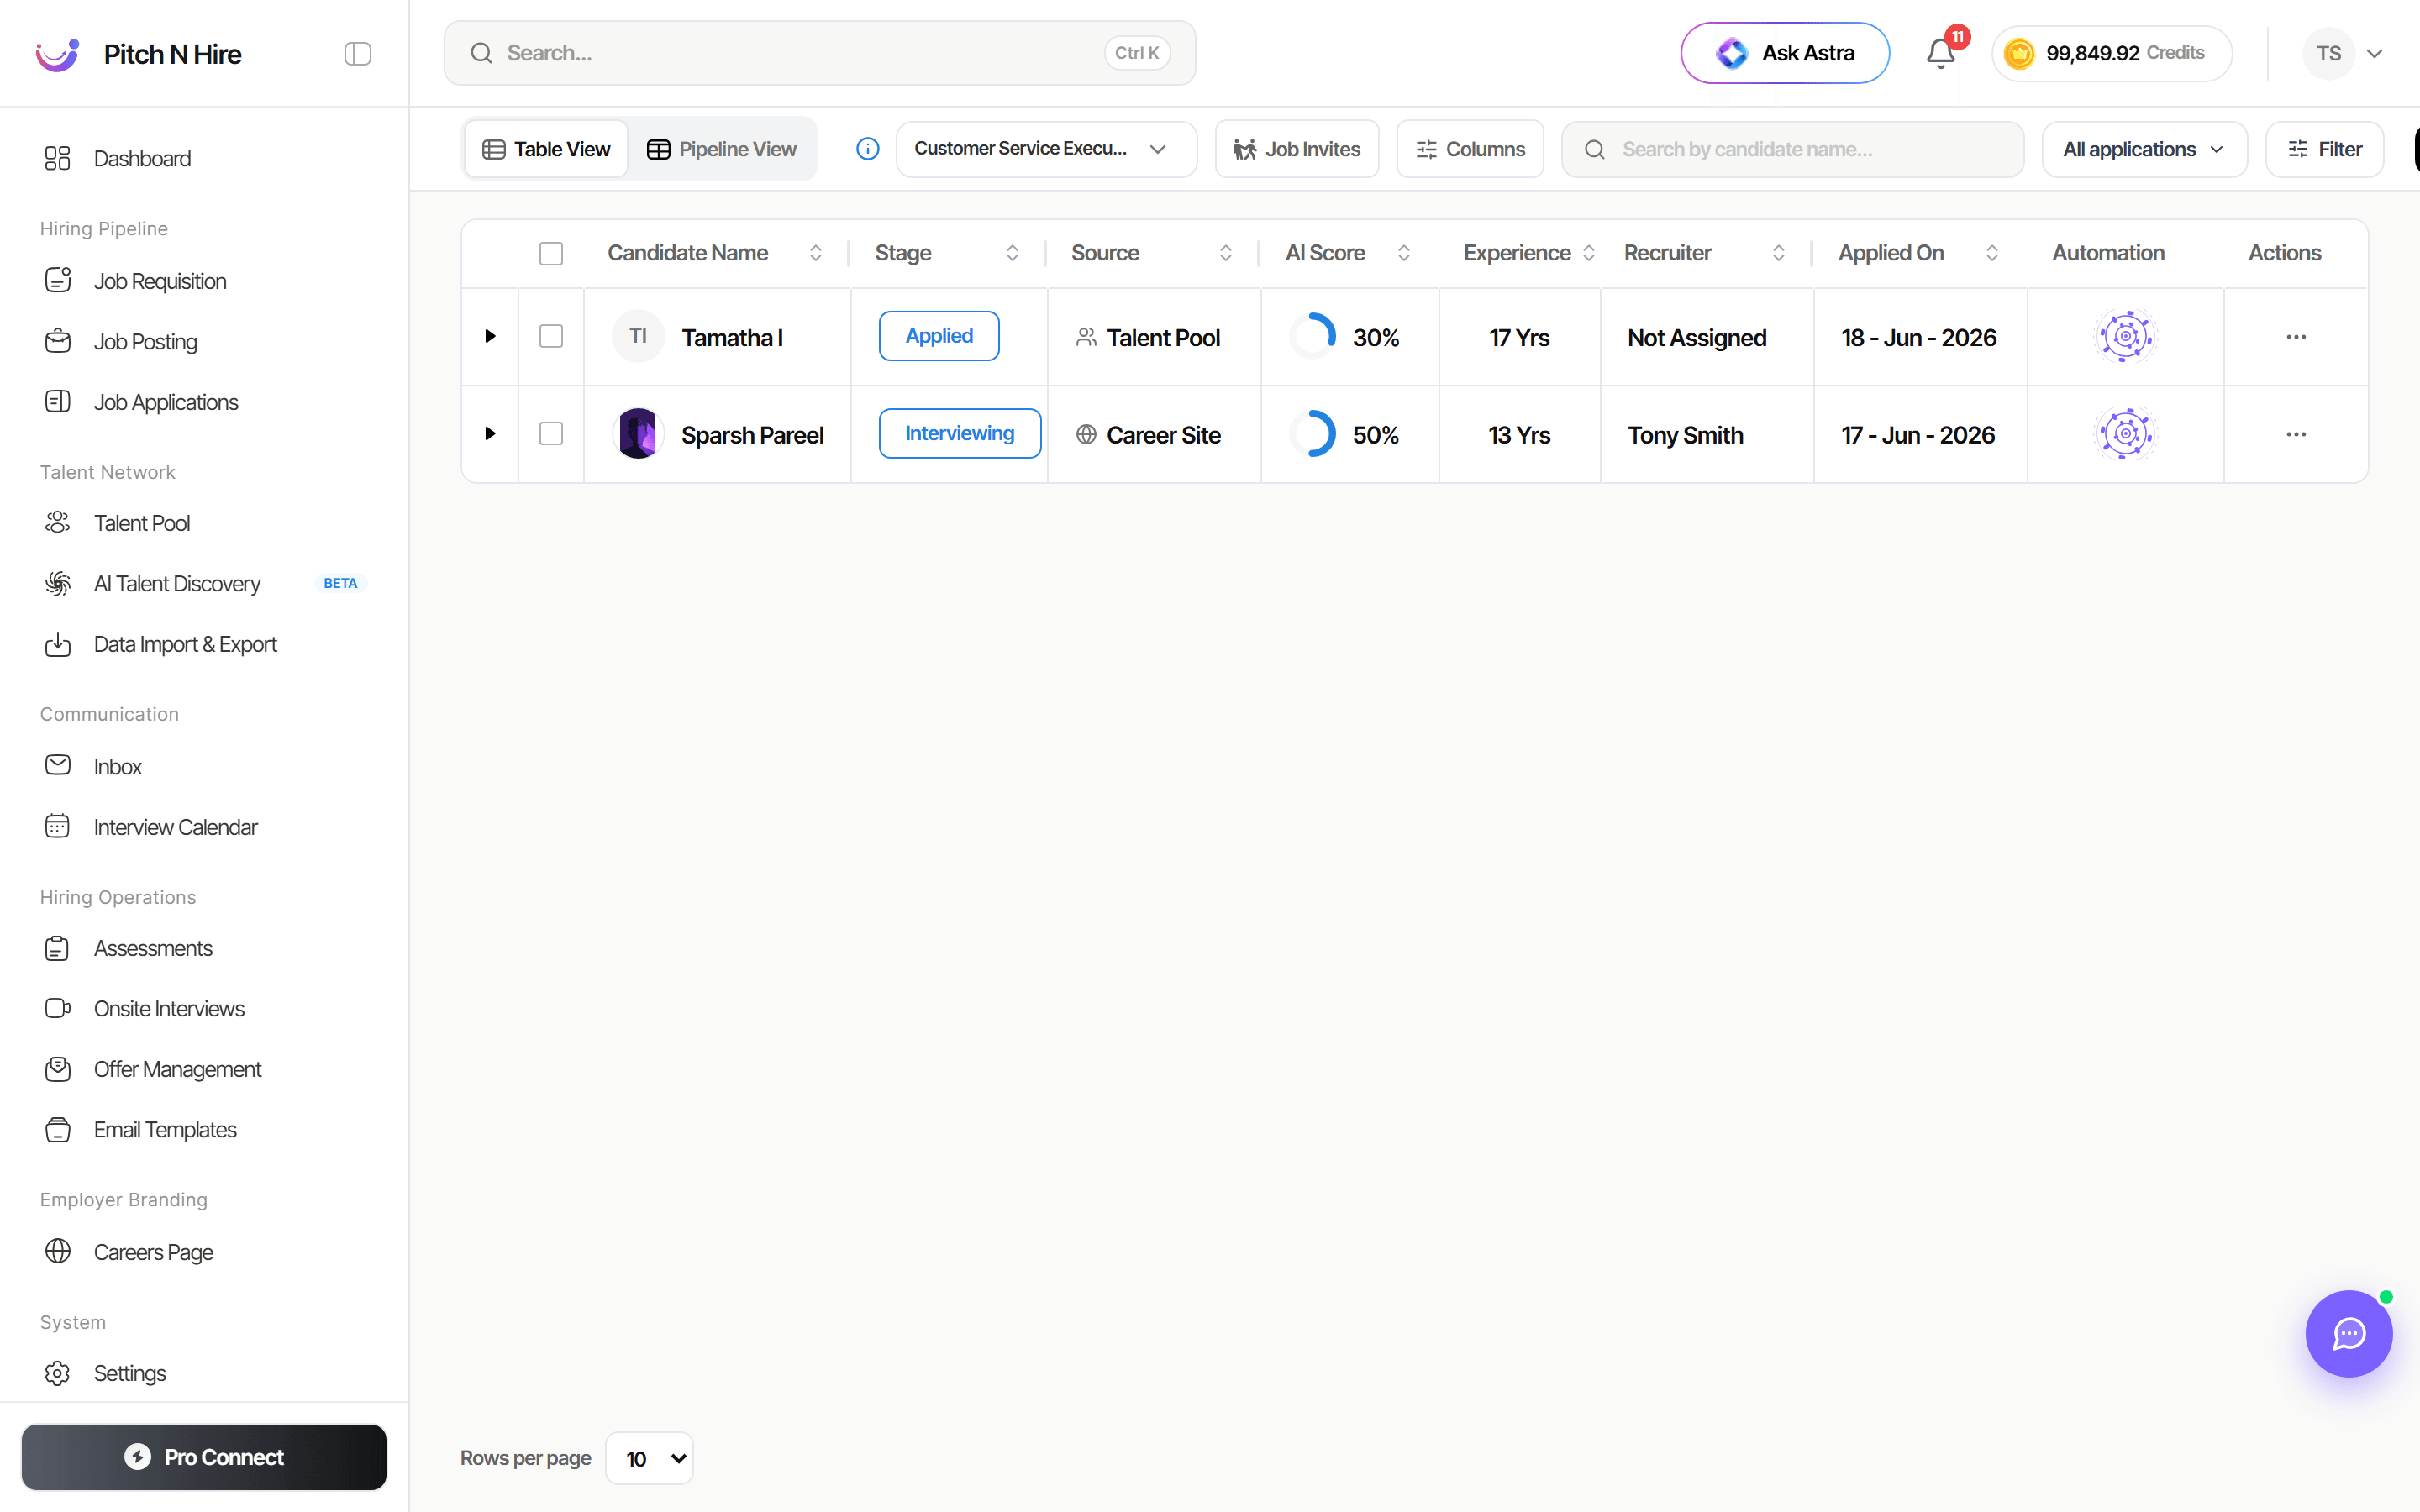
Table View lists every applicant in a sortable grid with columns for Candidate Name, Stage, Source, AI Score, Experience, Recruiter, Applied On, Automation and Actions. Click any column header to sort, expand a row with the chevron, and select candidates with the row checkboxes for bulk actions.
Add more columns
Use Columns in the toolbar to tailor the table. You can add Email, Phone, City, State, Country, Address, Zip Code, Gender and Date of Birth so the grid shows exactly the candidate data you need.
Pipeline View
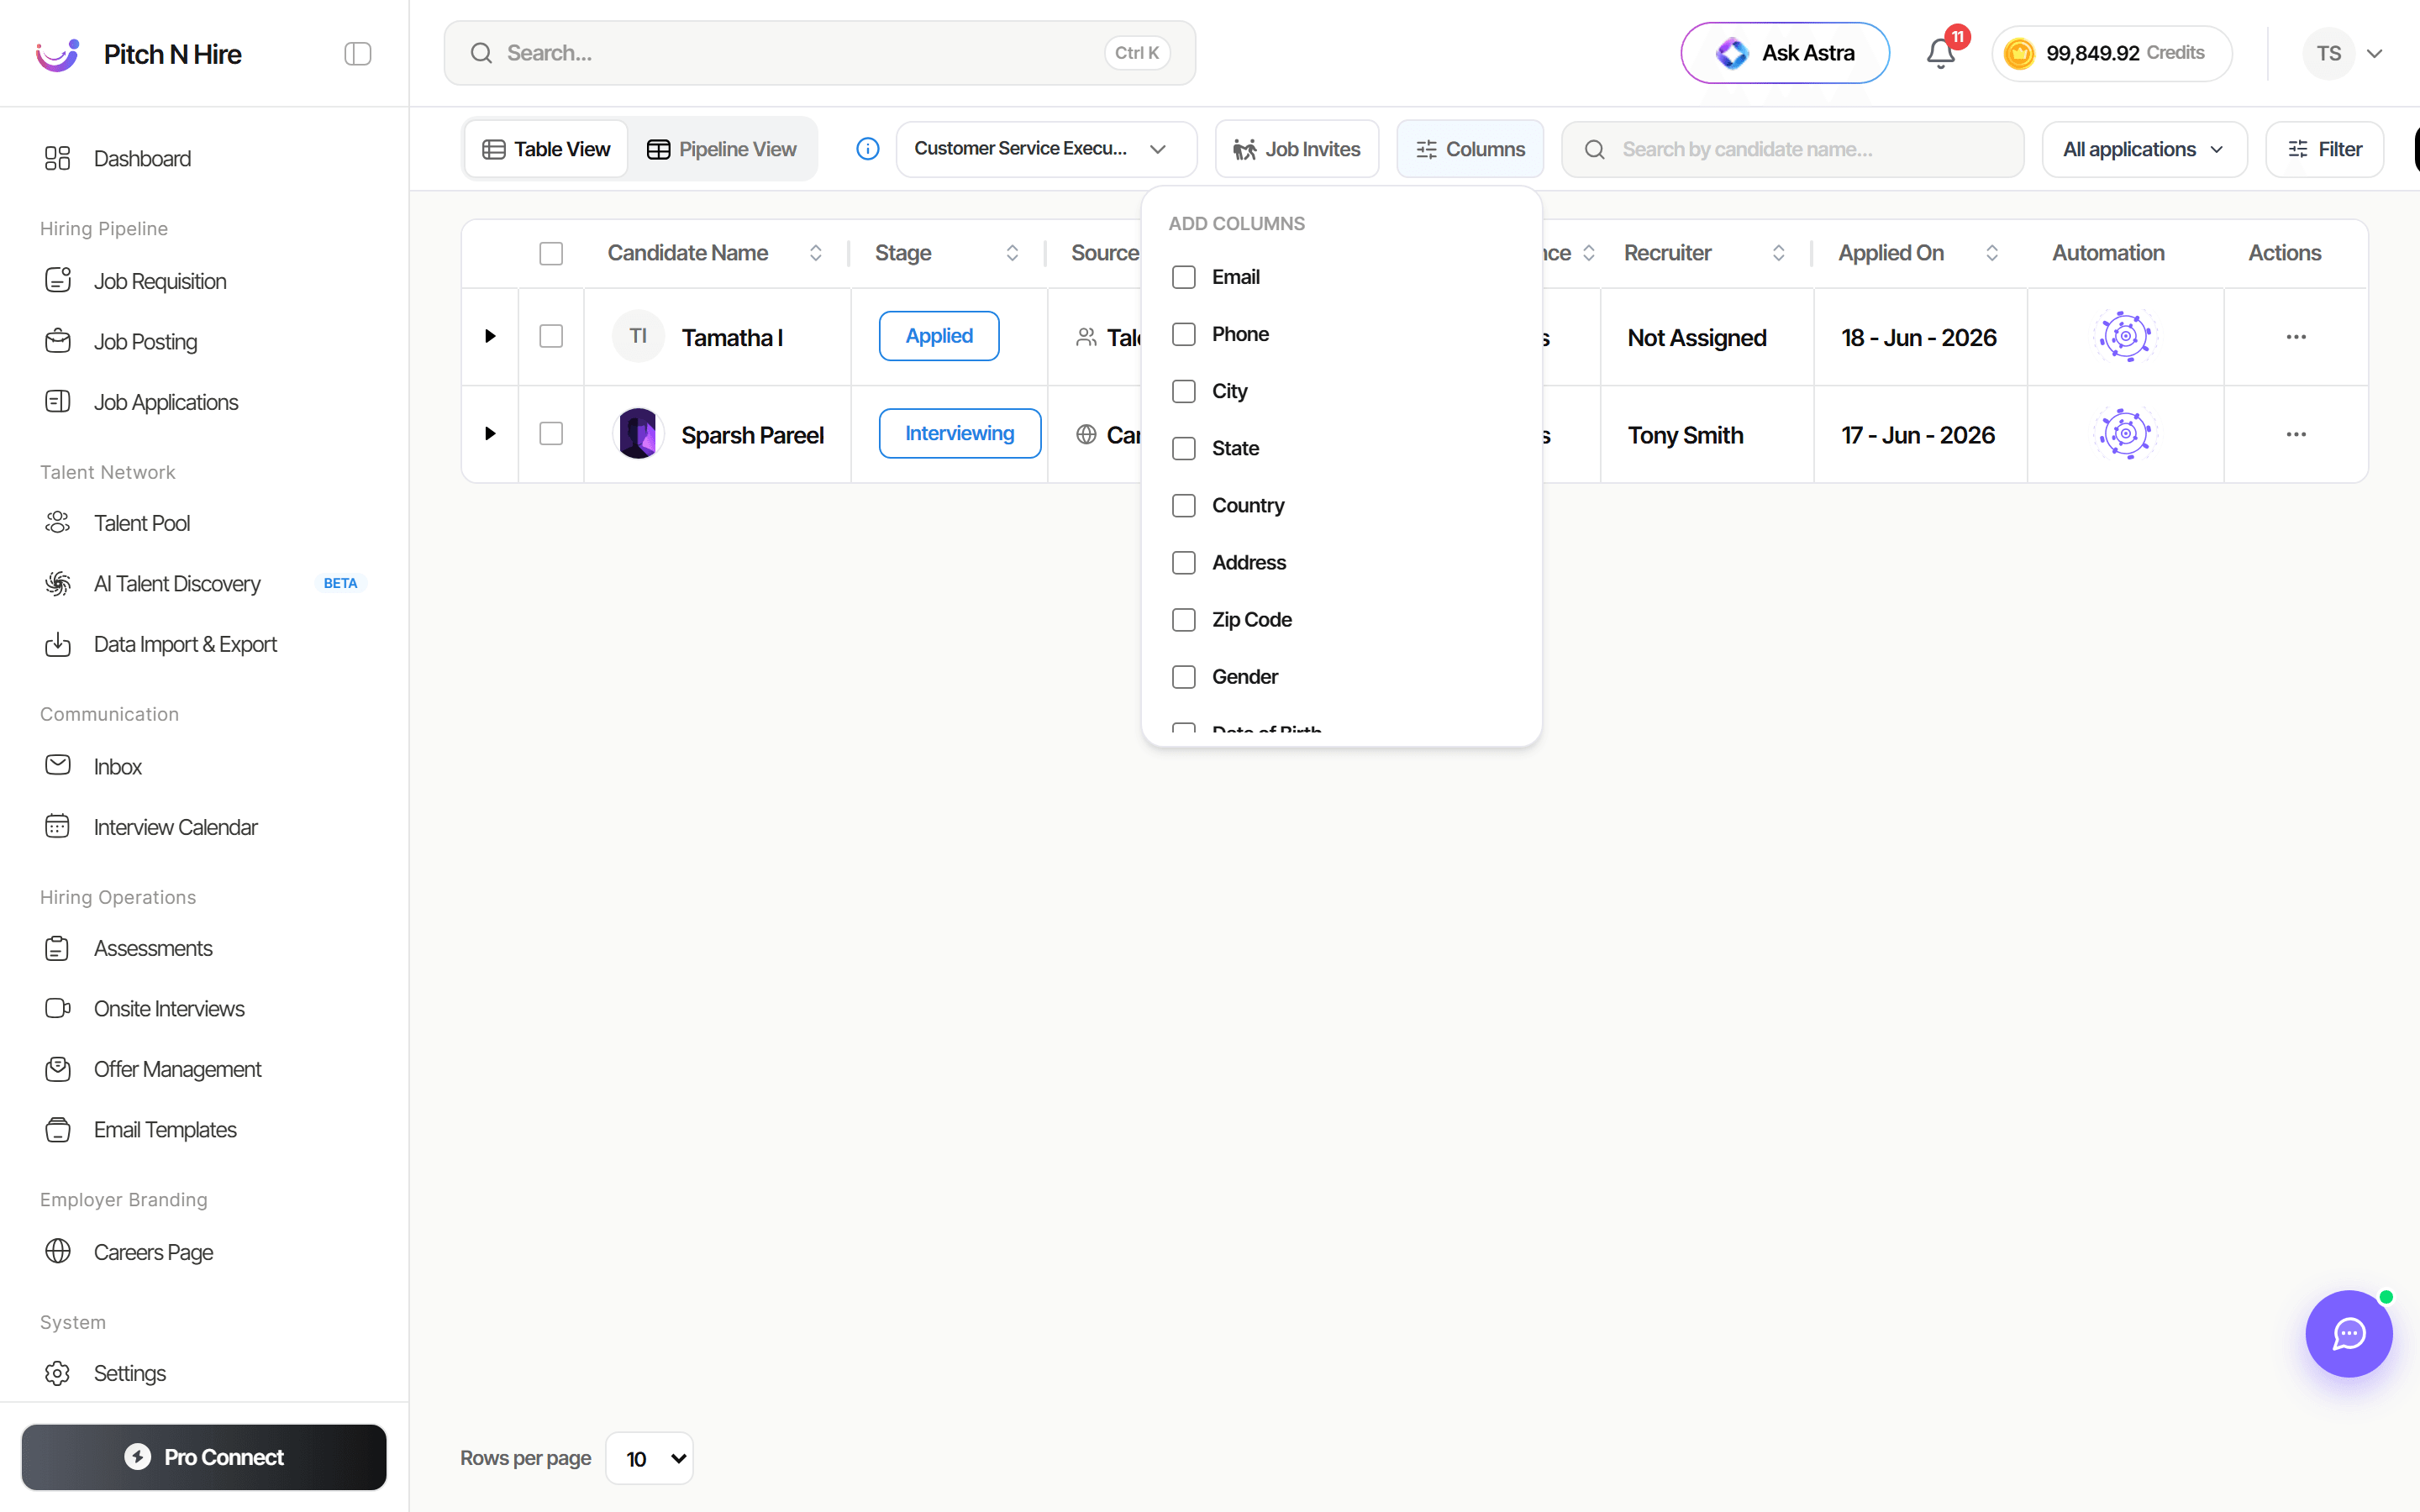
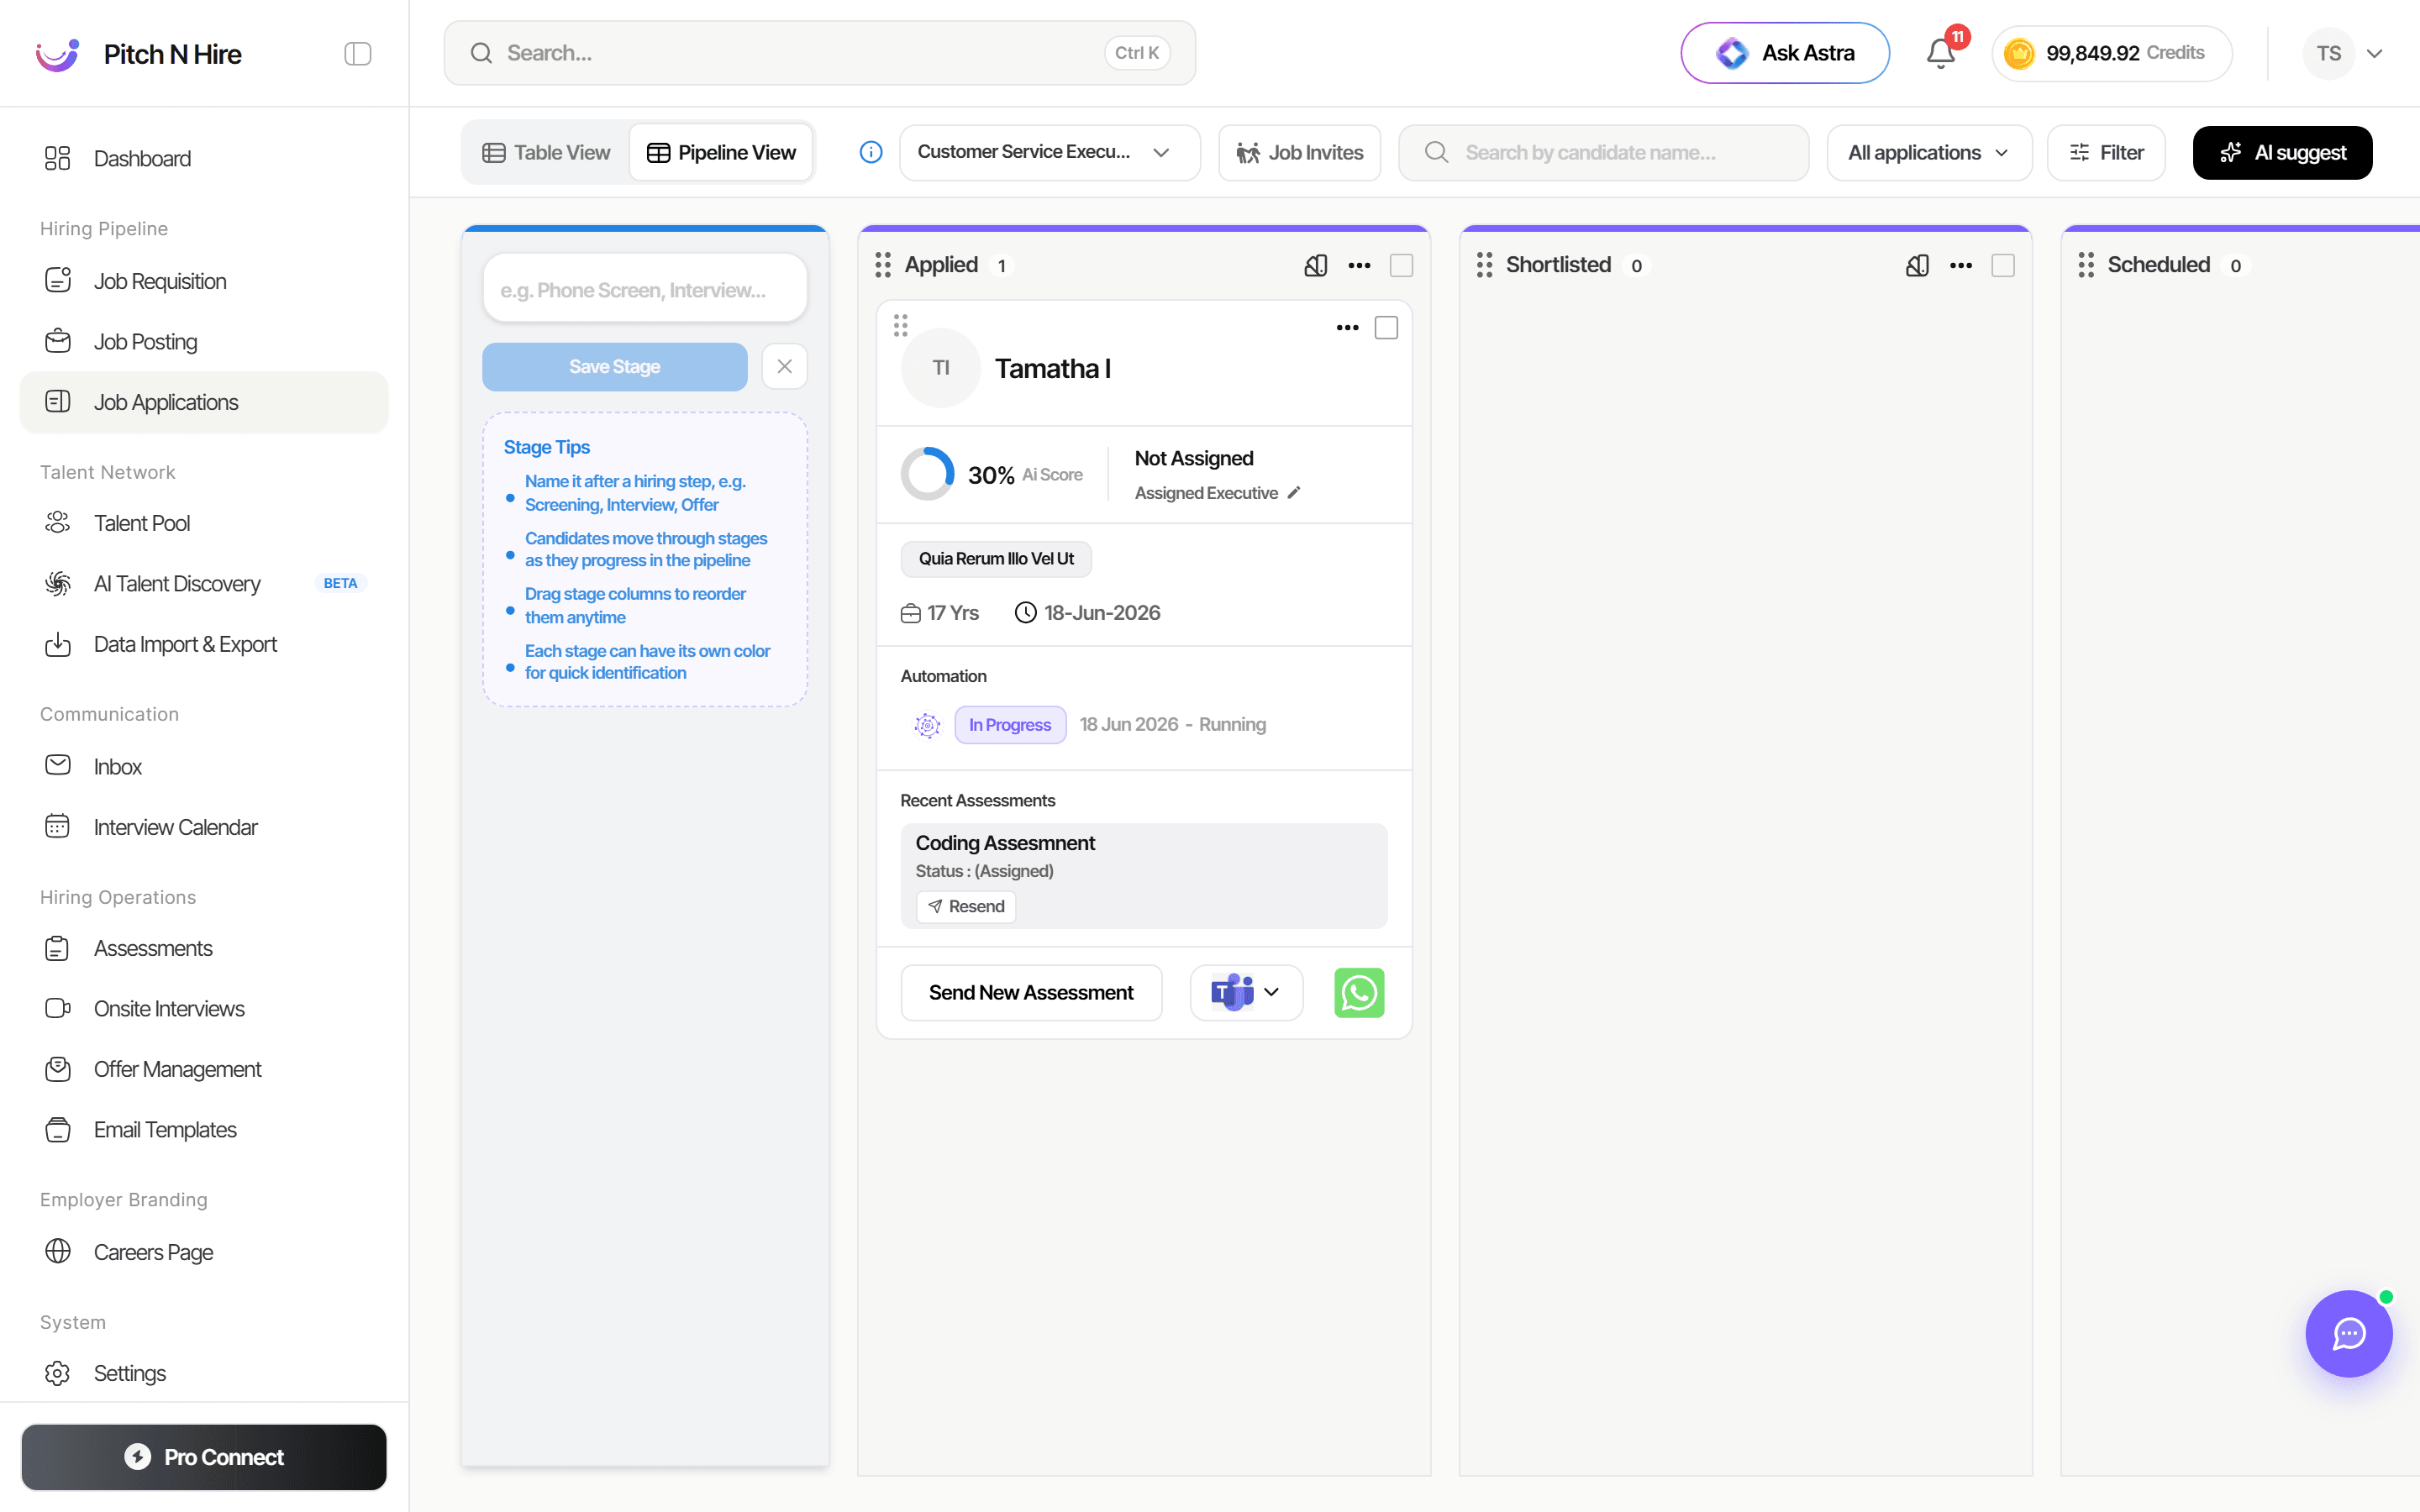
Pipeline View shows applicants as cards inside stage columns you can drag between. Each card shows the candidate’s AI Score, assigned executive, top skills, experience, applied date, View Resume, an Automation status (Passed / Failed / In Progress), Recent Assessments, and Send New Assessment via Microsoft Teams or WhatsApp.
Rapid View
Rapid View is a third way to work an applicant list: one candidate at a time, in a focused review tab. It’s built for the moment you have 60 new applications and need to triage them in a single sitting.
Click Rapid View in the toolbar (the ⚡ button beside the Table/Pipeline toggle — it’s on the Job Pipeline board too). Pitch N Hire opens the first applicant of the current list in a new tab, honouring whatever filters and search you already have applied.
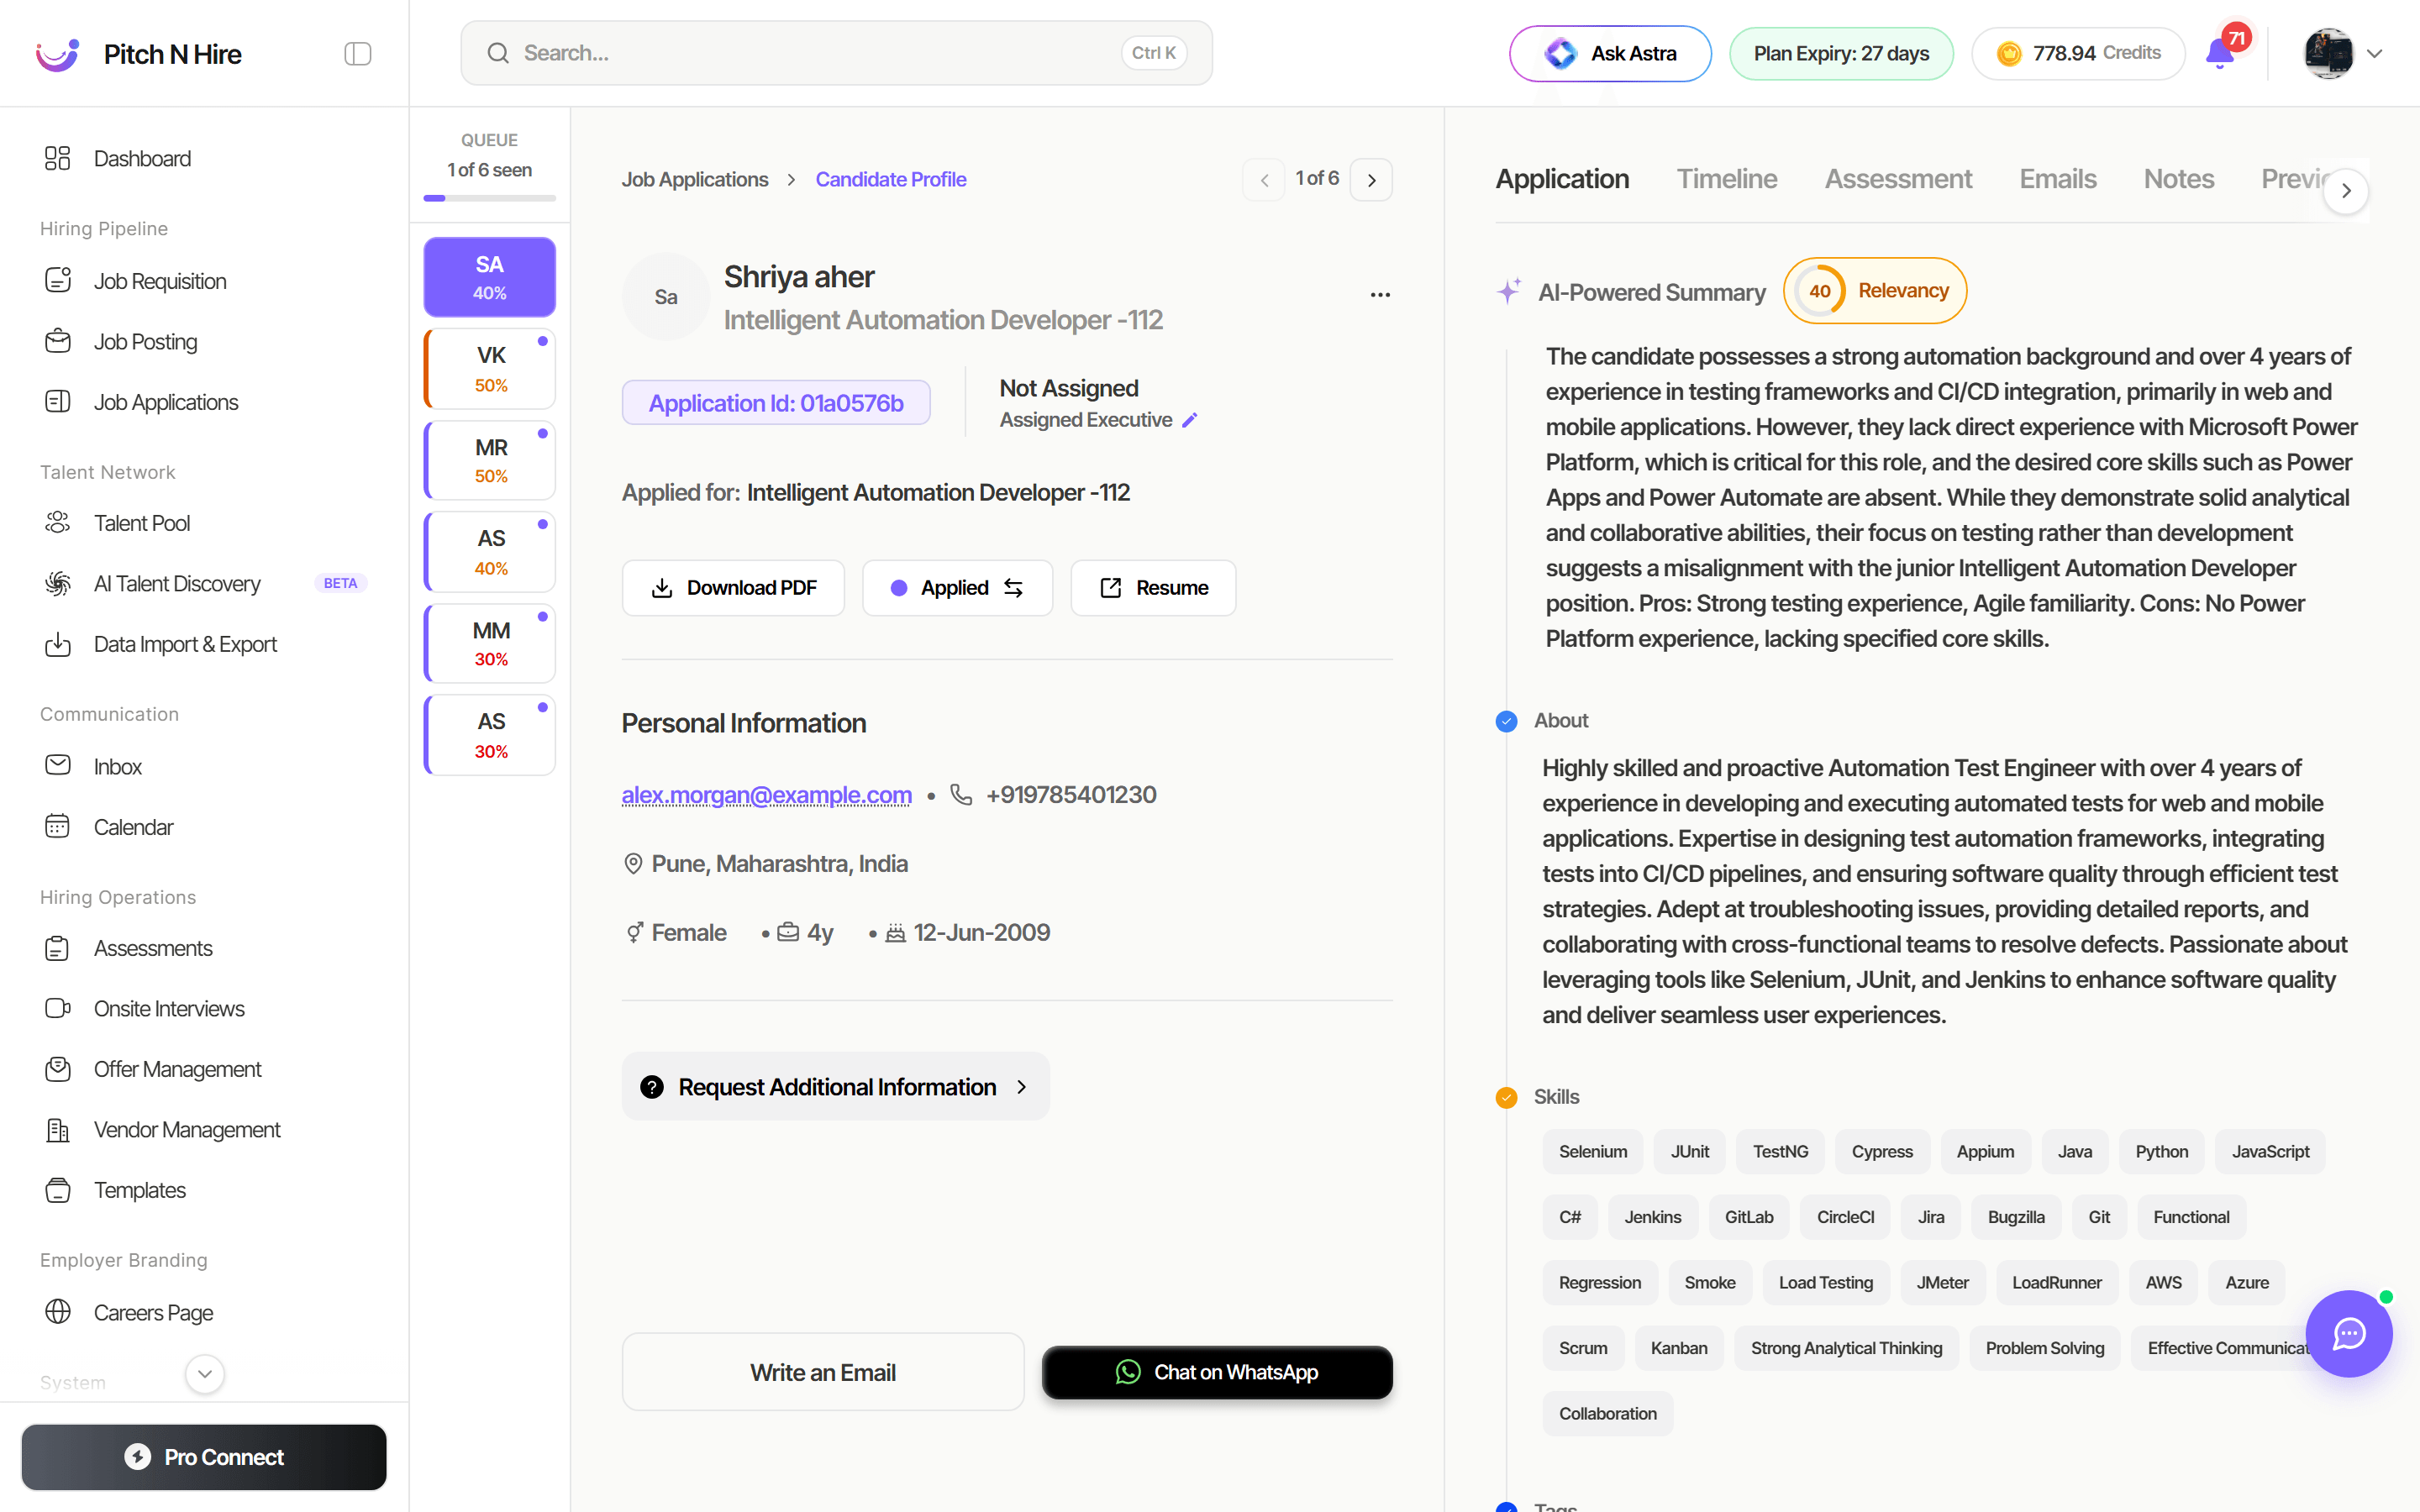
Inside Rapid View you get:
- A queue rail down the left listing every other applicant for the job, each as their initials plus an AI relevancy score — colour-coded green (70%+), amber (40–69%) or red (below 40%).
- A progress counter — “x of y seen” with a progress bar, so you know how much of the pile is left.
- Seen markers — candidates you’ve already opened are dimmed, and unseen ones carry a dot. The count is remembered for the rest of your browser session.
- Stage colours on each queue entry, so you can see where a candidate sits without leaving the review.
- Previous / next arrows and an “x of y” readout at the top of the profile to move through the queue in order.
Everything on the normal candidate profile is still available — resume, AI score, notes, assessments, interviews and stage changes — so you can action a candidate and move straight on to the next one.
Filtering and search
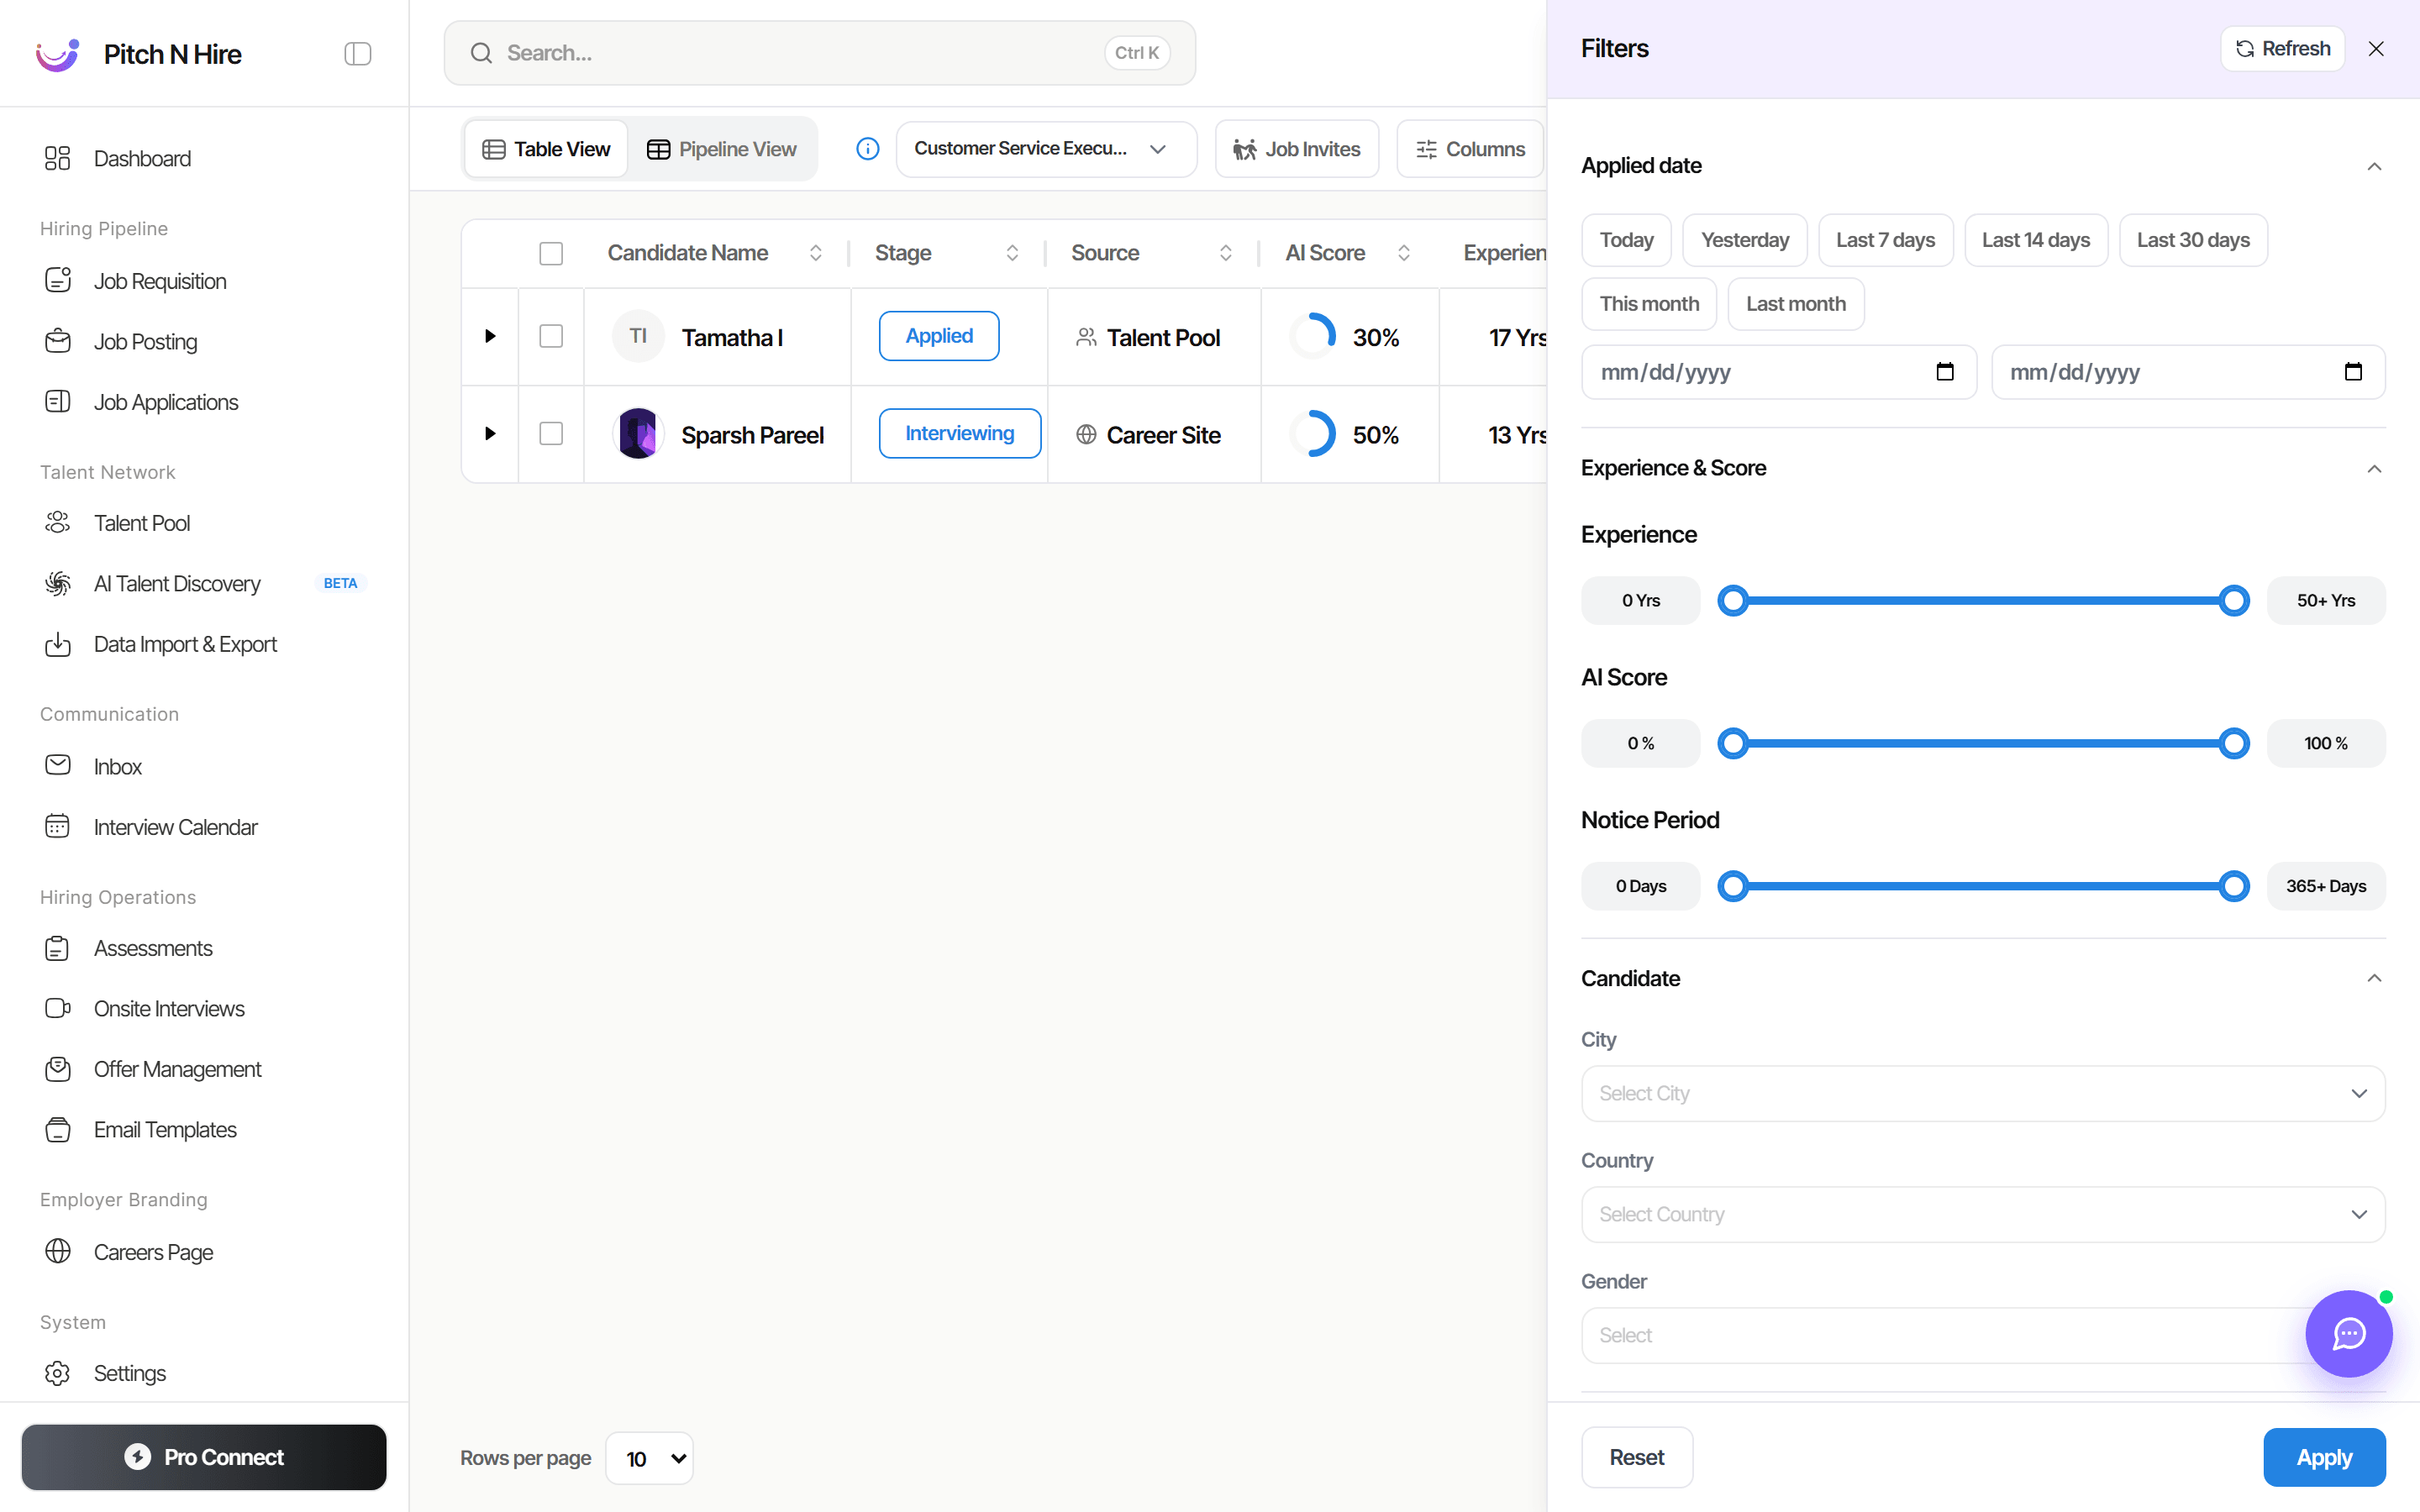
Open Filter for a rich side panel: Applied date (Today, Yesterday, Last 7/14/30 days, This/Last month, or a custom range), Experience, AI Score and Notice Period sliders, and Candidate attributes such as City, Country and Gender, plus Stage & Skills. Apply your criteria, or hit Reset to clear. The toolbar’s Search by candidate name box and the All applications dropdown narrow the list further.
Bulk and candidate actions
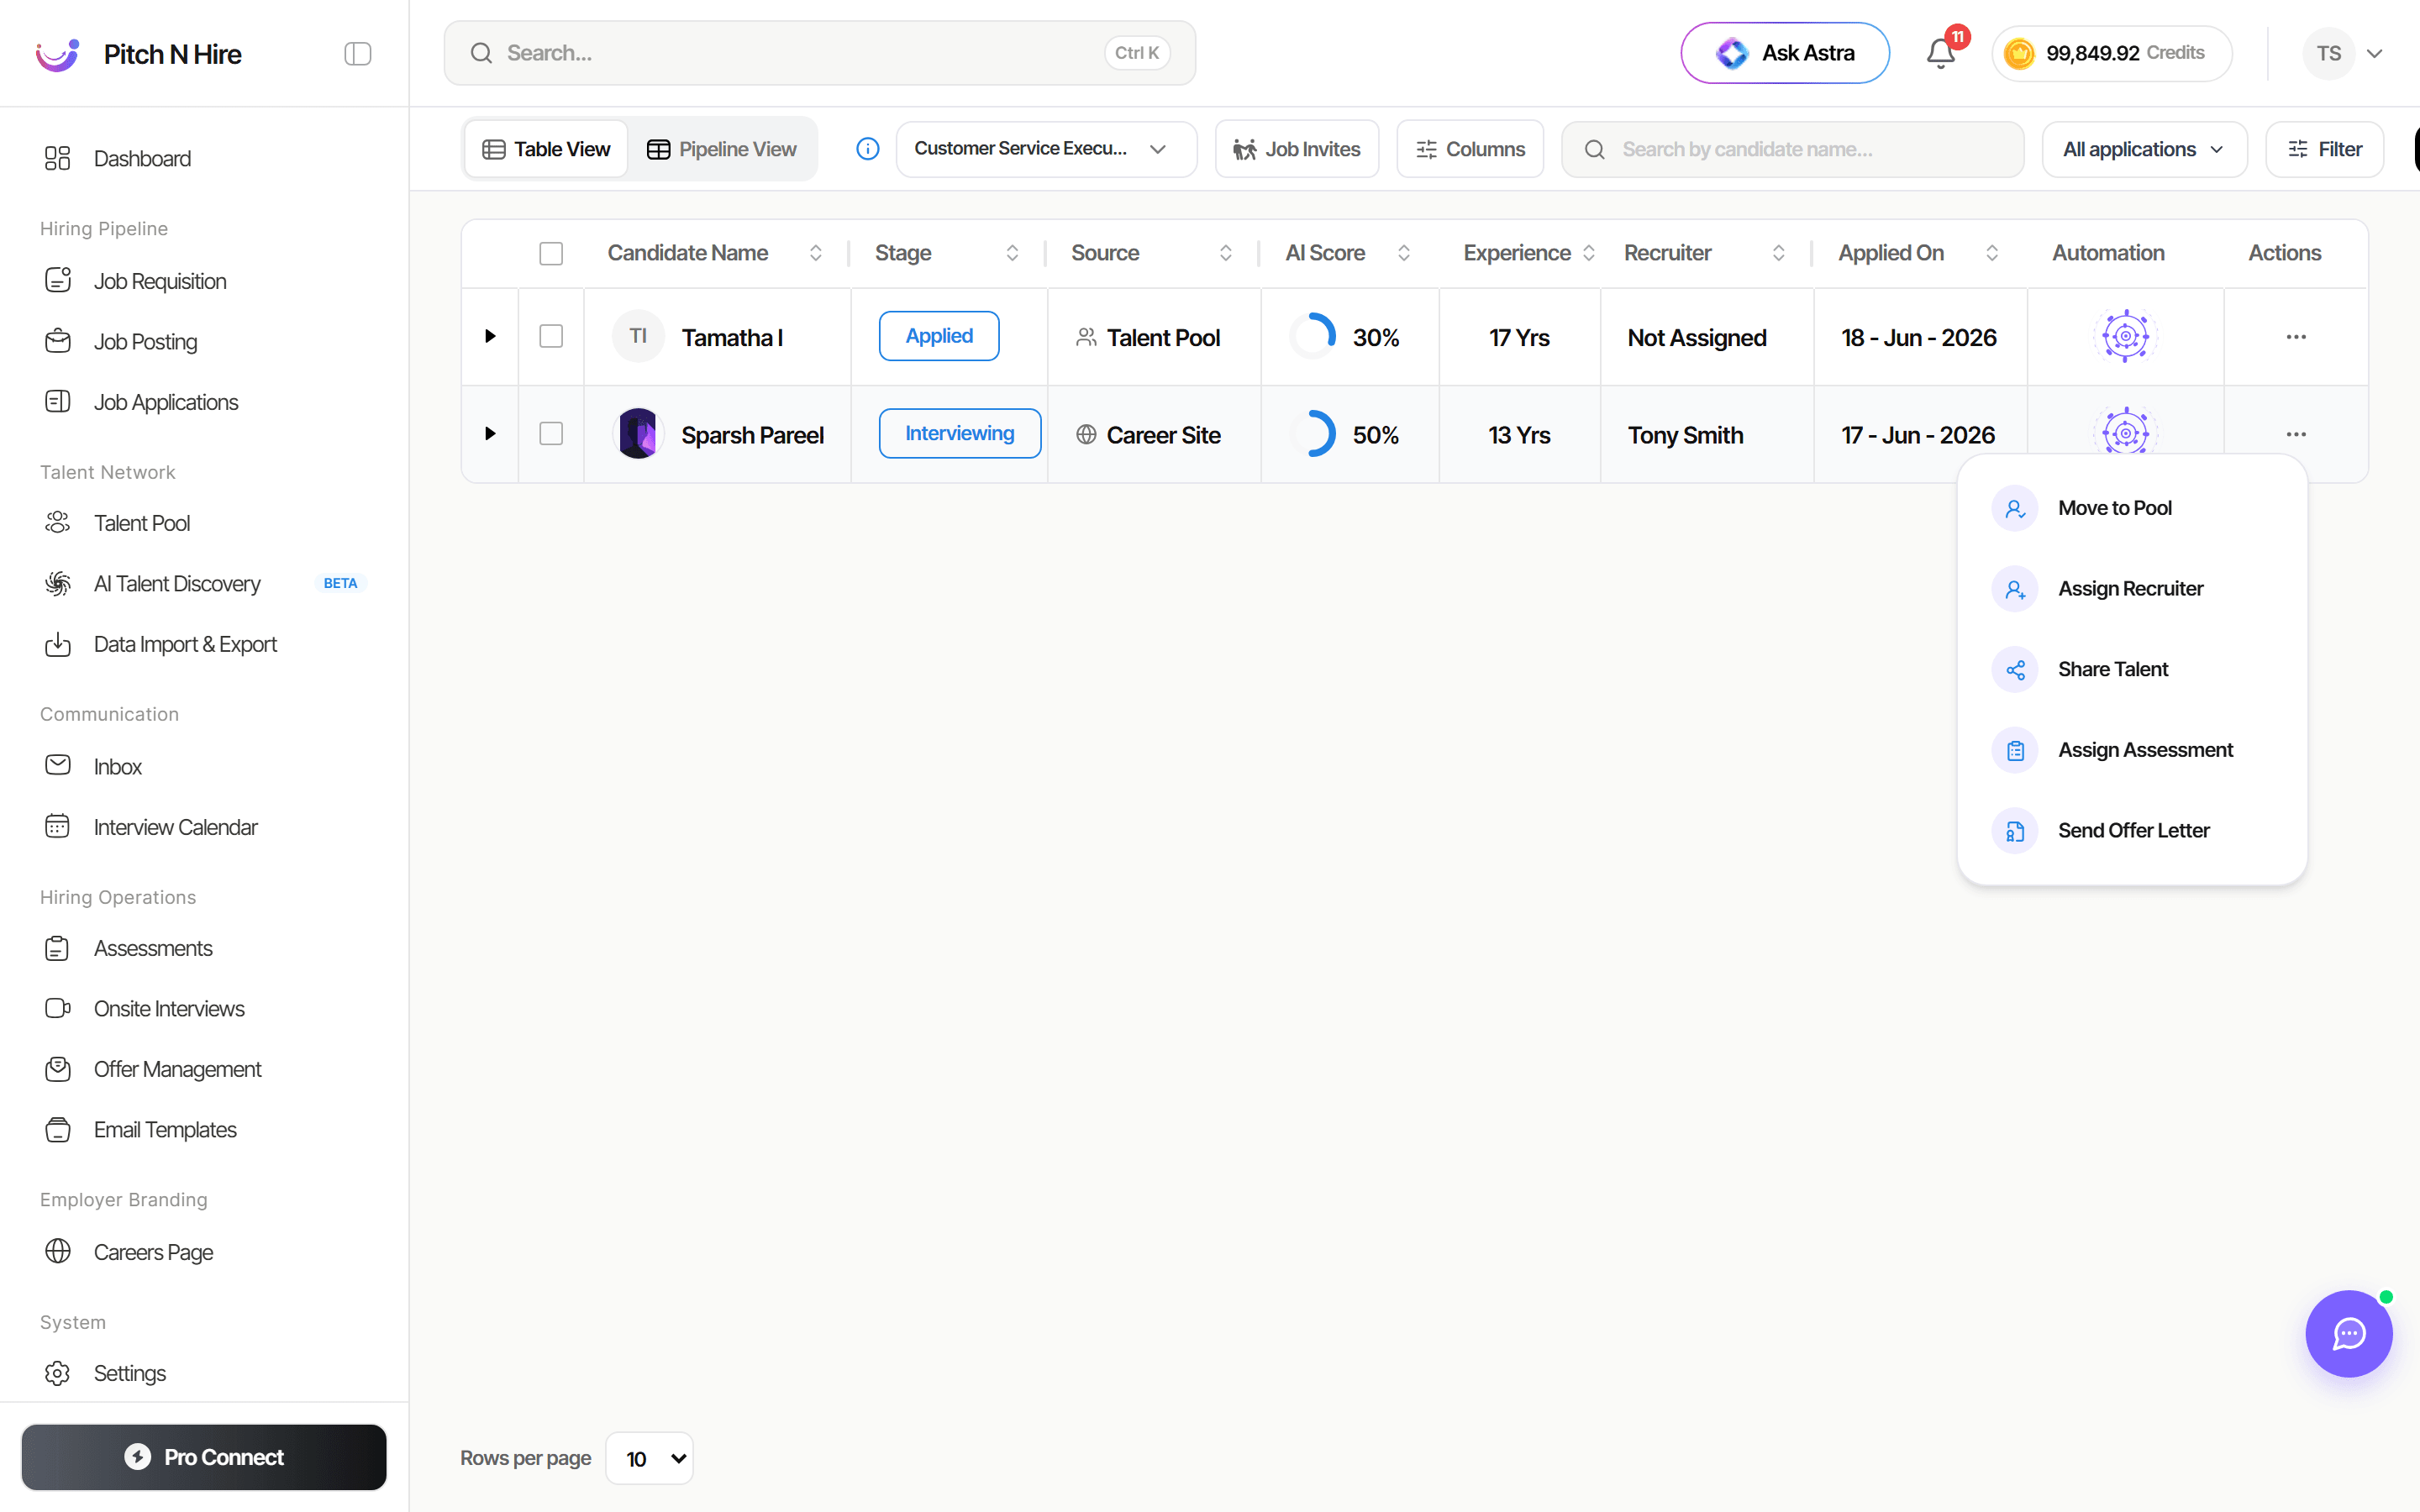
Select one or more candidates (or use select-all in the header) to act on them together. The menu opens with a count — “6 candidates selected” — followed by:
- Move to Pool — send candidates into your Talent Pool.
- Assign Recruiter — set the owning recruiter.
- Share Talent — share candidate profiles with teammates or clients.
- Assign Assessment — dispatch an assessment to the selected candidates.
- Bulk Emailing — send one email template to everyone selected, personalised for each (see Bulk email candidates).
- Send Offer Letter — start an offer for the candidate.
- Add to Onsite Event — add them to a walk-in / onsite interview event.
- Download PDF — download the selected candidates’ profiles.
- Compare Candidates — compare side by side, up to 5 at a time (the menu tells you how many to deselect if you’ve picked more).
Custom hiring stages
Your pipeline is fully customizable — build stages that match how your team actually hires.
Add a stage
Click Add New Stage in the left-most column, give it a clear name (for example Phone Screen or Interview Round 1) and save. The built-in Stage Tips remind you to name stages after a hiring step, that candidates move through stages as they progress, that you can drag columns to reorder them, and that each stage can have its own color.
Edit, delete, color and notifications
Open a stage’s ⋯ menu in its column header to:
- Notify Candidate — toggle whether candidates are automatically notified when they enter this stage.
- Email Template — choose which email they receive on entering it (see Set the email for a stage).
- Competencies — the criteria panellists rate a candidate on at this stage.
Renaming and deleting a custom stage are available from the stage’s own controls.
To recolor a stage, open its Stage Color picker and choose a shade — color-coding makes the board easy to scan at a glance. Click Save to apply.
Working a candidate card
- Read the AI Score and assigned executive to gauge fit, and open View Resume for detail.
- Check the Automation status (Passed / Failed / In Progress) to see where automated steps stand.
- Under Recent Assessments, review results and Resend if a candidate needs to retake one.
- Click Send New Assessment and choose Microsoft Teams or WhatsApp to dispatch it.
- Drag the card to the next stage to advance the applicant, or use Change Stage from the bulk menu.
Scheduling interviews
You can schedule an interview for a candidate straight from their application — no need to leave the pipeline. The scheduler is available in both Table View (expand a candidate row) and Pipeline View (on the candidate card).
Open the scheduler
- In Job Applications, find the candidate (expand their row in Table View, or use their card in Pipeline View).
- Click the calendar button (it shows your connected provider’s icon — Google or Outlook/Teams — with a dropdown arrow).
- Choose a connected provider from the menu. The Create … Interview dialog opens, pre-titled with the role (for example “Interview Invitation: Virtual Interview – Dynamic Brand Director”) and with the candidate already added as an attendee.
Fill in the interview
The dialog adapts to the interview type you choose:
- Title (required) — the invite subject; it’s pre-filled and updates automatically when you change the Interview Type.
- Location — type it in (Manual) or pick a saved one from your Address Book.
- Start Date — date and time of the interview.
- Duration — 30, 45, 60 or 90 minutes.
- Interview Type — Video, Telephonic or Onsite. Choosing Video turns on the meeting link automatically.
- Attach resume for panel — when on (default), the candidate’s resume is shared with the interview panel.
- Attendees — search your recruiters/panellists or type any email to add. Each panellist shows a live ● Available / ● Unavailable status for the chosen time plus any interviews they already have booked. At least 2 attendees are required (the candidate counts as one).
- Timezone — the timezone the start time is interpreted in.
- Create meeting link — for video interviews, generates the meeting link automatically.
- Description — a rich-text body for the invite.
Click Create to schedule it (the button stays disabled until you have a Title, a Start Date and at least 2 attendees). Attendees receive the invite, and — for video — the meeting link.
Review interviews on the candidate profile
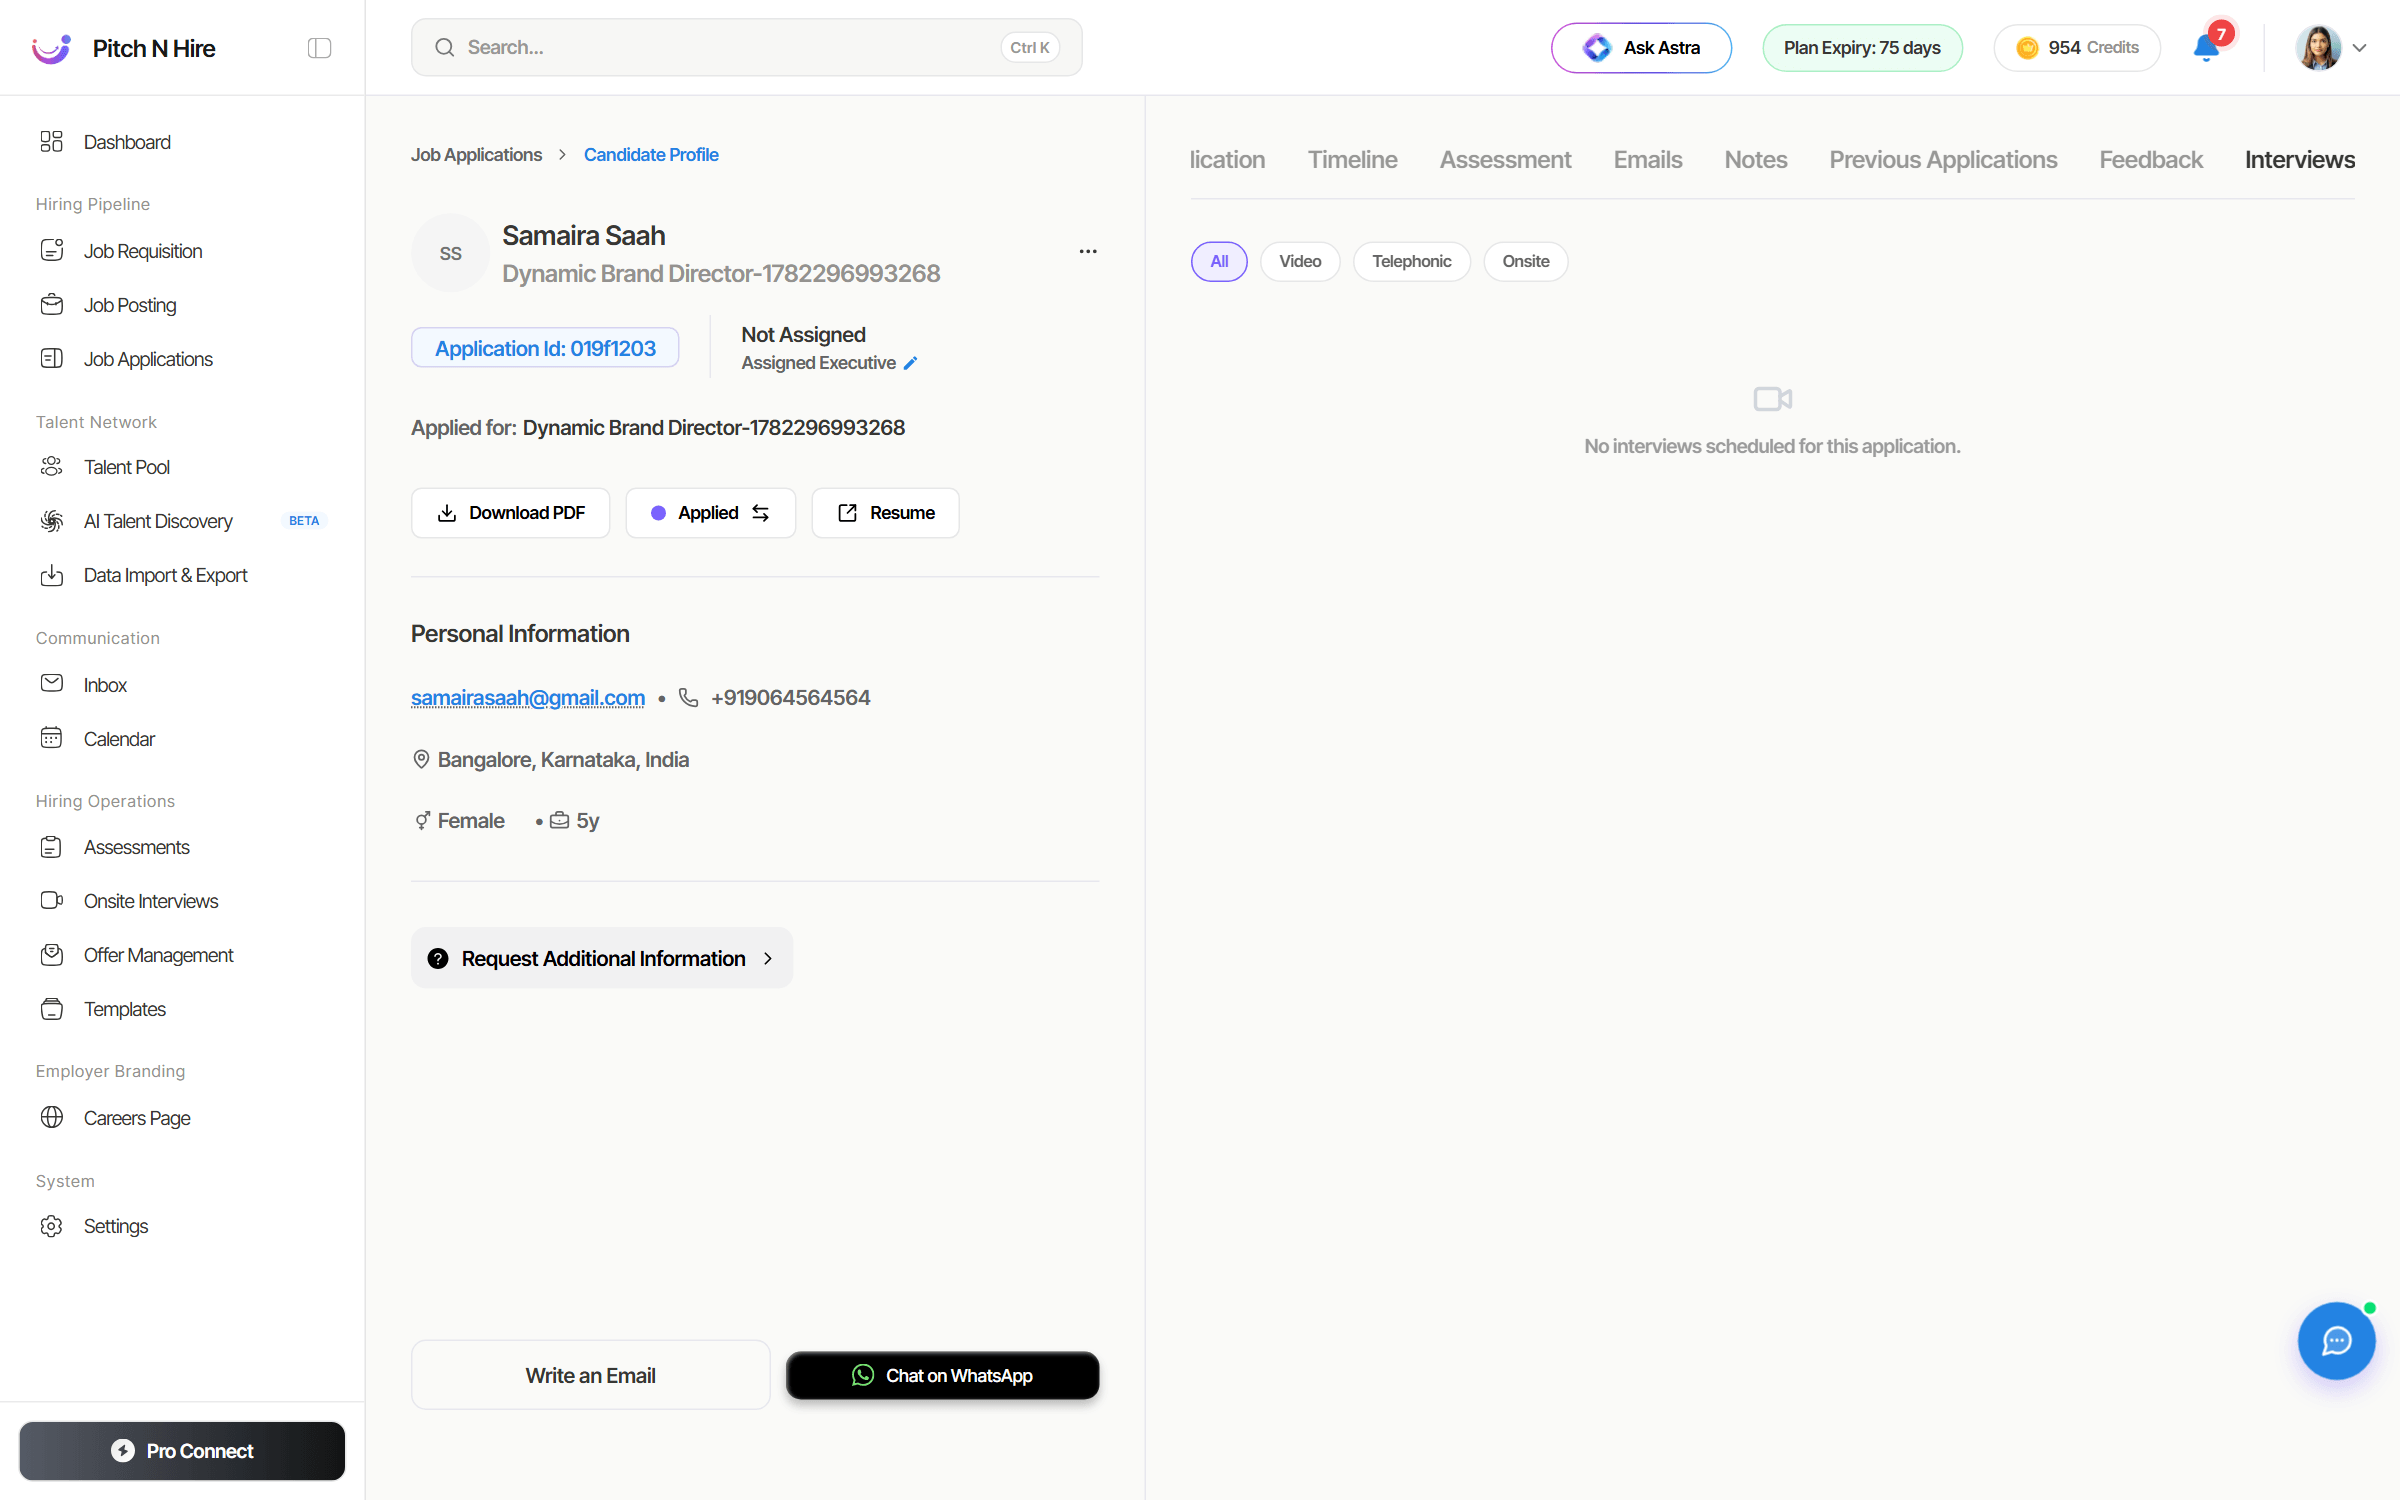
Open a candidate’s profile (click their name) and go to the Interviews tab to see everything scheduled for that application. Filter by All / Video / Telephonic / Onsite; before anything is booked it reads “No interviews scheduled for this application.”
Each scheduled interview appears as a card showing its title, provider/mode, date and time (with duration and timezone), a Join Meeting link for video, the location for onsite, and the panellists — including their star rating and feedback once submitted. A status badge marks each as Scheduled, Completed or Cancelled. Use the pencil icon on a card to edit the title, start time, timezone, address, description or status (editing is disabled once an interview is Completed or Cancelled).
Emailing candidates
You don’t need to leave the ATS — or copy an address into Outlook — to email an applicant. Every email you send from here uses the Email Templates you’ve built, so your messaging stays consistent and every placeholder is filled in for you.
Email a single candidate
Open a candidate’s profile and go to the Emails tab. The composer reads Email Candidate — “Send a message or request information from the candidate.”
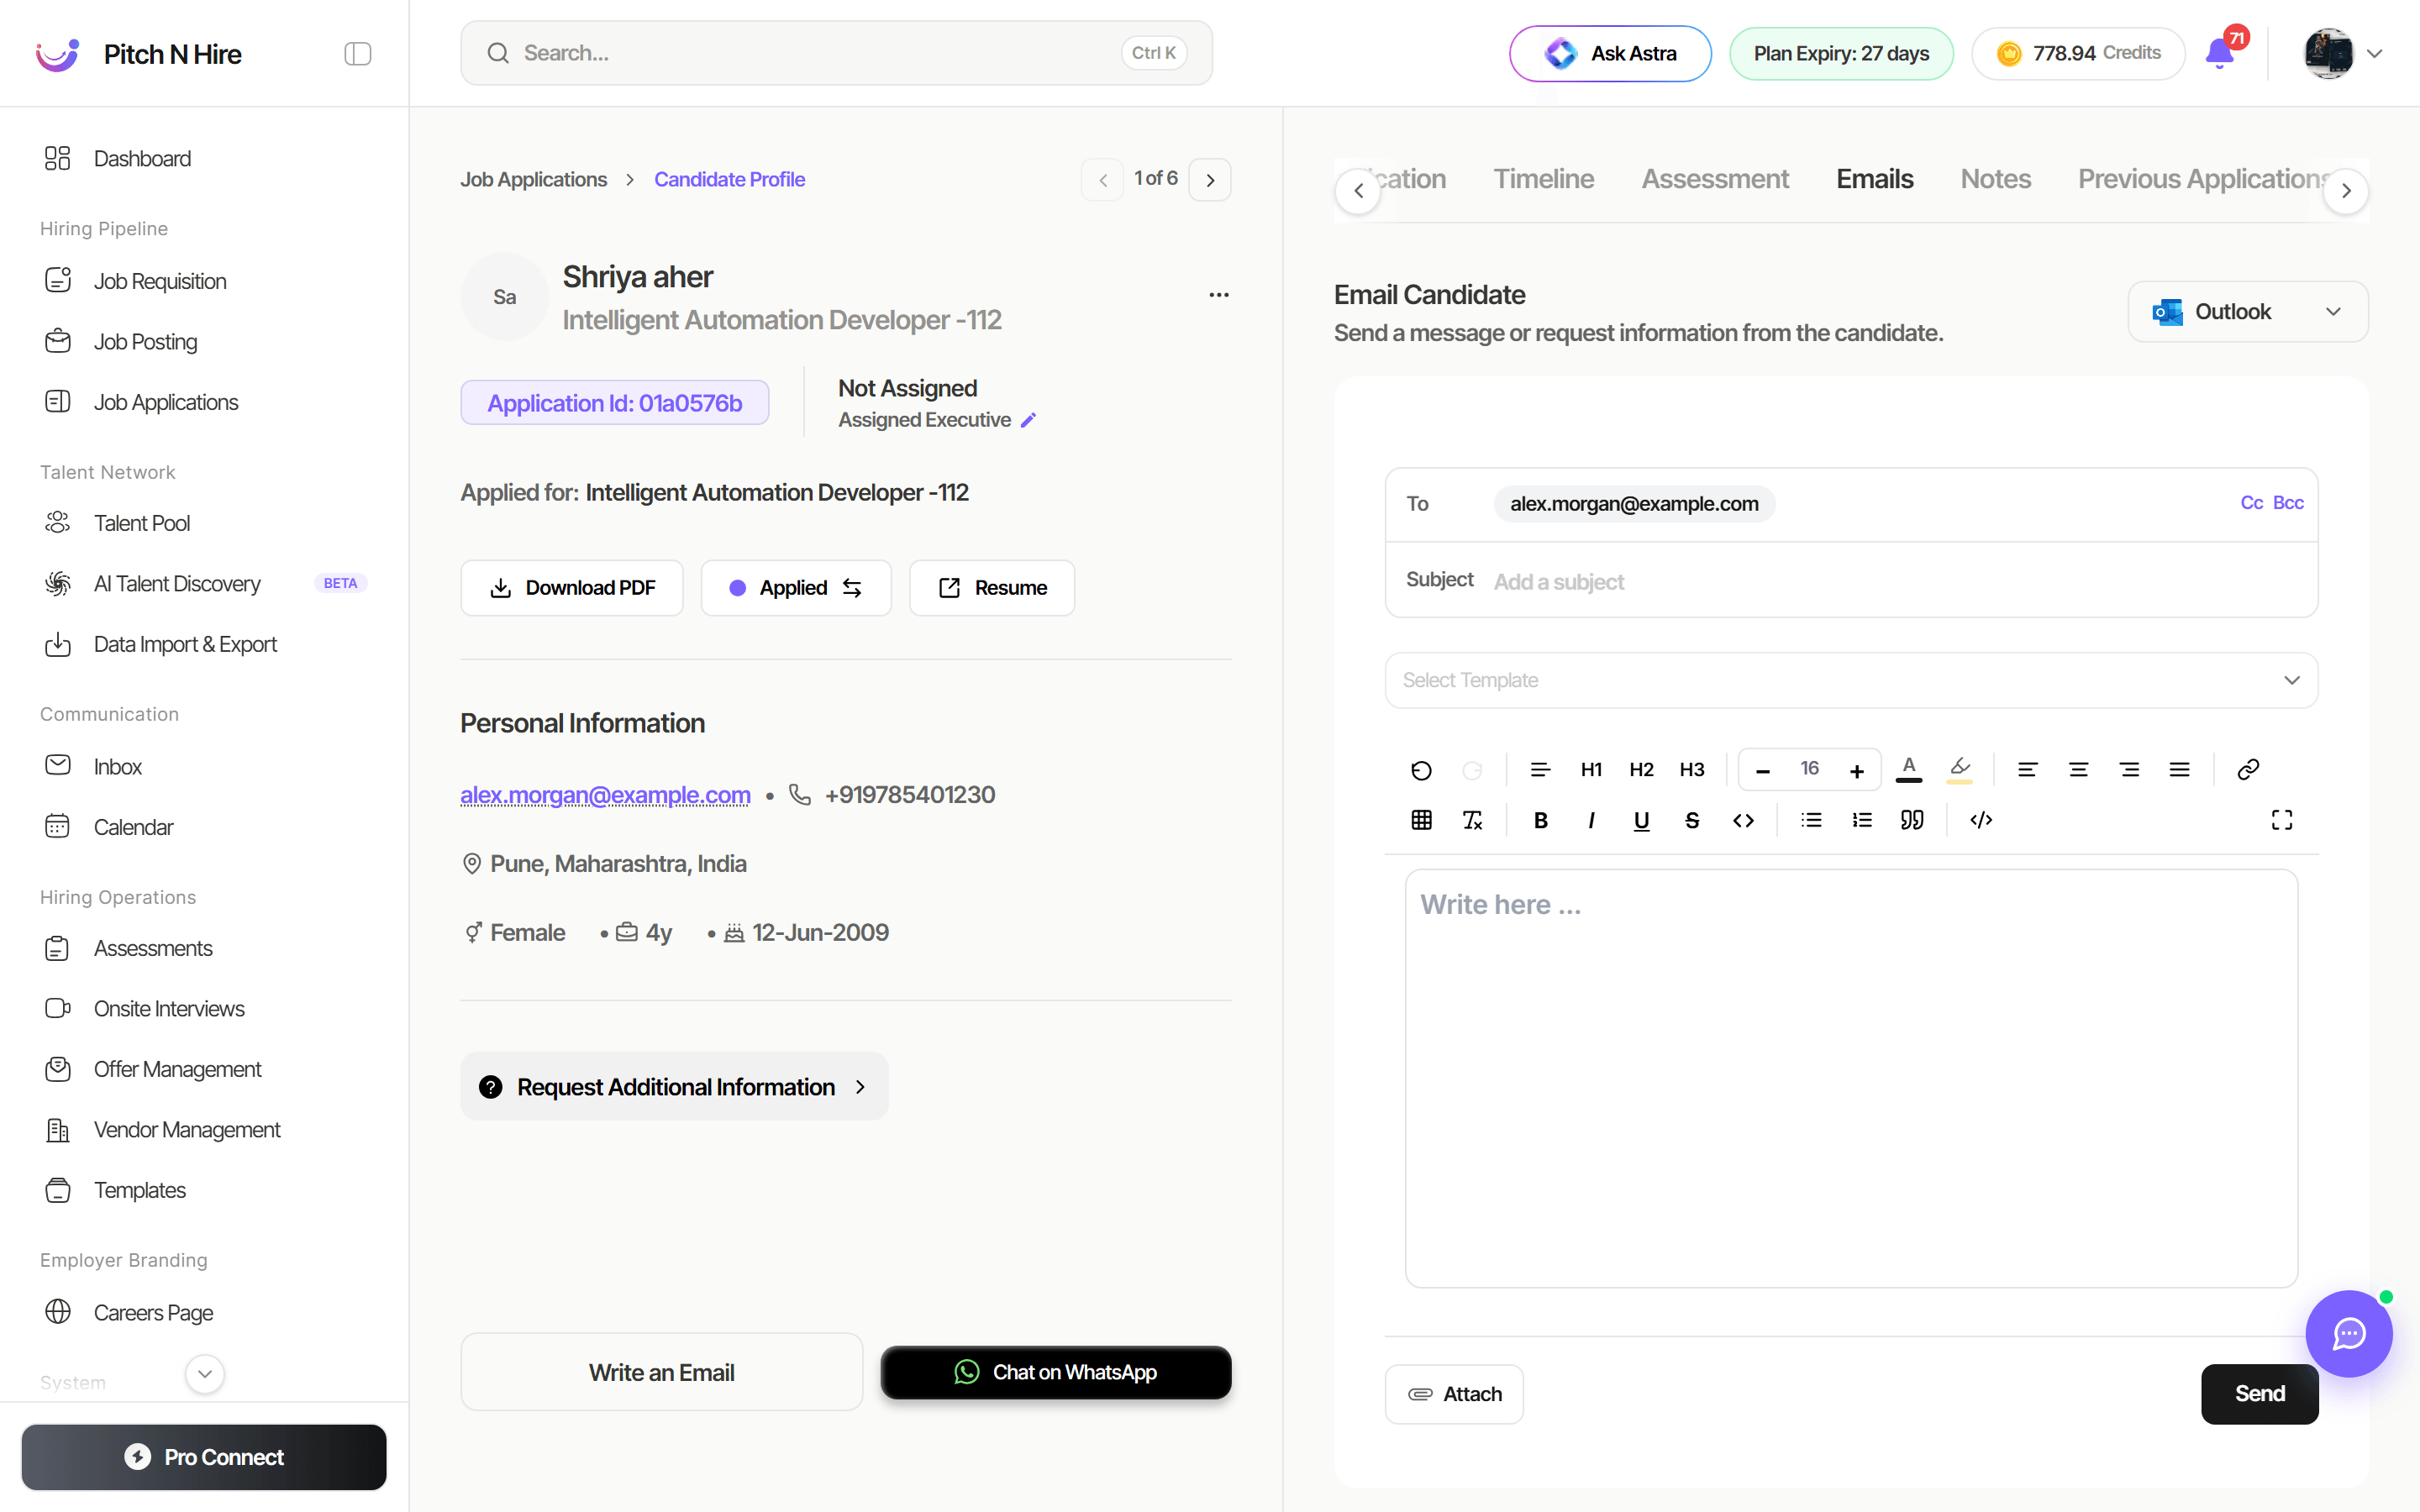
- To is already filled in with the candidate’s address. Add Cc or Bcc if others should see it.
- Add a Subject, or pick a Select Template — the template fills in the subject and body for you.
- Edit the message in the rich-text editor. Because you’re sending to one known candidate, Pitch N Hire renders the template against this application first, so you see the real, personalised email before it goes.
- Use Attach to add files, then click Send.
Bulk email candidates
To email a whole group, select them in Table View (or on the pipeline board) and choose Bulk Emailing from the actions menu.
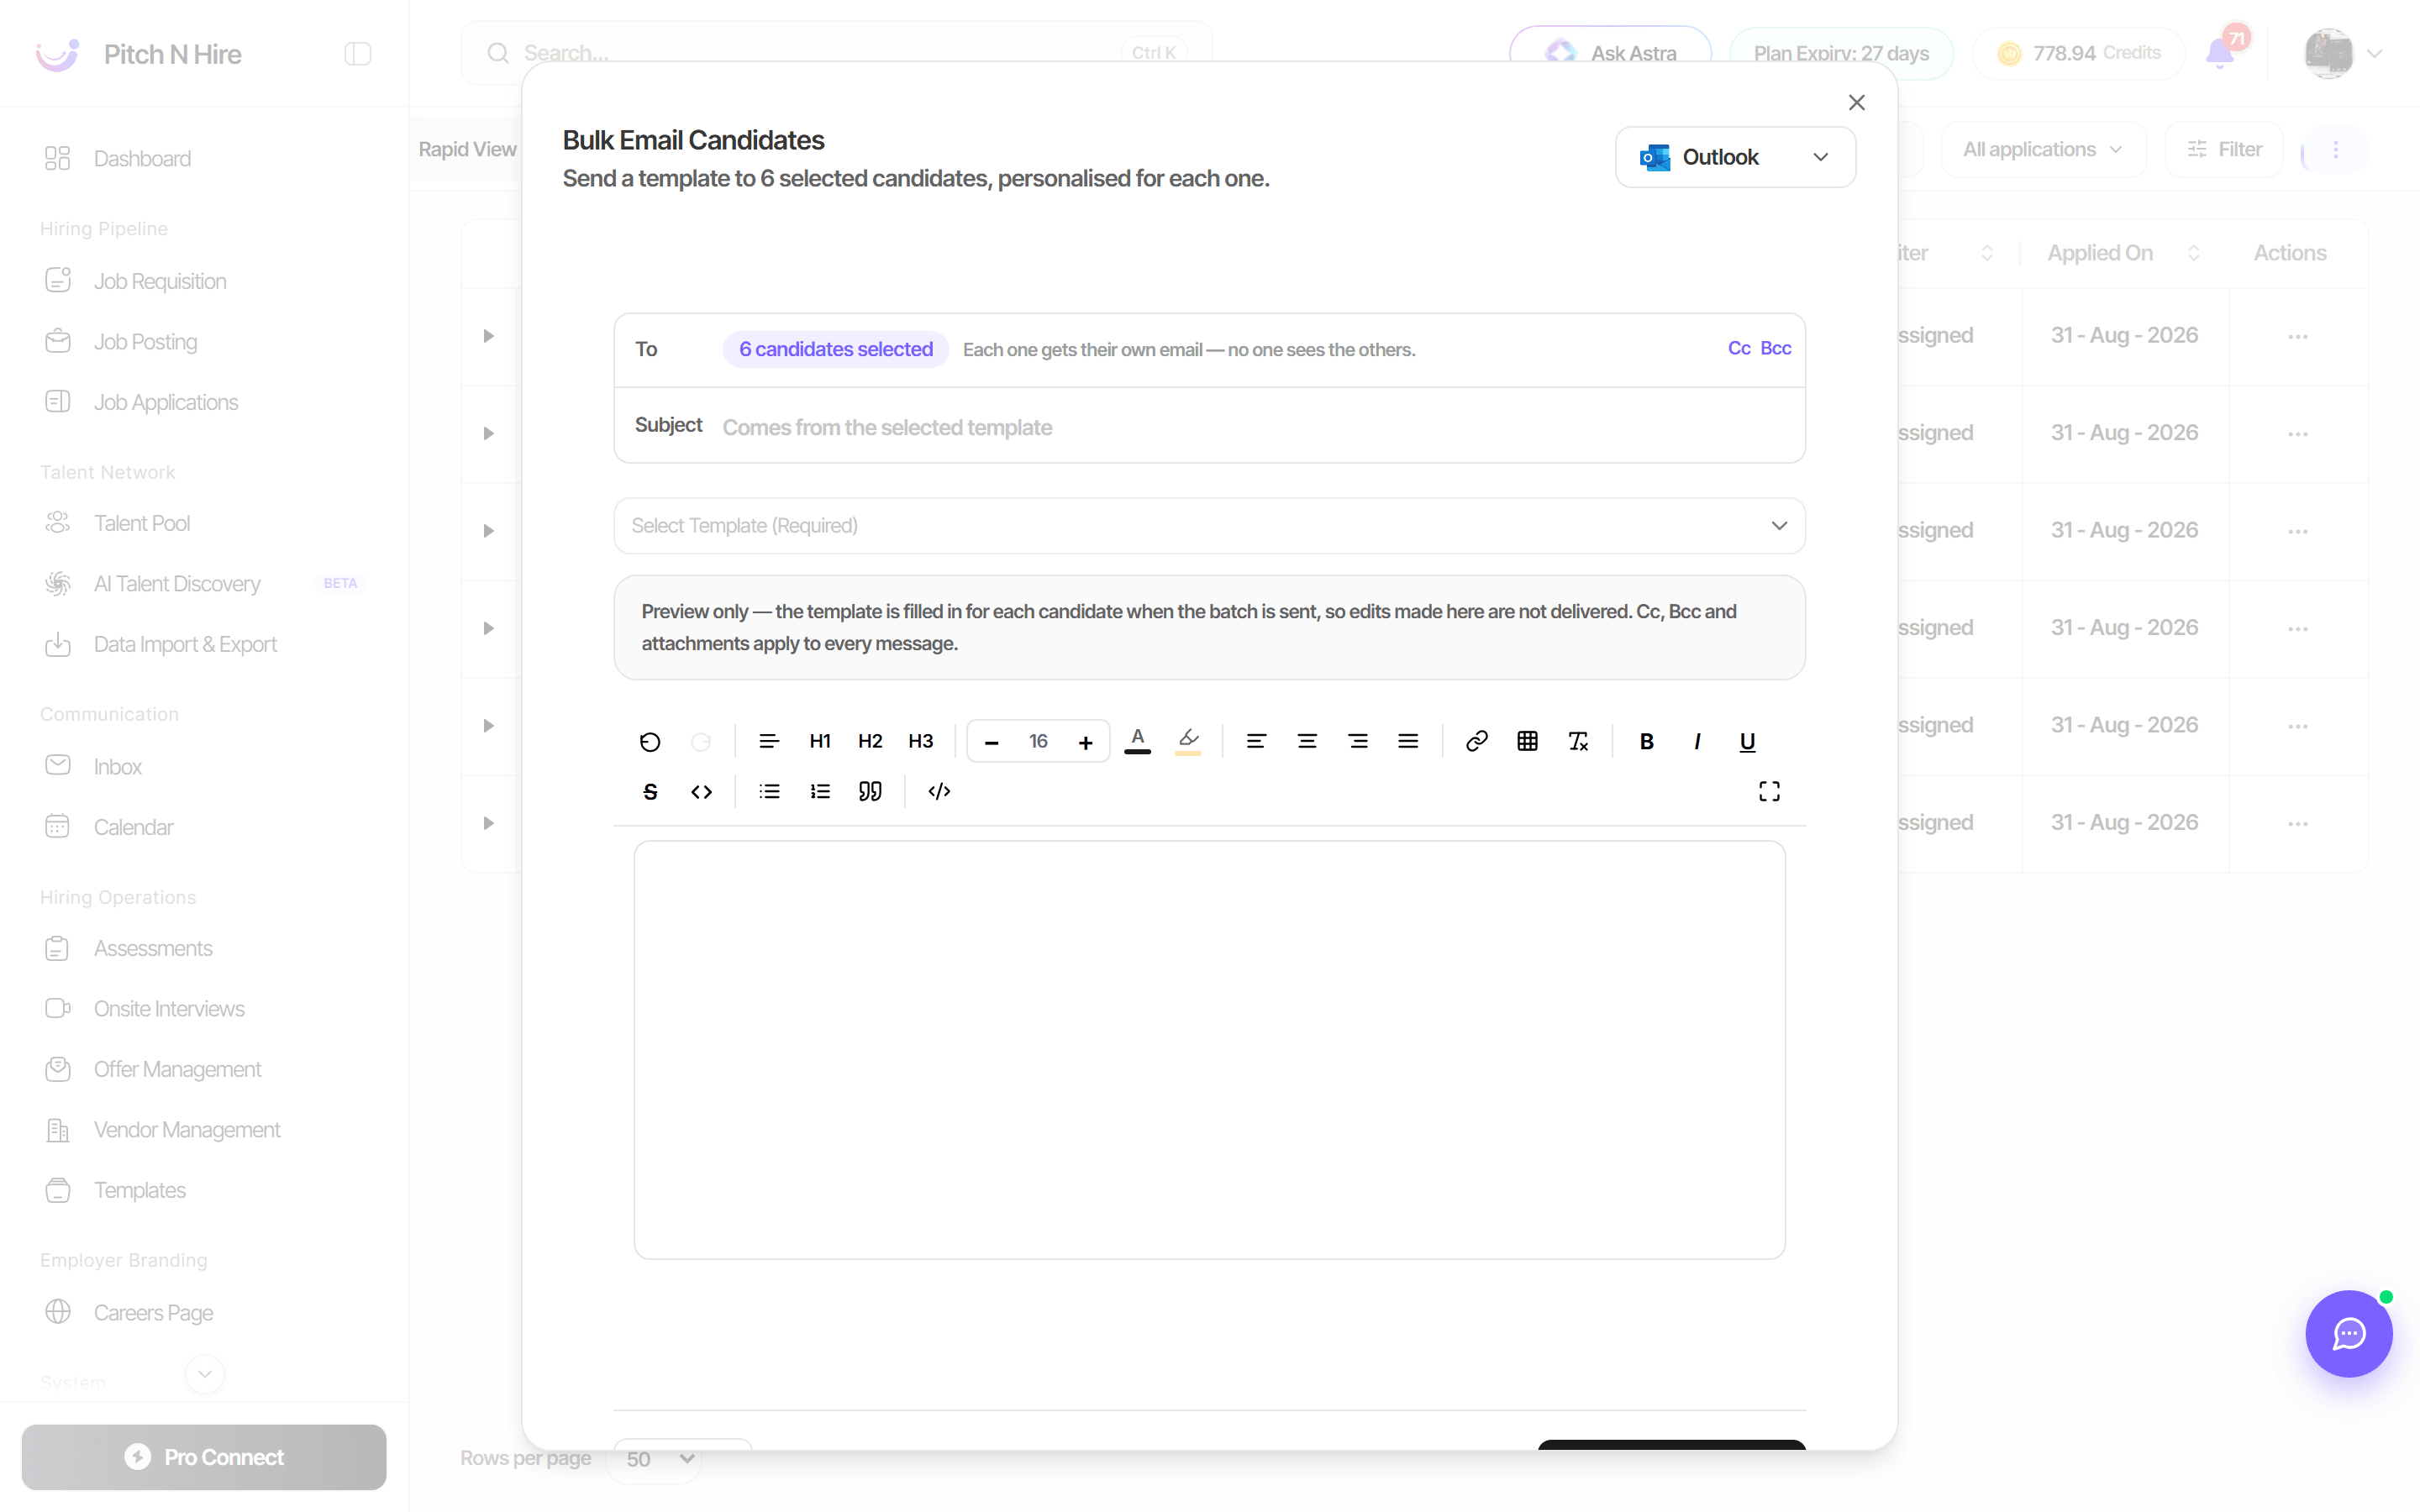
The dialog reads Bulk Email Candidates — “Send a template to 6 selected candidates, personalised for each one.”
- To shows the count as a single chip — “6 candidates selected” — with the reassurance that “Each one gets their own email — no one sees the others.” Add Cc or Bcc if needed; they apply to every message.
- Select Template is required in bulk mode. The Subject comes from the template you pick.
- The body below is a preview only — “the template is filled in for each candidate when the batch is sent, so edits made here are not delivered.”
- Attach any files (they go on every message) and send.
Notes for the interview panel
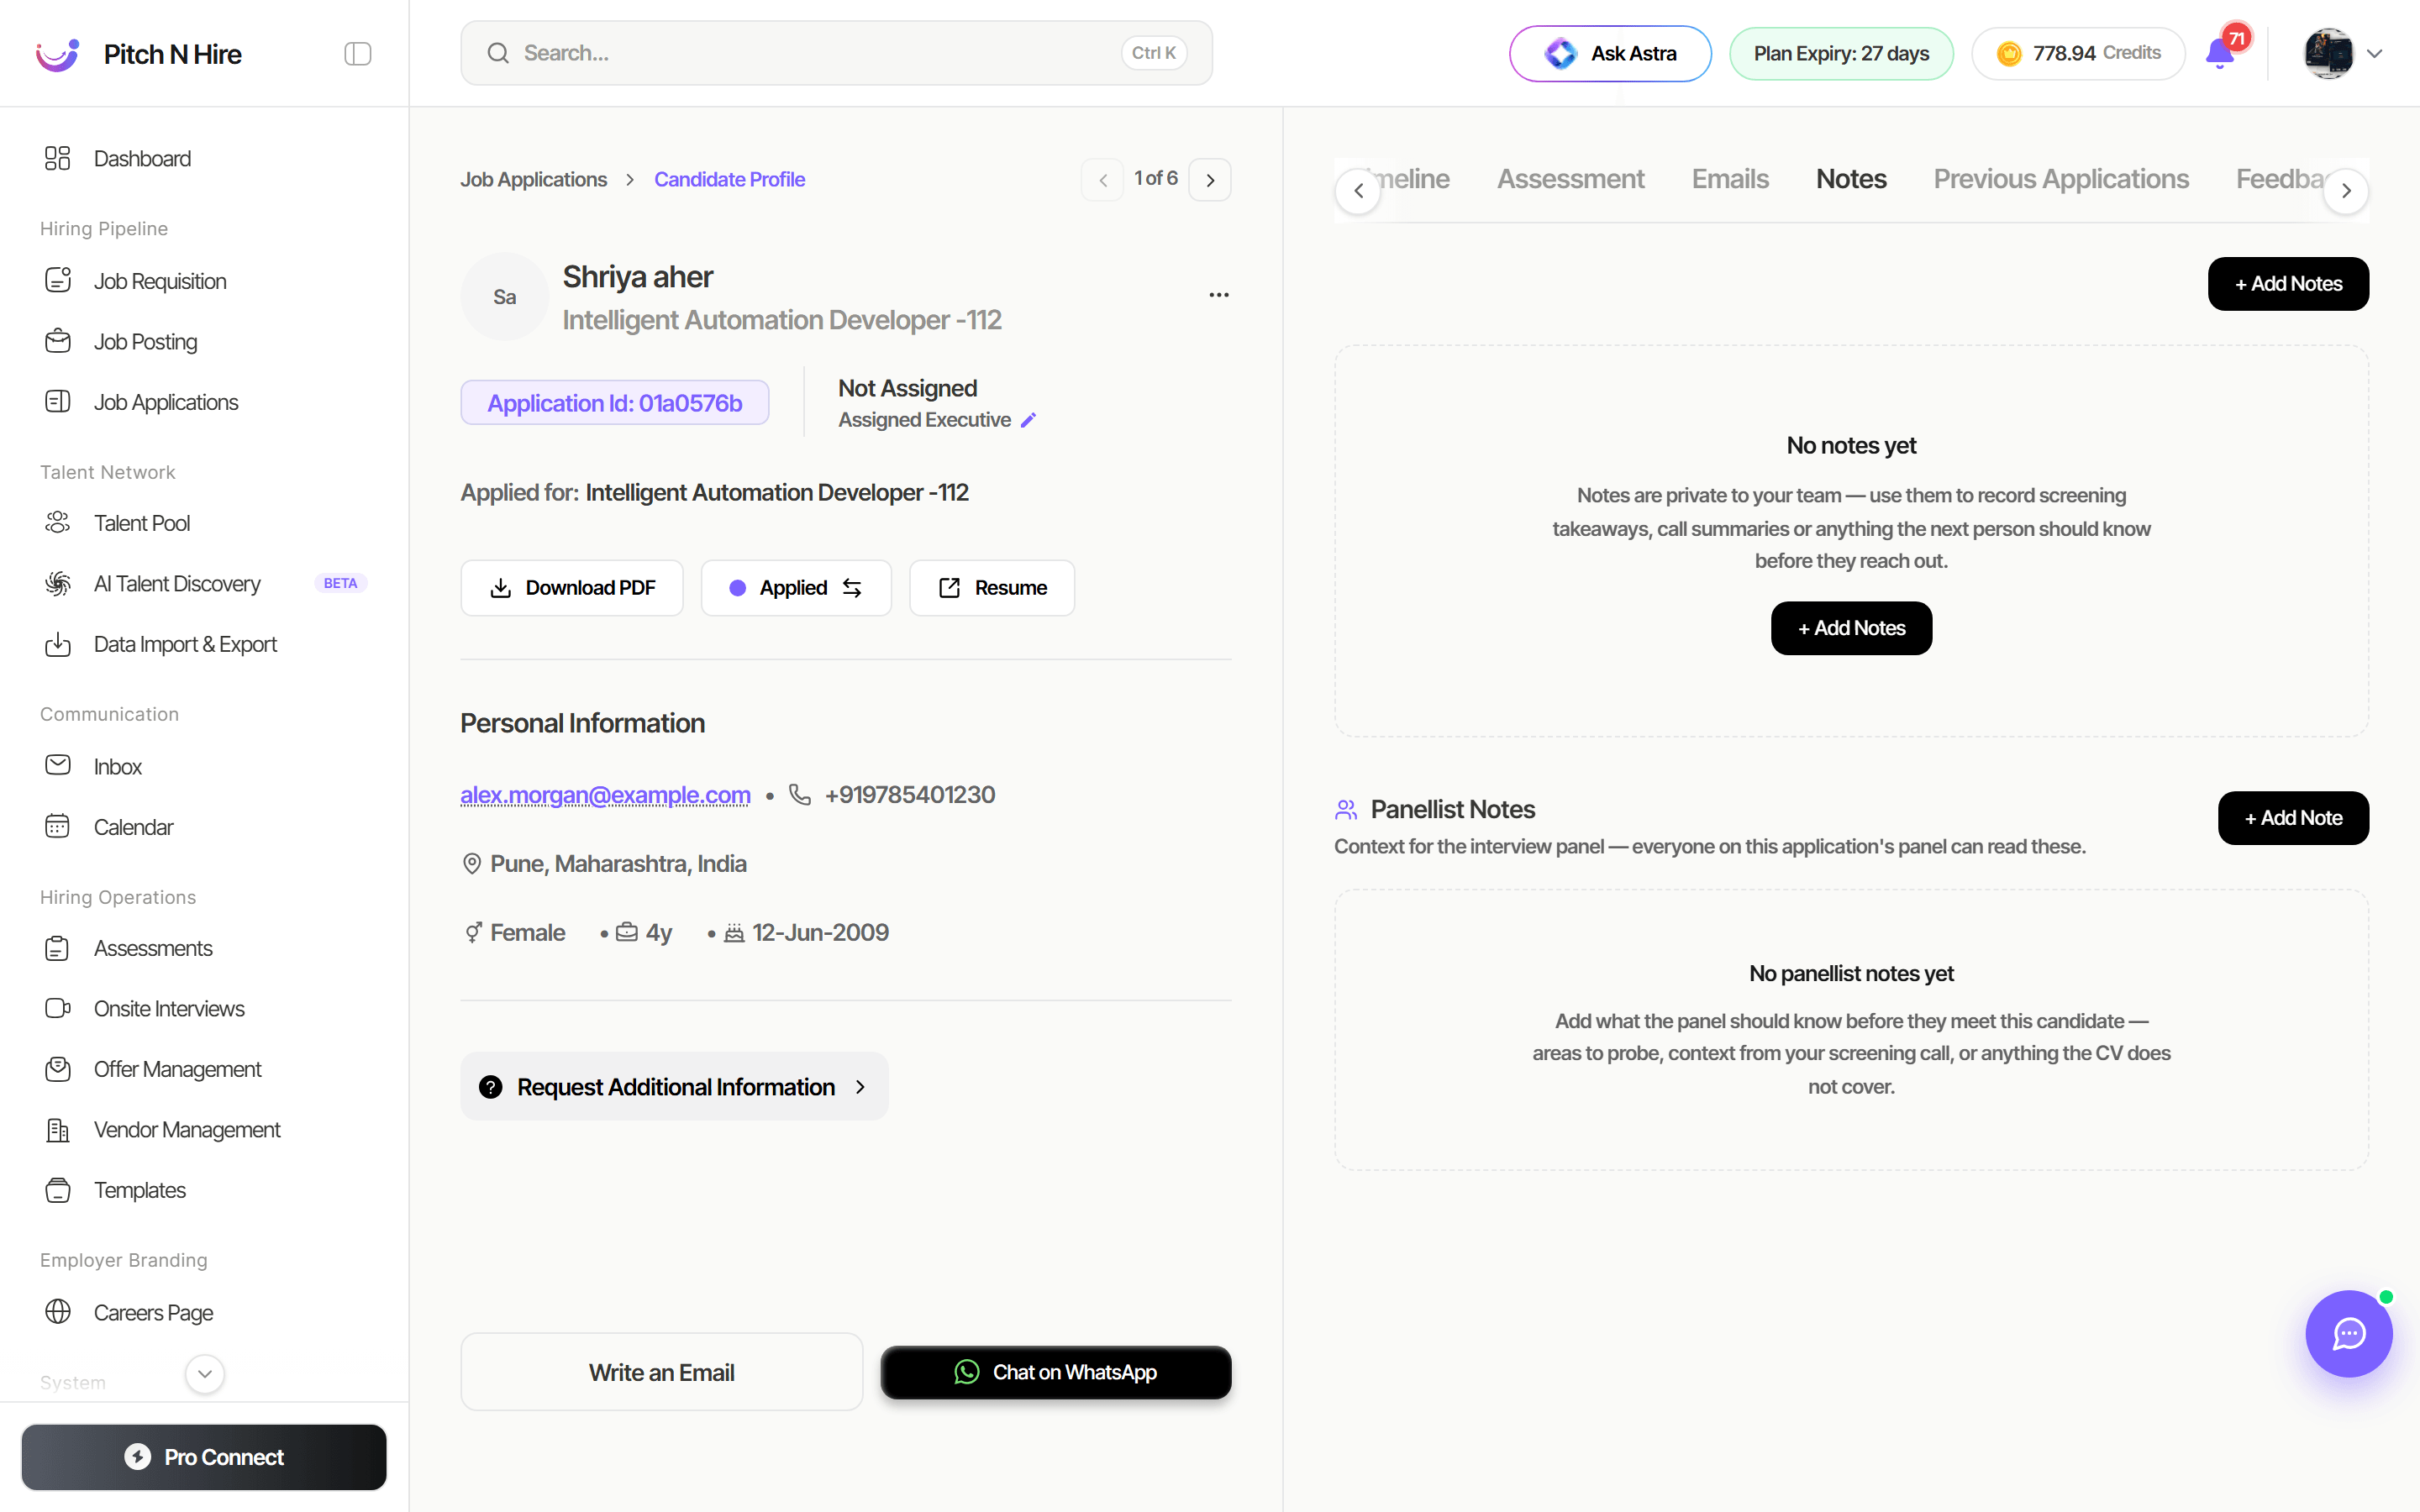
A candidate’s profile carries two separate kinds of notes. Your team’s own notes stay internal; Panellist Notes are written for the people interviewing the candidate and are visible to every panellist on that application, from their own dashboard.
Open the Notes tab on the candidate’s profile. Your team’s notes sit at the top — “Notes are private to your team” — and Panellist Notes sit below them, marked “Context for the interview panel — everyone on this application’s panel can read these.” Click + Add Note, give it a title, and write the note in the rich-text editor. Notes can be edited or deleted later, and each shows who wrote it and when.
See Interview Panelists for how panellists read these notes from their portal.
Assessments and AI screening on an application
The candidate’s Assessment tab is where you Send Assessment, Resend one, Copy URL for the candidate’s link, open View Submission, and pull a Report, a Proctoring Report or a Consolidated report covering every round they’ve taken. Sending an AI Screening Interview — an automated voice interview that comes back scored and transcribed — works exactly the same way.
Tips
Common issues & fixes
- No applicants visible — wrong job selected or a filter is active — re-select the job and Reset the filters and search.
- Cannot drag a candidate — you are in Table View — switch to Pipeline View to move cards between stages.
- Can’t delete a stage — default stages can’t be removed — only custom stages you created can be deleted from the stage ⋯ menu.
- Candidate wasn’t notified on a stage change — the stage’s Notify Candidate toggle is off — turn it on from the stage menu.
- Assessment didn’t reach the candidate — delivery channel or contact issue — Resend via Teams or WhatsApp and confirm the candidate’s contact details.
- AI Score missing on a card — scoring may still be processing for a new application — refresh after a short wait.
- No calendar button on the row/card — no calendar is connected. Connect Google or Outlook/Teams under Settings → Integrations, then reload.
- Can’t click Create in the interview dialog — it needs a Title, a Start Date and at least 2 attendees (the candidate is one) — add another attendee to enable it.
- Can’t edit an interview — editing is turned off once an interview is Completed or Cancelled; only Scheduled interviews can be changed.